Managing Plugins
Table of Contents
Plugins are the primary means of enhancing the functionality of a Jenkins environment to suit organization- or user-specific needs. There are over a thousand different plugins which can be installed on a Jenkins controller and to integrate various build tools, cloud providers, analysis tools, and much more.
Plugins can be automatically downloaded, with their dependencies, from the Update Center. The Update Center is a service operated by the Jenkins project which provides an inventory of open source plugins which have been developed and maintained by various members of the Jenkins community.
This section covers everything from the basics of managing plugins within the Jenkins web UI, to making changes on the controller’s file system.
Installing a plugin
Jenkins provides two methods for installing plugins on the controller:
-
Using the "Plugin Manager" in the web UI.
-
Using the Jenkins CLI
install-plugincommand.
Each approach will result in the plugin being loaded by Jenkins but may require different levels of access and trade-offs in order to use.
The two approaches require that the Jenkins controller be able to download meta-data from an Update Center, whether the primary Update Center operated by the Jenkins project [1], or a custom Update Center.
The plugins are packaged as self-contained .hpi files, which have all the
necessary code, images, and other resources which the plugin needs to operate
successfully.
From the web UI
The simplest and most common way of installing plugins is through the Manage Jenkins > Plugins view, available to administrators of a Jenkins environment.
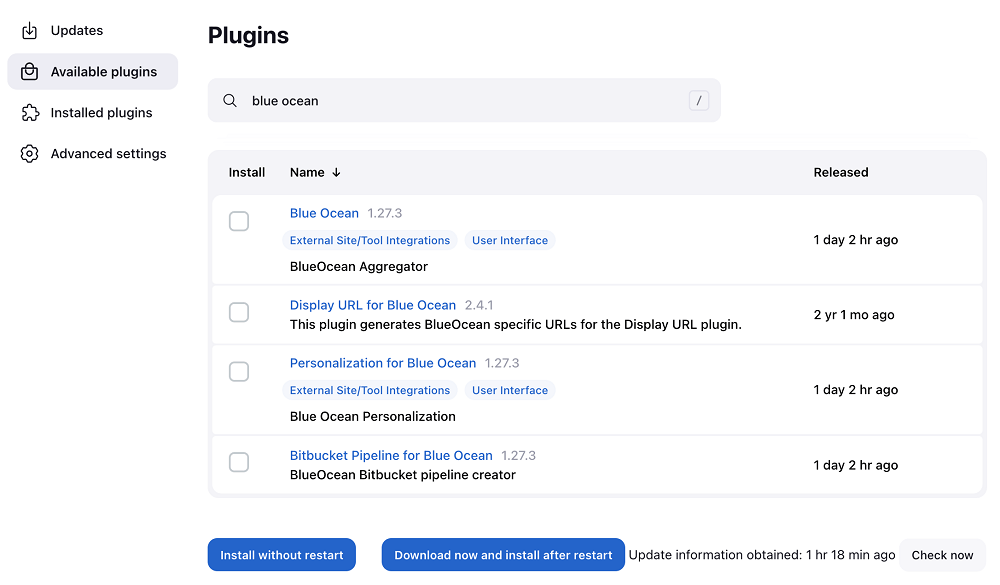
Under the Available tab, plugins available for download from the configured Update Center can be searched and considered:
Most plugins can be installed and used immediately by checking the box adjacent to the plugin and clicking Install without restart.
|
If the list of available plugins is empty, the controller may be incorrectly configured or has not yet downloaded plugin meta-data from the Update Center. Clicking the Check now button forces Jenkins to attempt to contact its configured Update Center. |
Using the Jenkins CLI
Installing Jenkins plugins using Jenkins CLI
Administrators may also use the Jenkins CLI which provides a command to install plugins. Scripts to manage Jenkins environments, or configuration management code, may need to install plugins without direct user interaction in the web UI. The Jenkins CLI allows a command line user or automation tool to download a plugin and its dependencies.
java -jar jenkins-cli.jar -s http://localhost:8080/ install-plugin SOURCE ... [-deploy] [-name VAL] [-restart]Installs a plugin either from a file, an URL, or from update center.
SOURCE : If this points to a local file, that file will be installed. If
this is an URL, Jenkins downloads the URL and installs that as a
plugin.Otherwise the name is assumed to be the short name of the
plugin in the existing update center (like "findbugs"),and the
plugin will be installed from the update center.
-deploy : Deploy plugins right away without postponing them until the reboot.
-name VAL : If specified, the plugin will be installed as this short name
(whereas normally the name is inferred from the source name
automatically).
-restart : Restart Jenkins upon successful installation.
Advanced installation
The Update Center only allows the installation of the most recently released
version of a plugin. In cases where an older release of the plugin is desired,
a Jenkins administrator can download an older .hpi archive and manually
install that on the Jenkins controller.
Jenkins stores plugins it has downloaded in the plugins directory with a .jpi suffix, whether the plugins originally had a .jpi or an .hpi suffix.
If an administrator manually copies a plugin archive into the plugins directory, it should be named with a .jpi suffix to match the file names used by plugins installed from the update center.
From the web UI
Assuming a .hpi file has been downloaded, a logged-in Jenkins administrator
may upload the file from within the web UI:
-
Navigate to the Manage Jenkins > Plugins page in the web UI.
-
Click on the Advanced tab.
-
Choose the
.hpifile from your system or enter a URL to the archive file under the Deploy Plugin section. -
Deploy the plugin file.
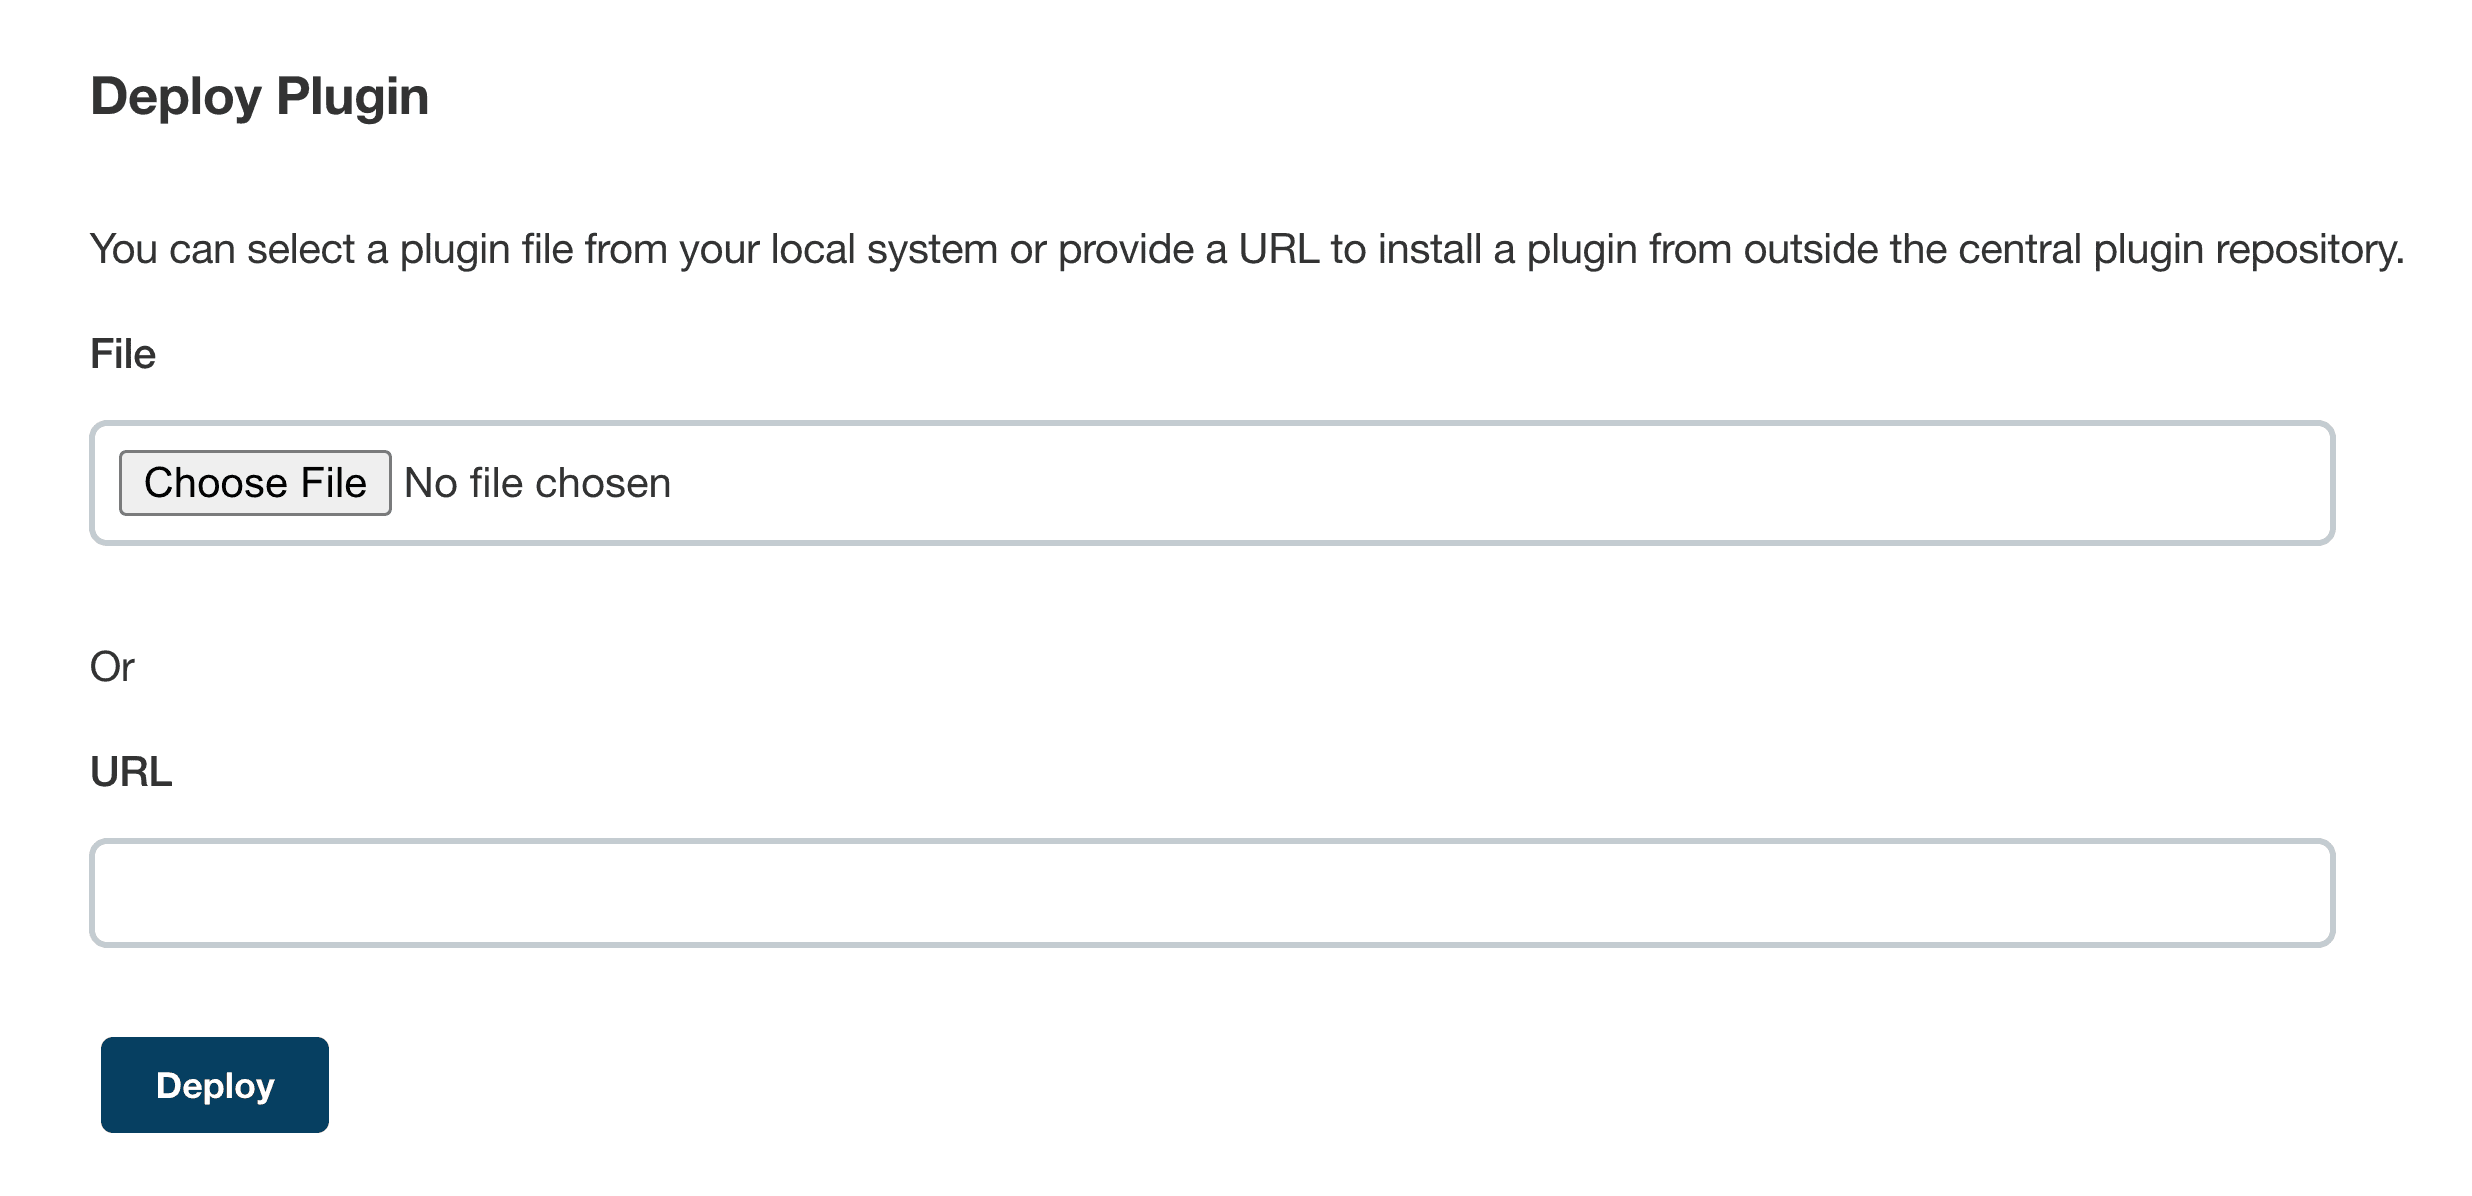
Once a plugin file has been uploaded, the Jenkins controller must be manually restarted in order for the changes to take effect.
On the controller
Assuming a .hpi file has been explicitly downloaded by a system
administrator, the administrator can manually place the file in a
specific location on the file system.
Copy the downloaded .hpi` file into the JENKINS_HOME/plugins directory on
the Jenkins controller (for example, on Debian systems JENKINS_HOME is generally
/var/lib/jenkins).
If an administrator manually copies a plugin archive into the plugins directory, it should be named with a .jpi suffix to match the file names used by plugins installed from the update center.
The controller must be restarted before the plugin is loaded and made available in the Jenkins environment.
|
The names of the plugin directories in the Update Site [1] are not always the same as the plugin’s display name. Searching plugins.jenkins.io for the desired plugin will provide the appropriate link to the archive file. |
Updating a plugin
Updates are listed in the Updates tab of the Plugins page and can be installed by checking the checkboxes of the desired plugin updates and clicking the Download now and install after restart button.
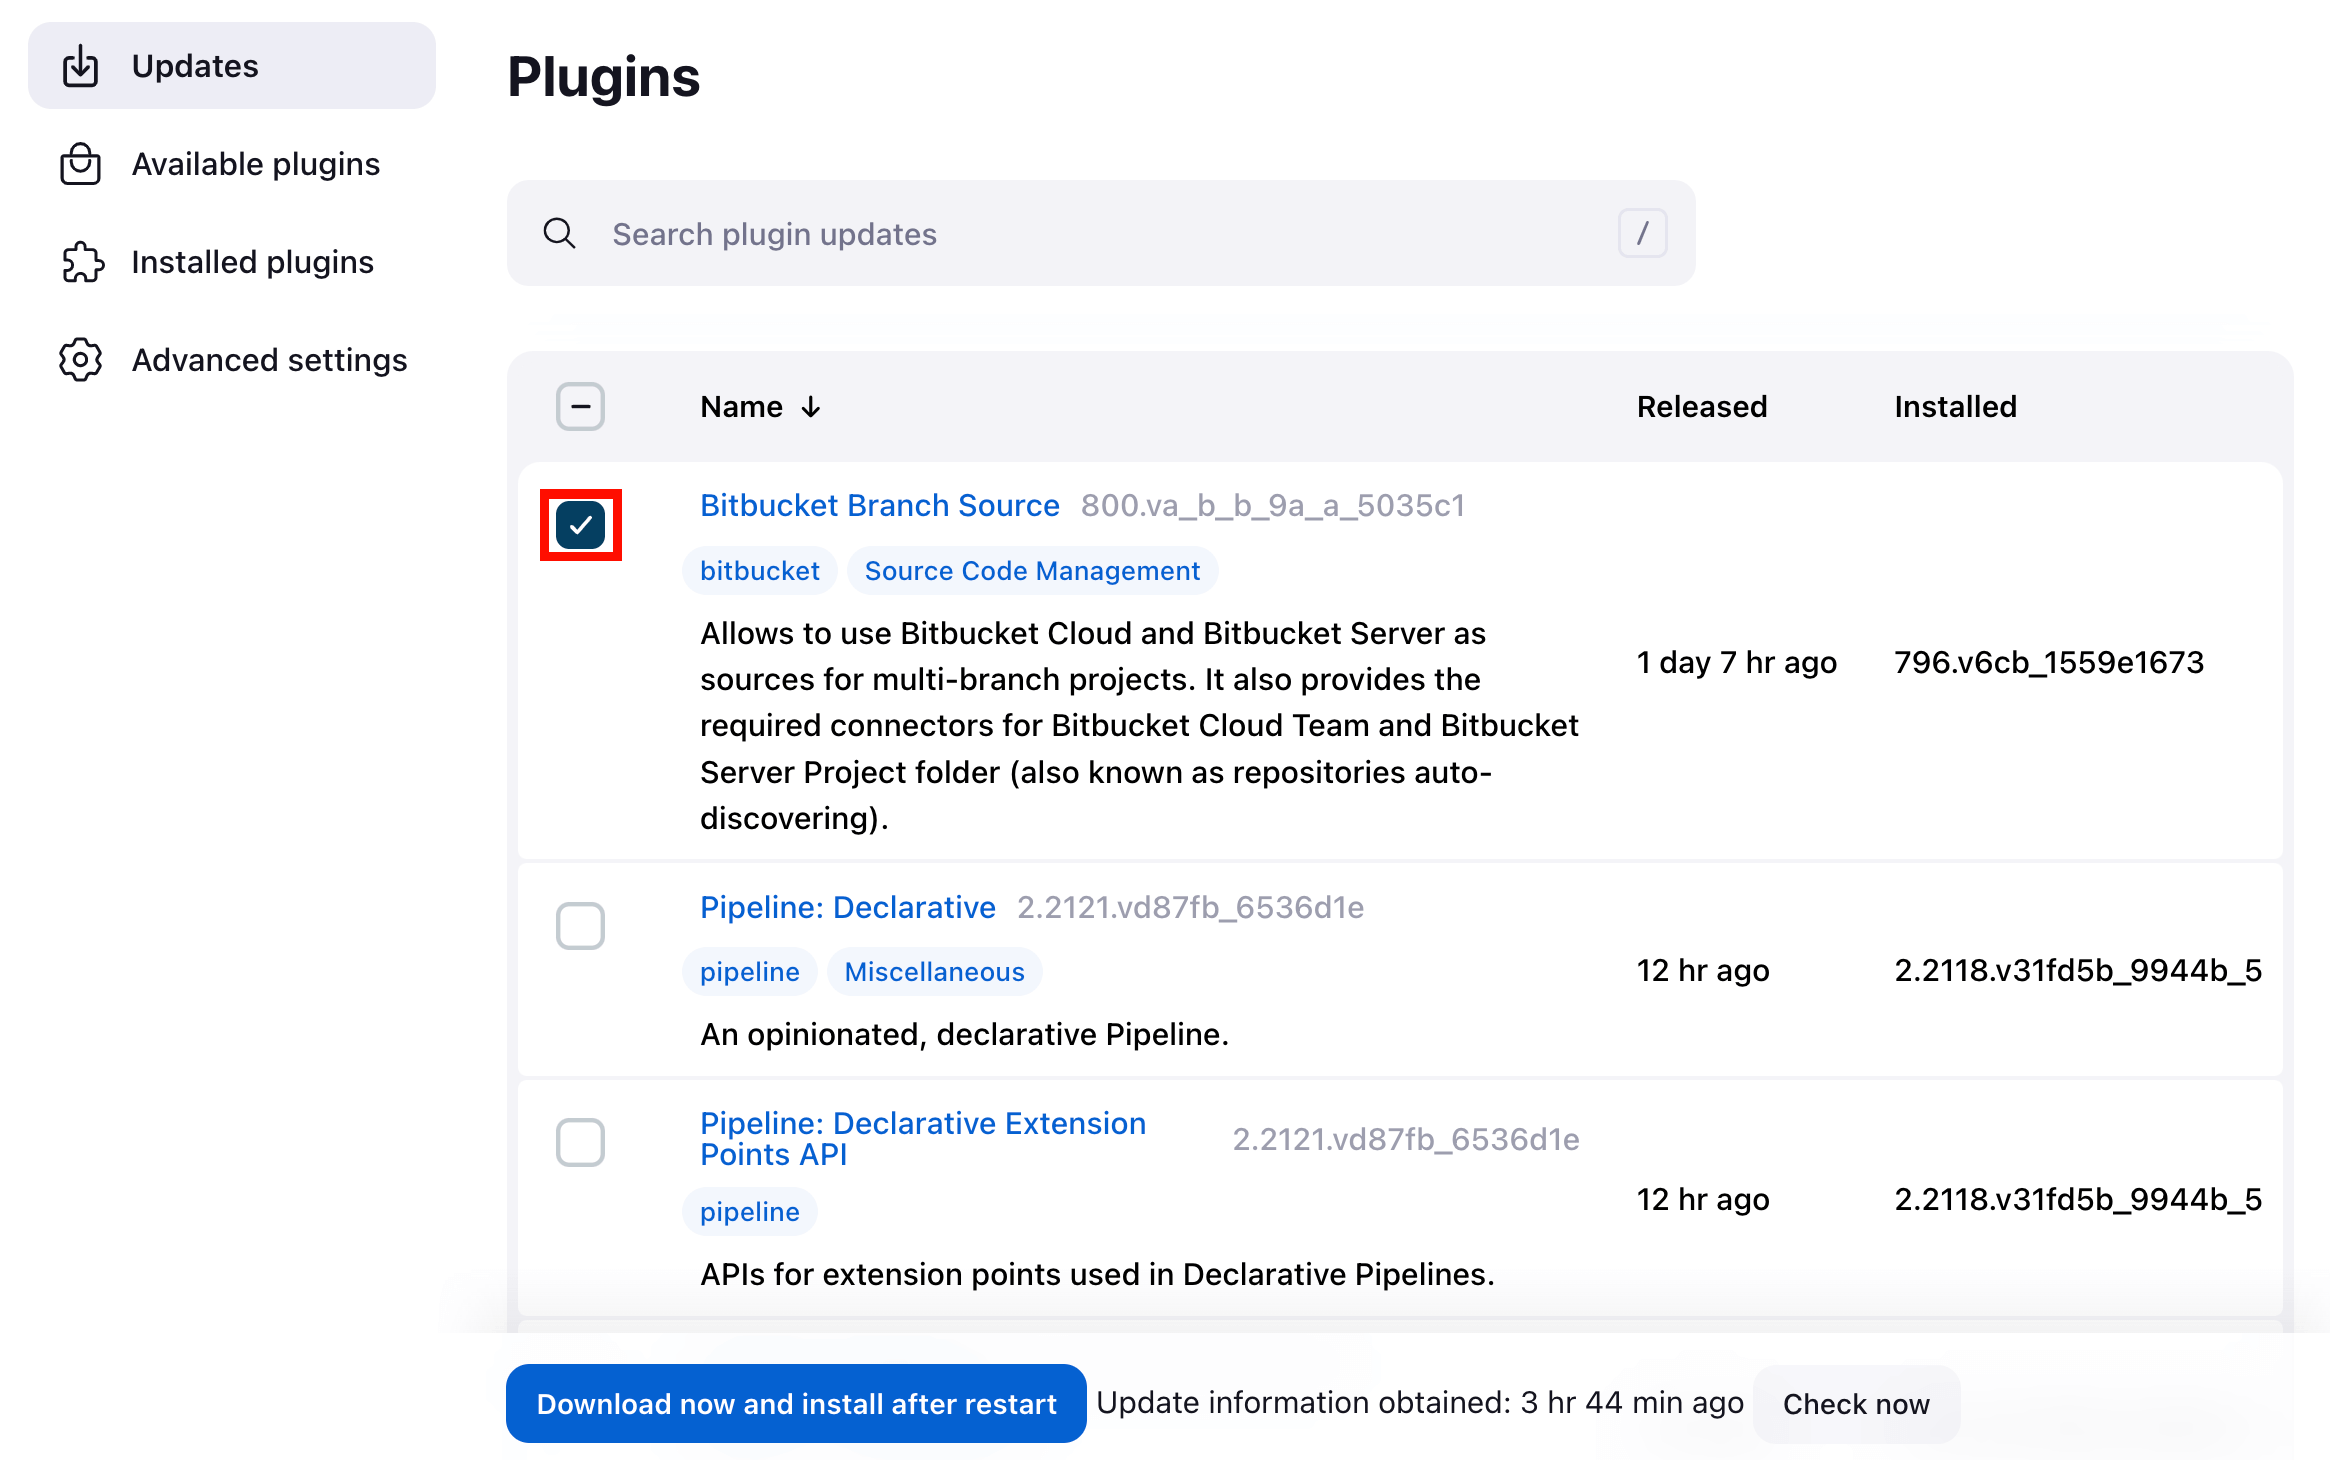
By default, the Jenkins controller will check for updates from the Update Center once every 24 hours. To manually trigger a check for updates, simply click on the Check now button in the Updates tab.
List installed plugins and their versions
The simplest way to retrieve the list of installed plugins and their versions is by using the Jenkins Script Console.
Follow these steps:
-
Open the Jenkins Script Console:
-
Navigate to
Manage Jenkins>Script Console.
-
-
Run the following script to list installed plugins and their versions:
   Jenkins.instance.pluginManager.plugins.each {
      println("${it.getShortName()}: ${it.getVersion()}")
   }
This script iterates through each installed plugin and prints its short name along with the version.
Removing a plugin
When a plugin is no longer used in a Jenkins environment, it is prudent to remove the plugin from the Jenkins controller. This provides a number of benefits such as reducing memory overhead at boot or runtime, reducing configuration options in the web UI, and removing the potential for future conflicts with new plugin updates.
Uninstalling a plugin
This video reviews the process of uninstalling a plugin from Jenkins.
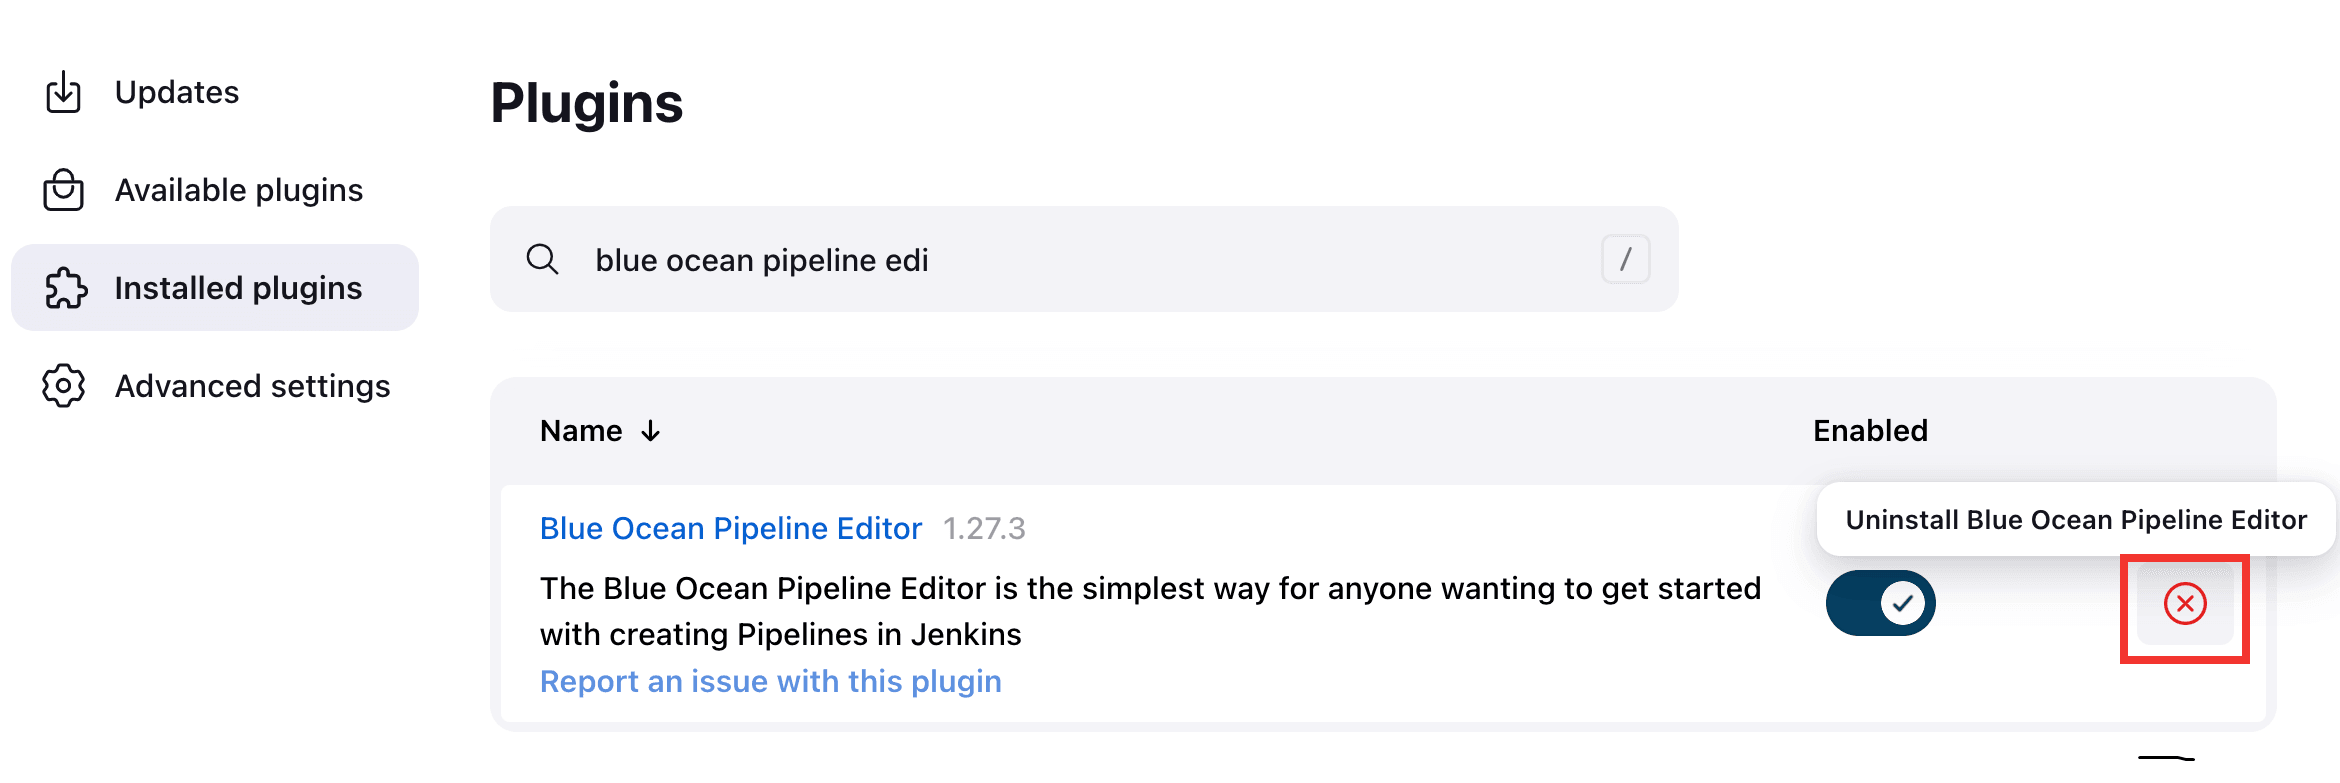
The simplest way to uninstall a plugin is to navigate to the Installed tab on the Plugins page. From there, Jenkins will automatically determine which plugins are safe to uninstall, those which are not dependencies of other plugins, and present a button for doing so.
A plugin may also be uninstalled by removing the corresponding .jpi
file from the JENKINS_HOME/plugins directory on the controller. The plugin will
continue to function until the controller has been restarted.
|
If a plugin file is removed but required by other plugins, the Jenkins controller may fail to boot correctly. |
Uninstalling a plugin does not remove the configuration that the plugin may have created. If there are existing jobs/nodes/views/builds/etc configurations that reference data created by the plugin, during boot Jenkins will warn that some configurations could not be fully loaded and ignore the unrecognized data.
Since the configuration(s) will be preserved until they are overwritten, re-installing the plugin will result in those configuration values reappearing.
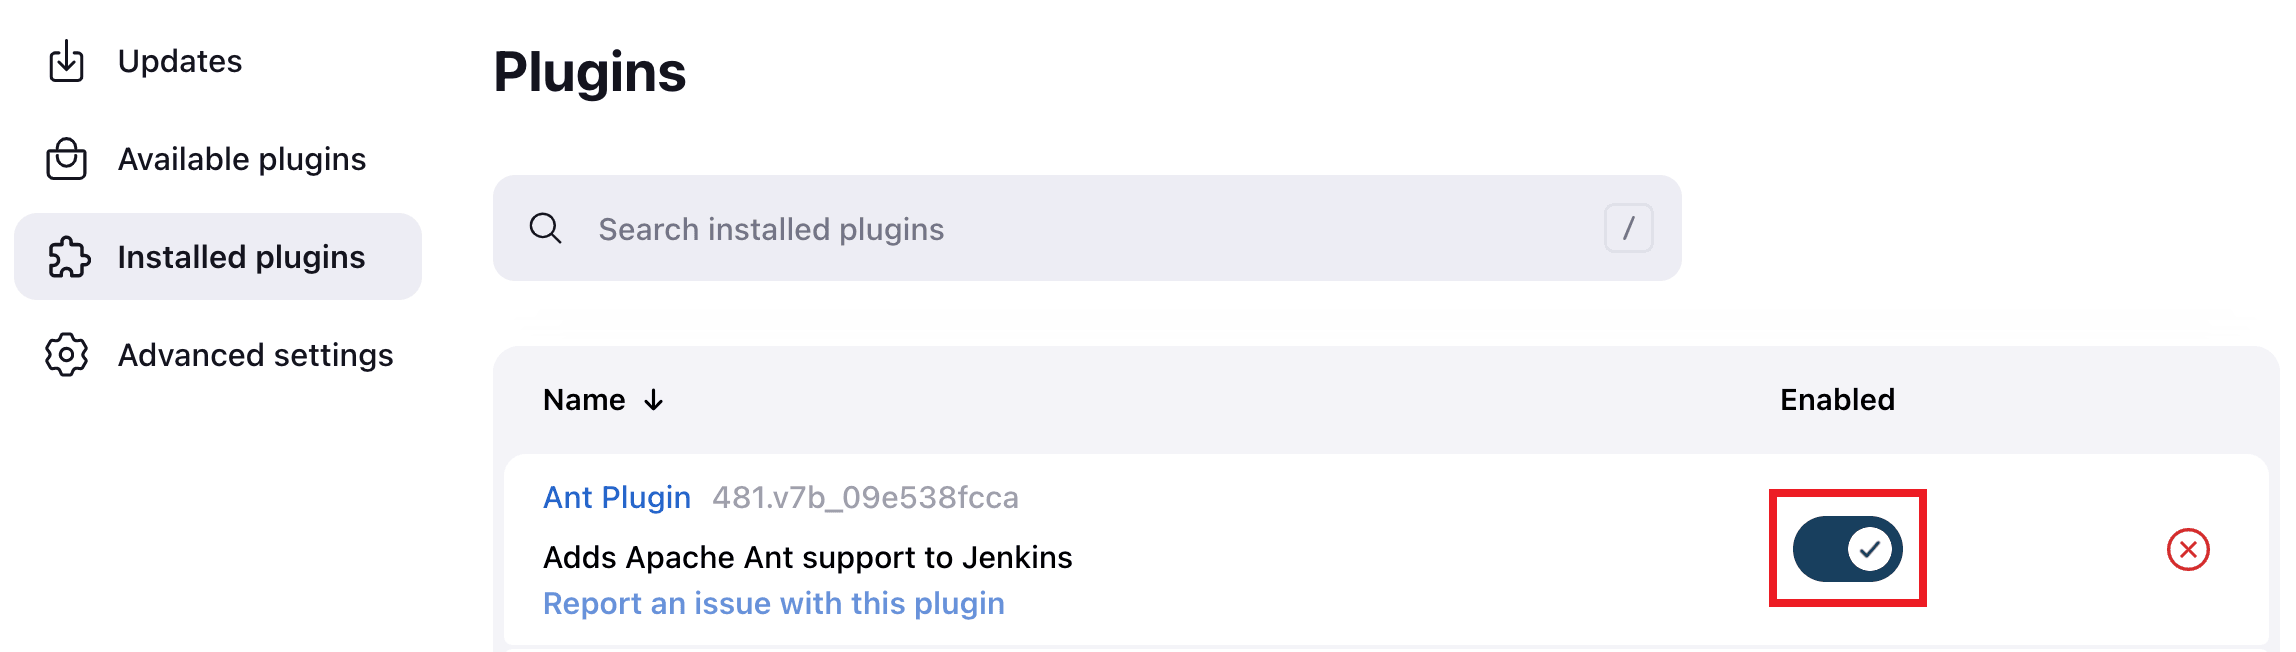
Disabling a plugin
Disabling a plugin is a softer way to retire a plugin. Jenkins will continue to recognize that the plugin is installed, but it will not start the plugin, and no extensions contributed from this plugin will be visible.
A Jenkins administrator may disable a plugin by unchecking the box on the Installed tab of the Plugins page (see below).
A systems administrator may also disable a plugin by creating a file on the
Jenkins controller, such as: JENKINS_HOME/plugins/PLUGIN_NAME.jpi.disabled.
The configuration(s) created by the disabled plugin behave as if the plugin were uninstalled, insofar that they result in warnings on boot but are otherwise ignored.
Using the Jenkins CLI
It is also possible to enable or disable plugins via the Jenkins CLI
using the enable-plugin or disable-plugin commands.
The enable-plugin command receives a list of plugins to be enabled.
Any plugins which a selected plugin depends on will also be enabled by this command.
java -jar jenkins-cli.jar -s http://localhost:8080/ enable-plugin PLUGIN ... [-restart]Enables one or more installed plugins transitively.
PLUGIN : Enables the plugins with the given short names and their
dependencies.
-restart : Restart Jenkins after enabling plugins.
The disable-plugin command receives a list of plugins to be disabled. The
output will display messages for both successful and failed operations. If you
only want to see error messages, the -quiet option can be specified.
The -strategy option controls what action will be taken when one of the specified plugins
is listed as an optional or mandatory dependency of another enabled plugin.
java -jar jenkins-cli.jar -s http://localhost:8080/ disable-plugin PLUGIN ... [-quiet (-q)]
[-restart (-r)] [-strategy (-s) strategy]
Disable one or more installed plugins.
Disable the plugins with the given short names. You can define how to proceed with the
dependant plugins and if a restart after should be done. You can also set the quiet mode
to avoid extra info in the console.
PLUGIN : Plugins to be disabled.
-quiet (-q) : Be quiet, print only the error messages
-restart (-r) : Restart Jenkins after disabling plugins.
-strategy (-s) strategy : How to process the dependant plugins.
- none: if a mandatory dependant plugin exists and
it is enabled, the plugin cannot be disabled
(default value).
- mandatory: all mandatory dependant plugins are
also disabled, optional dependant plugins remain
enabled.
- all: all dependant plugins are also disabled, no
matter if its dependency is optional or mandatory.
|
In the same way than enabling and disabling plugins from the UI requires a restart
to complete the process, the changes made with the CLI commands will take effect
once Jenkins is restarted. The |
Pinned plugins
|
Pinned plugins feature was removed in Jenkins 2.0. Versions later than Jenkins 2.0 do not bundle plugins, instead providing a wizard to install the most useful plugins. |
The notion of pinned plugins applies to plugins that are bundled with Jenkins 1.x, such as the Matrix Authorization plugin.
By default, whenever Jenkins is upgraded, its bundled plugins overwrite the
versions of the plugins that are currently installed in JENKINS_HOME.
However, when a bundled plugin has been manually updated, Jenkins will mark
that plugin as pinned to the particular version. On the file system, Jenkins
creates an empty file called JENKINS_HOME/plugins/PLUGIN_NAME.jpi.pinned
to indicate the pinning.
Pinned plugins will never be overwritten by bundled plugins during Jenkins startup. (Newer versions of Jenkins do warn you if a pinned plugin is older than what is currently bundled.)
It is safe to update a bundled plugin to a version offered by the Update Center. This is often necessary to pick up the newest features and fixes. The bundled version is occasionally updated, but not consistently.
The Plugin Manager allows plugins to be explicitly unpinned. The
JENKINS_HOME/plugins/PLUGIN_NAME.hpi.pinned file can also be manually
created/deleted to control the pinning behavior. If the pinned file is
present, Jenkins will use whatever plugin version the user has specified.
If the file is absent, Jenkins will restore the plugin to the default version
on startup.
What is an implied dependency?
Features are sometimes detached (or split off) from Jenkins core and moved into a plugin.
Many plugins, like Subversion and JUnit, got their beginnings as Jenkins core functionalities. When a plugin was attached to Jenkins core prior to being detached, it may or may not have used its full functionality with other plugins that relied on the same version of Jenkins. To ensure that plugins do not fail when a functionality on which they rely is separated from Jenkins core, it is necessary to have a dependency in the detached plugin, if it specifies a dependency on a version of Jenkins core prior to the split. It is assumed that there is a dependency on the detached plugin, even when it isn’t stated explicitly.
Implied dependencies build up over time for plugins that don’t frequently update which Jenkins core version they depend on.
Why does the implied dependency exist?
It is "implied" since it is not stated explicitly in the plugin, and it is a dependency because Jenkins core is uncertain if the APIs available in Jenkins core, prior to the separation of the plugin, are necessary or not.
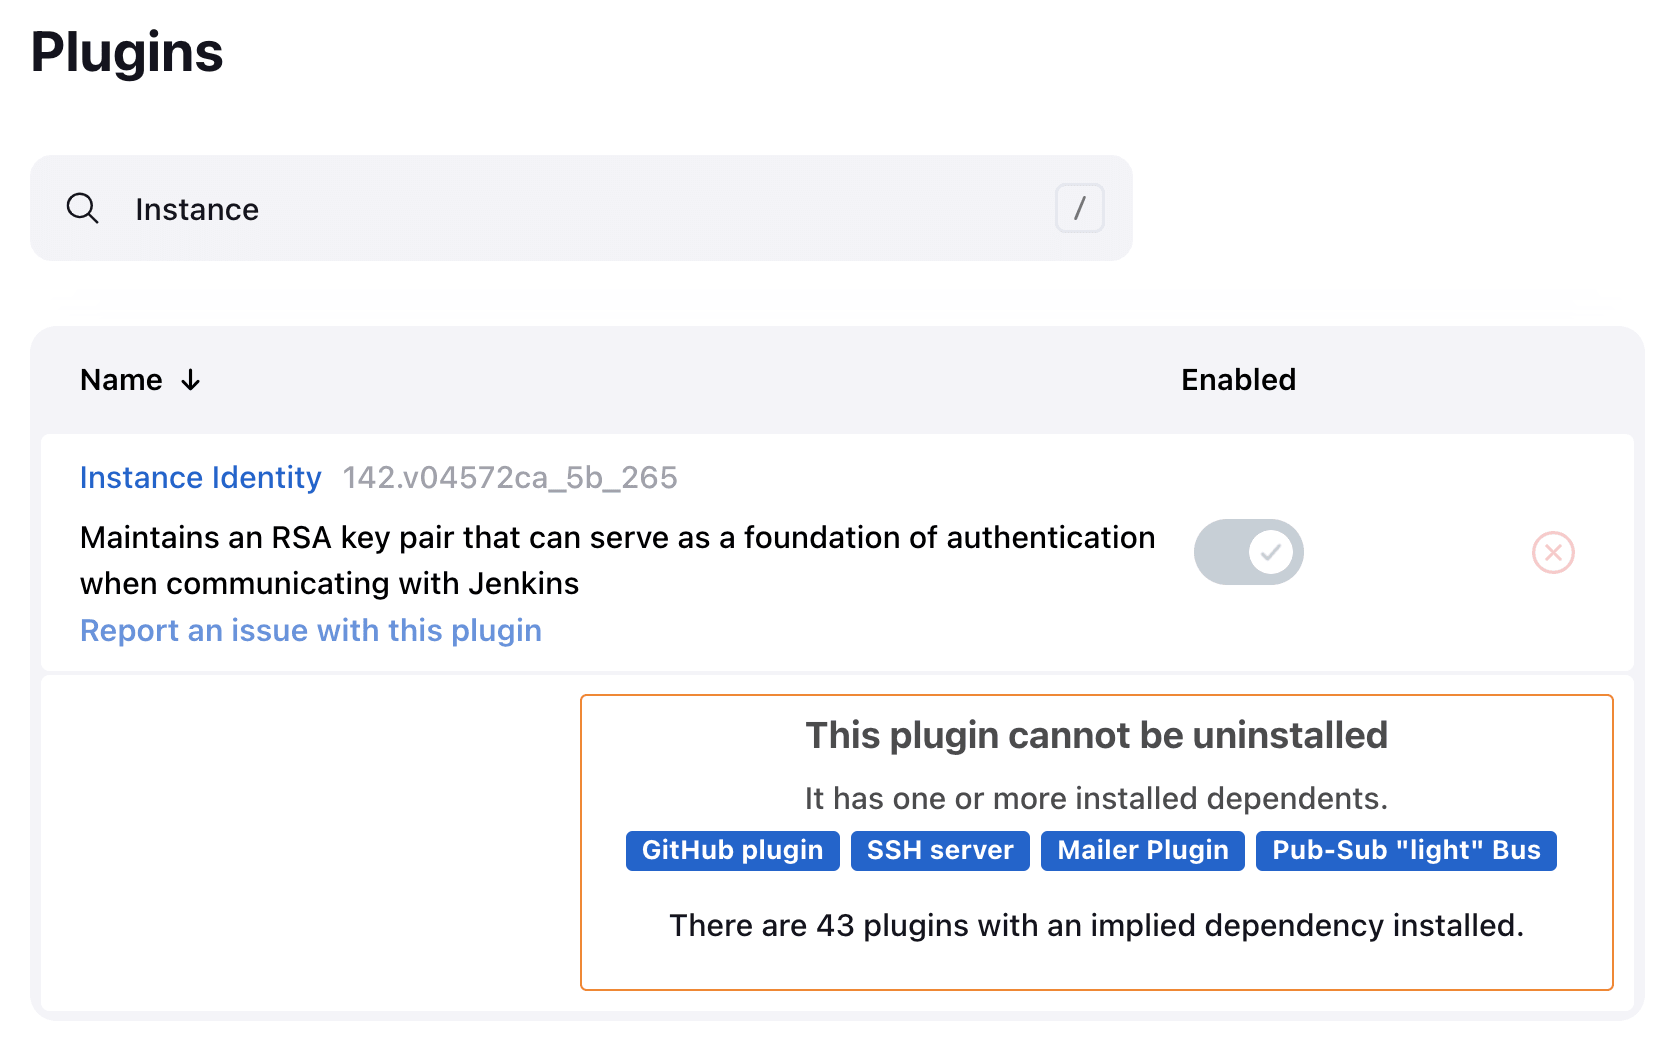
For example, because the Instance Identity plugin was separated from Jenkins core, Jenkins core is uninformed if the dependent plugin needs any functionality that was previously present in Jenkins core. This creates an implied dependency.
As a Jenkins administrator, you can see the plugins that have an implied dependency from the plugin manager page. Hover over the "uninstall" button and a list of plugins with an implied dependency is displayed.
How can the implied dependency be removed?
The implied dependency can be removed by releasing a new version of the plugin that depends on a newer minimum Jenkins core. The Improve a plugin tutorial provides steps that can assist plugin developers as they update the plugin to depend on a newer minimum Jenkins core.
What is the health score?
There is a metric available next to the plugins in the Plugin Manager called "Health Score".
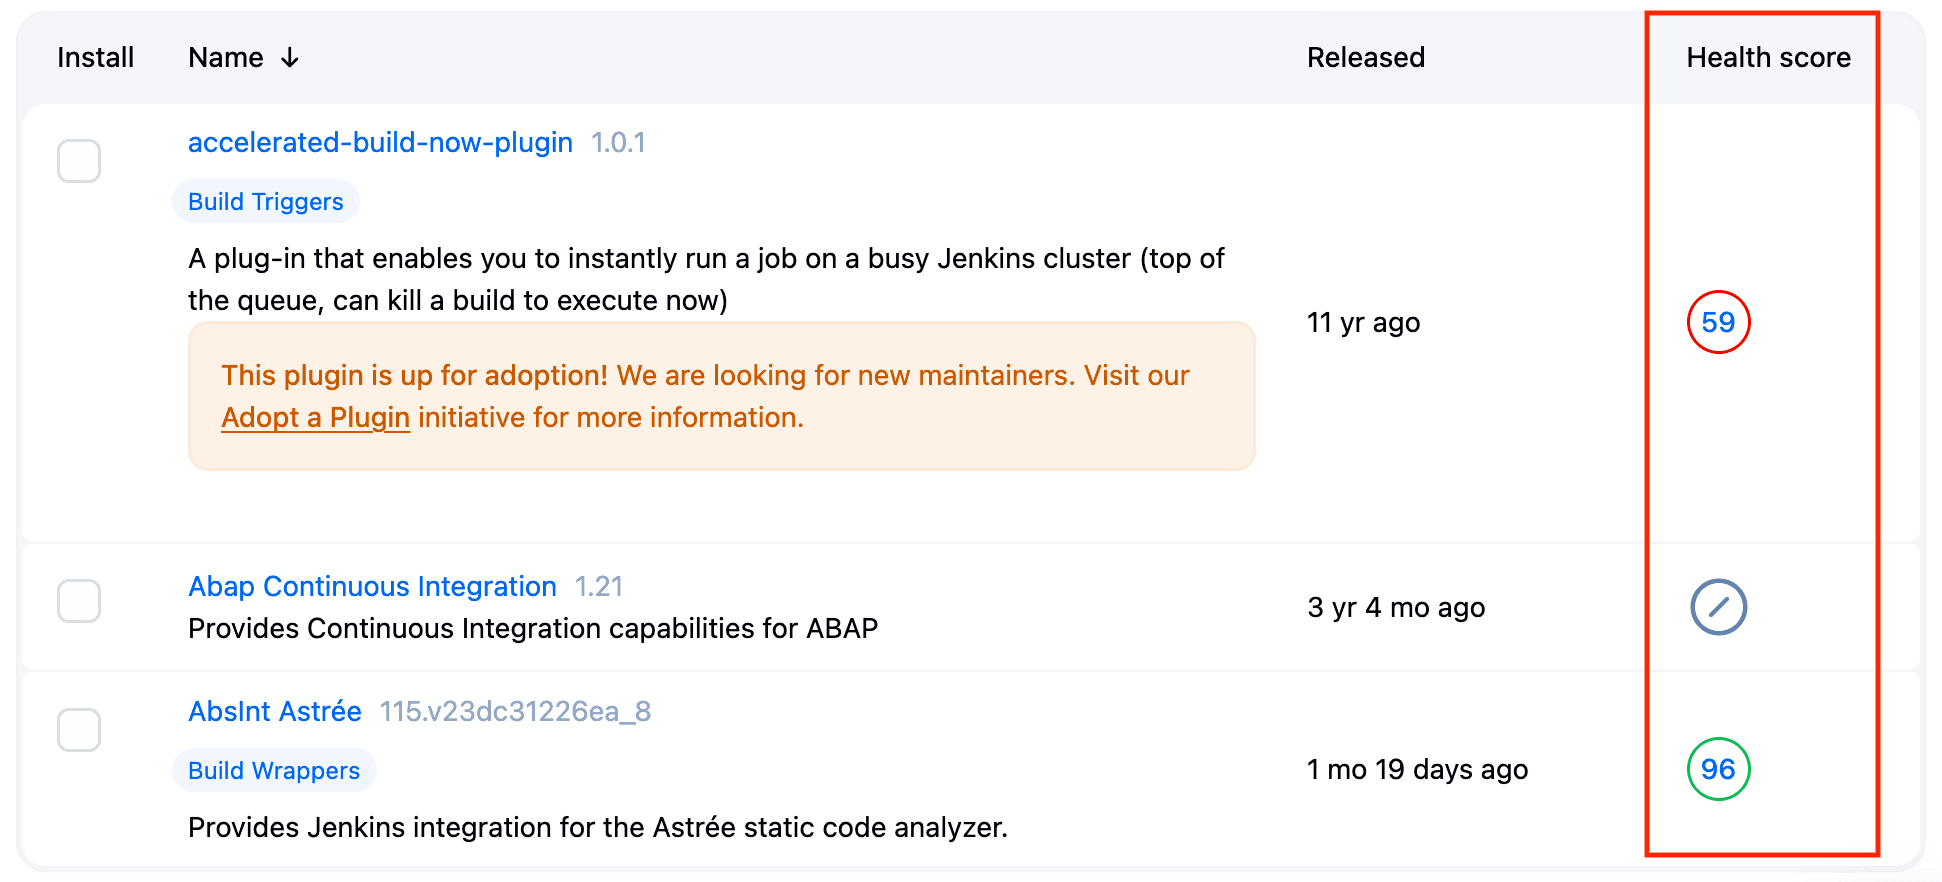
You can find the same metric in the available update and the installed page of the plugin manager.
| The score value is always based on the latest available data. This means that there is no score of a specific release of a plugin. What is available on the installed and updates page of the plugin manager does not stand for the version already installed. |
This metric is coming from Plugin Health Scoring.
This service is gathering data from each plugin.
The data can be related to the source code of the plugin, the content of the plugin repository, or external metrics about the plugin such as number of open pull requests.
That data is then used to evaluate the status of the project. All plugins are evaluated the same way, meaning there is a fair way to compare plugins.
While only the score is shown, the details behind this value are available on the plugins site in the health score section of each plugin:
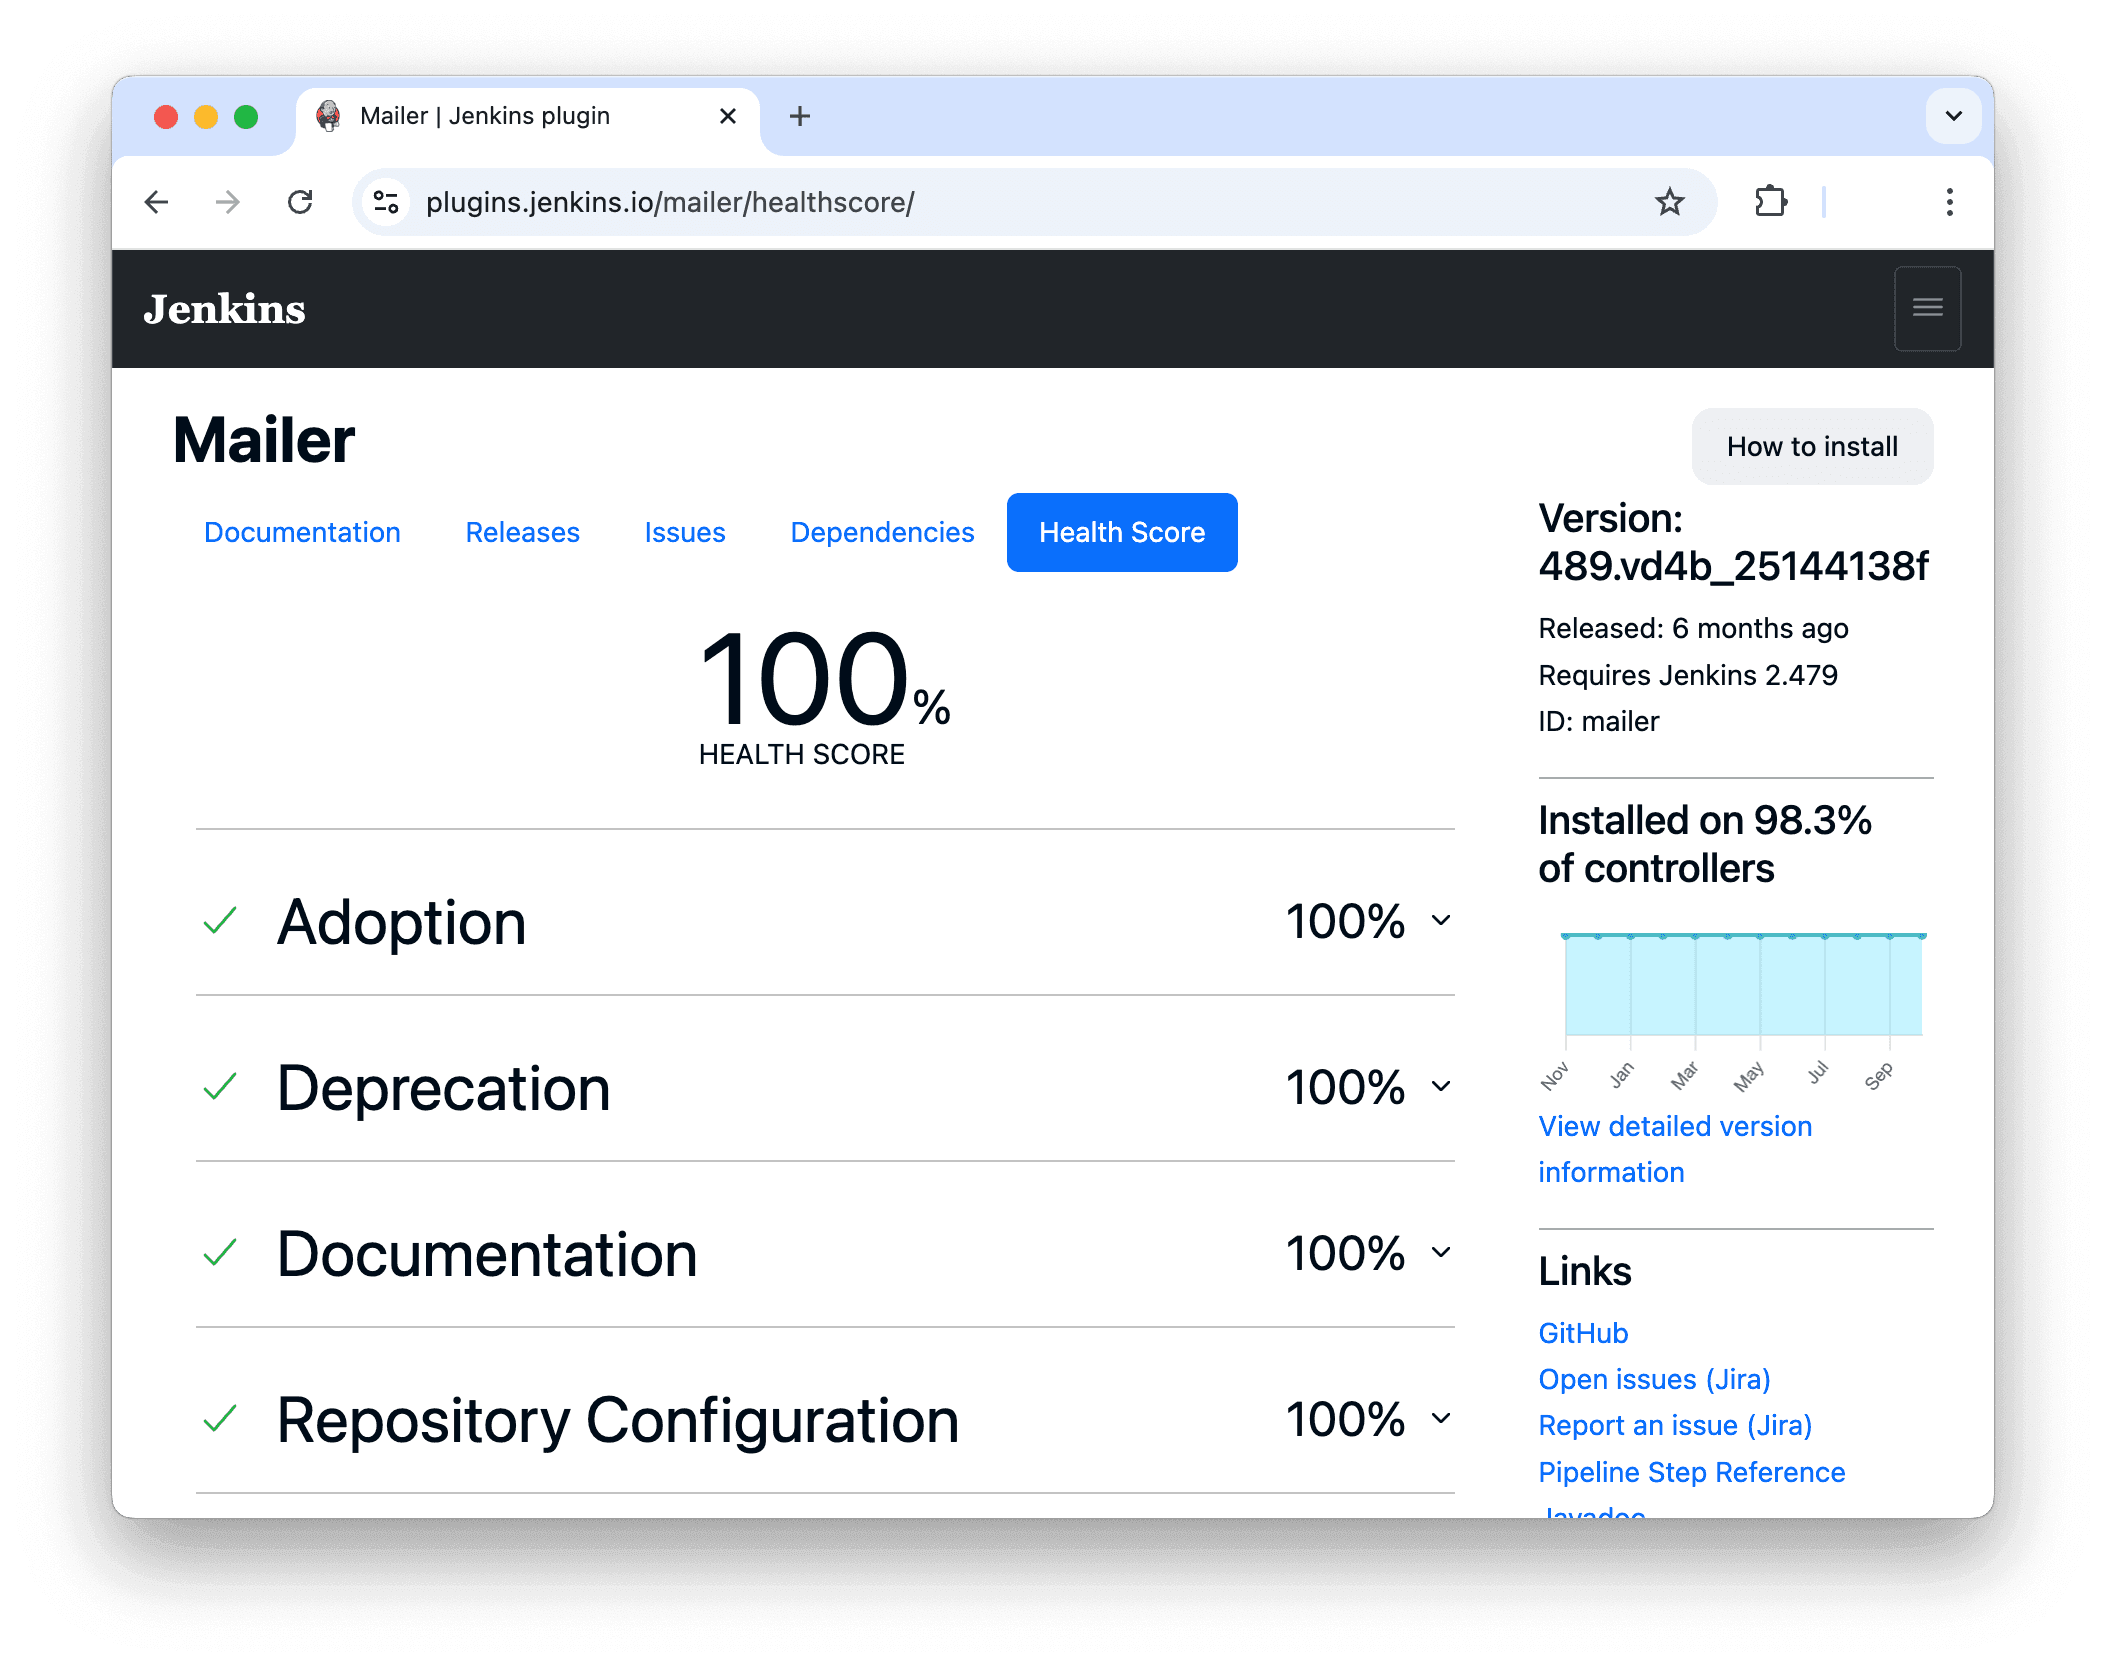
It is also possible to find the details directly on the Plugin Health Scoring service.
To access it, you need to append the plugin name to the score URL.
For example, the health score URL for the Mailer plugin is plugin-health.jenkins.io/scores/mailer.
Each section of the score can have one or multiple elements evaluated. Each component of the section can have more or less impact on the global score.
Please submit your feedback about this page through this quick form.
Alternatively, if you don't wish to complete the quick form, you can simply indicate if you found this page helpful?
See existing feedback here.