Linux
Jenkins installers are available for several Linux distributions.
Prerequisites
Minimum hardware requirements:
-
256 MB of RAM
-
1 GB of drive space (although 10 GB is a recommended minimum if running Jenkins as a Docker container)
Recommended hardware configuration for a small team:
-
4 GB+ of RAM
-
50 GB+ of drive space
Comprehensive hardware recommendations:
-
Hardware: see the Hardware Recommendations page
Software requirements:
-
Java 21 or later: see the Java Requirements page
-
Web browser: see the Web Browser Compatibility page
-
For Windows operating system: Windows Support Policy
-
For Linux operating system: Linux Support Policy
-
For servlet containers: Servlet Container Support Policy
Debian/Ubuntu
On Debian and Debian-based distributions like Ubuntu, you can install Jenkins through apt.
You need to choose either the Jenkins Long Term Support release or the Jenkins weekly release.
Installation of Java
Jenkins requires Java to run, yet not all Linux distributions include Java by default. Additionally, not all Java versions are compatible with Jenkins.
There are multiple Java implementations that you can use. OpenJDK is the most popular one at the moment, we will use it in this guide.
Update the Debian apt repositories, install OpenJDK 21, and check the installation using the following commands:
sudo apt update
sudo apt install fontconfig openjdk-21-jre
java -version
If the installation was successful, you should see an output similar to the following:
openjdk 21.0.8 2025-07-15
OpenJDK Runtime Environment (build 21.0.8+9-Debian-1)
OpenJDK 64-Bit Server VM (build 21.0.8+9-Debian-1, mixed mode, sharing)|
On Debian/Ubuntu, it is strongly recommended to install Java before Jenkins. If Jenkins is installed first and Java is added later, the Jenkins service may fail to start with: Installing Java first ensures the environment is fully initialized and avoids this issue. After completing the Java installation, continue with the Jenkins installation steps below. |
Long Term Support release
A LTS (Long-Term Support) release is chosen every 12 weeks from the stream of regular releases as the stable release for that time period.
It can be installed from the debian-stable apt repository.
sudo wget -O /etc/apt/keyrings/jenkins-keyring.asc \
  https://pkg.jenkins.io/debian-stable/jenkins.io-2026.key
echo "deb [signed-by=/etc/apt/keyrings/jenkins-keyring.asc]" \
  https://pkg.jenkins.io/debian-stable binary/ | sudo tee \
  /etc/apt/sources.list.d/jenkins.list > /dev/null
sudo apt update
sudo apt install jenkins
Weekly release
A new release is produced weekly to deliver bug fixes and features to users and plugin developers.
It can be installed from the debian apt repository.
sudo wget -O /etc/apt/keyrings/jenkins-keyring.asc \
  https://pkg.jenkins.io/debian/jenkins.io-2026.key
echo "deb [signed-by=/etc/apt/keyrings/jenkins-keyring.asc]" \
  https://pkg.jenkins.io/debian binary/ | sudo tee \
  /etc/apt/sources.list.d/jenkins.list > /dev/null
sudo apt update
sudo apt install jenkins
Beginning with Jenkins 2.335 and Jenkins 2.332.1, the package is configured with systemd rather than the older System V init.
More information is available in "Managing systemd services".
The package installation will:
-
Setup Jenkins as a daemon launched on start. Run
systemctl cat jenkinsfor more details. -
Create a ‘jenkins’ user to run this service.
-
Direct console log output to
systemd-journald. Runjournalctl -u jenkins.serviceif you are troubleshooting Jenkins. -
Populate
/lib/systemd/system/jenkins.servicewith configuration parameters for the launch, e.gJENKINS_HOME -
Set Jenkins to listen on port 8080. Access this port with your browser to start configuration.
|
If Jenkins fails to start because a port is in use,
run Here, "8081" was chosen but you can put another port available. |
|
Why use |
Fedora
You can install Jenkins through dnf. You need to add the Jenkins repository from the Jenkins website to the package manager first.
Long Term Support release
A LTS (Long-Term Support) release is chosen every 12 weeks from the stream of regular releases as the stable release for that time period.
It can be installed from the rpm-stable yum repository.
sudo wget -O /etc/yum.repos.d/jenkins.repo \
    https://pkg.jenkins.io/rpm-stable/jenkins.repo
sudo dnf upgrade
# Add required dependencies for the Jenkins package
sudo dnf install fontconfig java-21-openjdk
sudo dnf install jenkins
sudo systemctl daemon-reload
Weekly release
A new release is produced weekly to deliver bug fixes and features to users and plugin developers.
It can be installed from the rpm yum repository.
sudo wget -O /etc/yum.repos.d/jenkins.repo \
    https://pkg.jenkins.io/rpm/jenkins.repo
sudo dnf upgrade
# Add required dependencies for the jenkins package
sudo dnf install fontconfig java-21-openjdk
sudo dnf install jenkins
Start Jenkins
You can enable the Jenkins service to start at boot with the command:
sudo systemctl enable jenkinsYou can start the Jenkins service with the command:
sudo systemctl start jenkinsYou can check the status of the Jenkins service using the command:
sudo systemctl status jenkinsIf everything has been set up correctly, you should see output similar to this:
Loaded: loaded (/lib/systemd/system/jenkins.service; enabled; vendor preset: enabled)
Active: active (running) since Tue 2018-11-13 16:19:01 +03; 4min 57s ago|
If you have a firewall installed, you must add Jenkins as an exception.
You must change |
Red Hat Enterprise Linux and derivatives
You can install Jenkins through yum on Red Hat Enterprise Linux, AlmaLinux, Rocky Linux, Oracle Linux, CentOS, and other Red Hat based distributions.
You need to choose either the Jenkins Long Term Support release or the Jenkins weekly release.
Long Term Support release
A LTS (Long-Term Support) release is chosen every 12 weeks from the stream of regular releases as the stable release for that time period.
It can be installed from the rpm-stable yum repository.
sudo wget -O /etc/yum.repos.d/jenkins.repo \
    https://pkg.jenkins.io/rpm-stable/jenkins.repo
sudo yum upgrade
# Add required dependencies for the jenkins package
sudo yum install fontconfig java-21-openjdk
sudo yum install jenkins
sudo systemctl daemon-reload
Weekly release
A new release is produced weekly to deliver bug fixes and features to users and plugin developers.
It can be installed from the rpm yum repository.
sudo wget -O /etc/yum.repos.d/jenkins.repo \
    https://pkg.jenkins.io/rpm/jenkins.repo
sudo yum upgrade
# Add required dependencies for the jenkins package
sudo yum install fontconfig java-21-openjdk
sudo yum install jenkins
Start Jenkins
You can enable the Jenkins service to start at boot with the command:
sudo systemctl enable jenkinsYou can start the Jenkins service with the command:
sudo systemctl start jenkinsYou can check the status of the Jenkins service using the command:
sudo systemctl status jenkinsIf everything has been set up correctly, you should see an output like this:
Loaded: loaded (/lib/systemd/system/jenkins.service; enabled; vendor preset: enabled)
Active: active (running) since Tue 2023-06-22 16:19:01 +03; 4min 57s ago
...|
If you have a firewall installed, you must add Jenkins as an exception.
You must change |
Post-installation setup wizard
After downloading, installing, and running Jenkins using one of the procedures above (except when installing with the Jenkins Operator), the post-installation setup wizard begins.
The setup wizard takes you through a few quick one-time steps to unlock Jenkins, customize it with plugins, and create the first administrator user through which you can continue accessing Jenkins.
Unlocking Jenkins
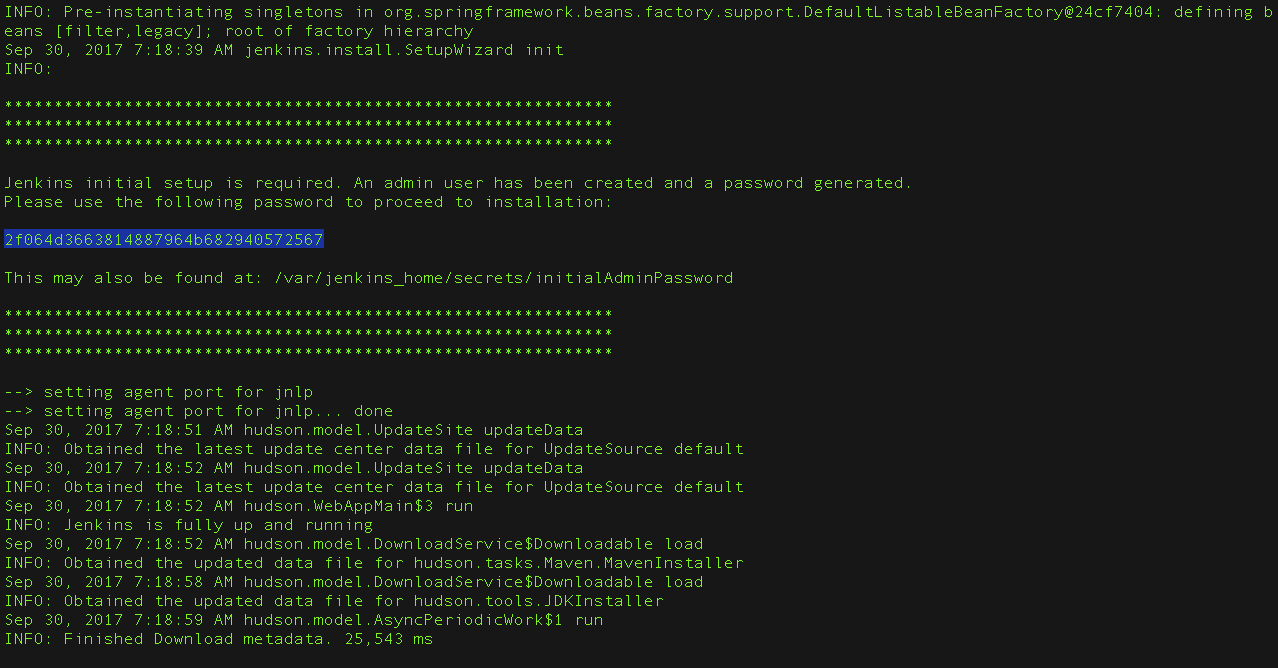
When you first access a new Jenkins controller, you are asked to unlock it using an automatically-generated password.
-
Browse to
http://localhost:8080(or whichever port you configured for Jenkins when installing it) and wait until the Unlock Jenkins page appears.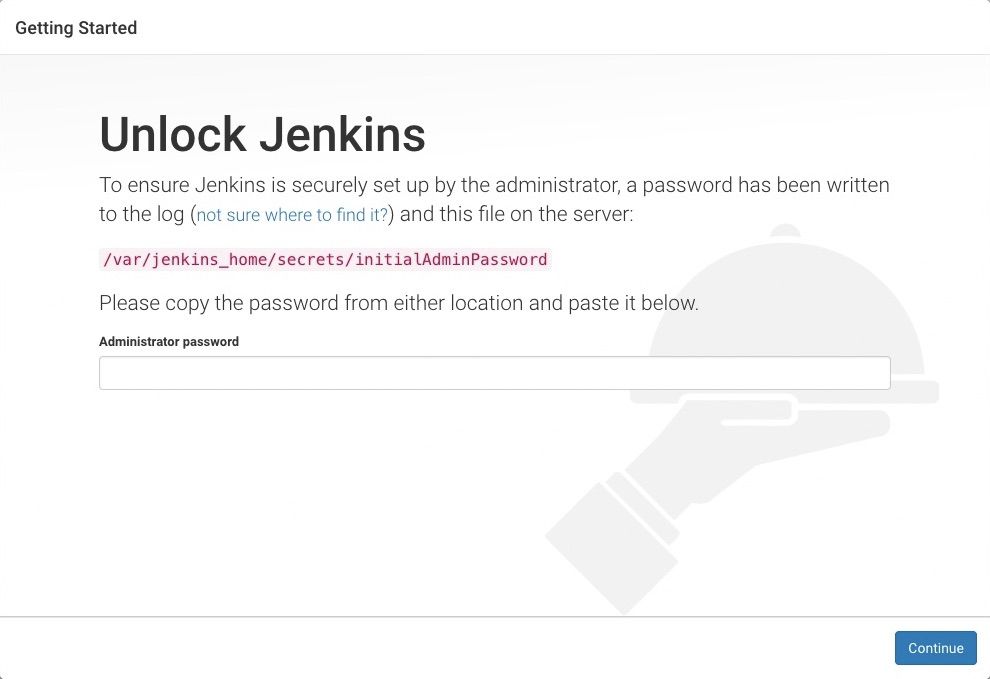
-
From the Jenkins console log output, copy the automatically generated alphanumeric password (between the 2 sets of asterisks).
Note:-
The command:
sudo cat /var/lib/jenkins/secrets/initialAdminPasswordwill print the password at console. -
If you are running Jenkins in Docker using the official
jenkins/jenkinsimage you can usesudo docker exec ${CONTAINER_ID or CONTAINER_NAME} cat /var/jenkins_home/secrets/initialAdminPasswordto print the password in the console without having to open an interactive shell inside the container.
-
-
On the Unlock Jenkins page, paste this password into the Administrator password field and click Continue.
Note:-
The Jenkins console log indicates the location (in the Jenkins home directory) where this password can also be obtained. This password must be entered in the setup wizard on new Jenkins installations before you can access Jenkins’s main UI. This password also serves as the default administrator account’s password (with username "admin") if you happen to skip the subsequent user-creation step in the setup wizard.
-
Customizing Jenkins with plugins
After unlocking Jenkins, the Customize Jenkins page appears. Here you can install any number of useful plugins as part of your initial setup.
Click one of the two options shown:
-
Install suggested plugins - to install the recommended set of plugins, which are based on most common use cases.
-
Select plugins to install - to choose which set of plugins to initially install. When you first access the plugin selection page, the suggested plugins are selected by default.
| If you are not sure what plugins you need, choose Install suggested plugins. You can install or remove additional Jenkins plugins later via the Manage Jenkins > Plugins page in Jenkins. |
The setup wizard shows the progression of Jenkins being configured and your chosen set of Jenkins plugins being installed. This process may take a few minutes to complete.
Creating the first administrator user
Finally, after customizing Jenkins with plugins, Jenkins asks you to create your first administrator user.
-
When the Create First Admin User page appears, specify the details for your administrator user in the respective fields and click Save and Finish.
-
When the Jenkins is ready page appears, click Start using Jenkins.
Notes:-
This page may display Jenkins is almost ready! instead and if so, click Restart.
-
If the page does not automatically refresh after a minute, use your web browser to refresh the page manually.
-
-
If required, log in to Jenkins using the credentials of the user you just created and you are ready to start using Jenkins!
Please submit your feedback about this page through this quick form.
Alternatively, if you don't wish to complete the quick form, you can simply indicate if you found this page helpful?
See existing feedback here.