docker network create jenkinsDocker
Table of Contents
- Installing Docker
- Prerequisites
- Accessing the Docker container
- Accessing the Docker logs
- Accessing the Jenkins home directory
- Using custom CA certificates with Jenkins in Docker and Kubernetes
- Post-installation setup wizard
Docker is a platform for running applications in an isolated environment called a "container" (or Docker container). Applications like Jenkins can be downloaded as read-only "images" (or Docker images), each of which can be run in Docker as a container. A Docker container is a "running instance" of a Docker image. A Docker image is stored permanently and updated only when new versions are published, whereas containers are temporary by nature. Learn more about these concepts in Getting Started, Part 1: Orientation and setup in the Docker documentation.
Due to Docker’s fundamental platform and container design, a Docker image for a given application, such as Jenkins, can be run on any supported operating system or cloud service also running Docker. Supported operating systems include macOS, Linux, and Windows, and supported cloud services include AWS and Azure.
Installing Docker
To install Docker on your operating system, follow the instructions in the Guided Tour prerequisites.
Alternatively, visit Docker Hub, and select the Docker Community Edition suitable for your operating system or cloud service. Follow the installation instructions provided on their website.
|
If you are installing Docker on a Linux-based operating system, ensure that Docker is configured so it can be managed as a non-root user. Read more about this in Docker’s Post-installation steps for Linux page of their documentation. This page also includes instructions for configuring Docker to start automatically on boot. |
Prerequisites
Minimum hardware requirements:
-
256 MB of RAM
-
1 GB of drive space (although 10 GB is a recommended minimum if running Jenkins as a Docker container)
Recommended hardware configuration for a small team:
-
4 GB+ of RAM
-
50 GB+ of drive space
Comprehensive hardware recommendations:
-
Hardware: see the Hardware Recommendations page
Software requirements:
-
Java 21 or later: see the Java Requirements page
-
Web browser: see the Web Browser Compatibility page
-
For Windows operating system: Windows Support Policy
-
For Linux operating system: Linux Support Policy
-
For servlet containers: Servlet Container Support Policy
Downloading and running Jenkins in Docker
Several Docker images of Jenkins are available.
Use the recommended official jenkins/jenkins image from the Docker Hub repository.
This image contains the current Long-Term Support (LTS) release of Jenkins, which is production-ready.
However, this image doesn’t contain Docker CLI, and is not bundled with the frequently used Blue Ocean plugins and its features.
To use the full power of Jenkins and Docker, you may want to go through the installation process described below.
|
A new |
On macOS and Linux
-
Open up a terminal window.
-
Create a bridge network in Docker using the following
docker network createcommand: -
In order to execute Docker commands inside Jenkins nodes, download and run the
docker:dindDocker image using the followingdocker runcommand:docker run \ --name jenkins-docker \(1) --rm \(2) --detach \(3) --privileged \(4) --network jenkins \(5) --network-alias docker \(6) --env DOCKER_TLS_CERTDIR=/certs \(7) --volume jenkins-docker-certs:/certs/client \(8) --volume jenkins-data:/var/jenkins_home \(9) --publish 2376:2376 \(10) docker:dind \(11) --storage-driver overlay2(12)1 ( Optional ) Specifies the Docker container name to use for running the image. By default, Docker generates a unique name for the container. 2 ( Optional ) Automatically removes the Docker container (the replica of the Docker image) when it is shut down. 3 ( Optional ) Runs the Docker container in the background. You can stop this process by running docker stop jenkins-docker.4 Running Docker in Docker currently requires privileged access to function properly. This requirement may be relaxed with newer Linux kernel versions. 5 This corresponds with the network created in the earlier step. 6 Makes the Docker in Docker container available as the hostname dockerwithin thejenkinsnetwork.7 Enables the use of TLS in the Docker server. Due to the use of a privileged container, this is recommended, though it requires the use of the shared volume described below. This environment variable controls the root directory where Docker TLS certificates are managed. 8 Maps the /certs/clientdirectory inside the container to a Docker volume namedjenkins-docker-certsas created above.9 Maps the /var/jenkins_homedirectory inside the container to the Docker volume namedjenkins-data. This allows for other Docker containers controlled by this Docker container’s Docker daemon to mount data from Jenkins.10 ( Optional ) Exposes the Docker daemon port on the host machine. This is useful for executing dockercommands on the host machine to control this inner Docker daemon.11 The docker:dindimage itself. Download this image before running, by using the command:docker image pull docker:dind.12 The storage driver for the Docker volume. Refer to the Docker storage drivers documentation for supported options. If you have problems copying and pasting the above command snippet, use the annotation-free version below: docker run --name jenkins-docker --rm --detach \ --privileged --network jenkins --network-alias docker \ --env DOCKER_TLS_CERTDIR=/certs \ --volume jenkins-docker-certs:/certs/client \ --volume jenkins-data:/var/jenkins_home \ --publish 2376:2376 \ docker:dind --storage-driver overlay2 -
Customize the official Jenkins Docker image, by executing the following two steps:
-
Create a Dockerfile with the following content:
FROM jenkins/jenkins:2.555.3-jdk21 USER root RUN apt-get update && apt-get install -y lsb-release ca-certificates curl && \ install -m 0755 -d /etc/apt/keyrings && \ curl -fsSL https://download.docker.com/linux/debian/gpg -o /etc/apt/keyrings/docker.asc && \ chmod a+r /etc/apt/keyrings/docker.asc && \ echo "deb [arch=$(dpkg --print-architecture) signed-by=/etc/apt/keyrings/docker.asc] \ https://download.docker.com/linux/debian $(. /etc/os-release && echo \"$VERSION_CODENAME\") stable" \ | tee /etc/apt/sources.list.d/docker.list > /dev/null && \ apt-get update && apt-get install -y docker-ce-cli && \ apt-get clean && rm -rf /var/lib/apt/lists/* USER jenkins RUN jenkins-plugin-cli --plugins "blueocean docker-workflow json-path-api" -
Build a new docker image from this Dockerfile, and assign the image a meaningful name, such as "myjenkins-blueocean:2.555.3-1":
docker build -t myjenkins-blueocean:2.555.3-1 .If you have not yet downloaded the official Jenkins Docker image, the above process automatically downloads it for you.
-
-
Run your own
myjenkins-blueocean:2.555.3-1image as a container in Docker using the followingdocker runcommand:docker run \ --name jenkins-blueocean \(1) --restart=on-failure \(2) --detach \(3) --network jenkins \(4) --env DOCKER_HOST=tcp://docker:2376 \(5) --env DOCKER_CERT_PATH=/certs/client \ --env DOCKER_TLS_VERIFY=1 \ --publish 8080:8080 \(6) --publish 50000:50000 \(7) --volume jenkins-data:/var/jenkins_home \(8) --volume jenkins-docker-certs:/certs/client:ro \(9) myjenkins-blueocean:2.555.3-1 (10)1 ( Optional ) Specifies the Docker container name for this instance of the Docker image. 2 Always restart the container if it stops. If it is manually stopped, it is restarted only when Docker daemon restarts or the container itself is manually restarted. 3 ( Optional ) Runs the current container in the background, known as "detached" mode, and outputs the container ID. If you do not specify this option, then the running Docker log for this container is displayed in the terminal window. 4 Connects this container to the jenkinsnetwork previously defined. The Docker daemon is now available to this Jenkins container through the hostnamedocker.5 Specifies the environment variables used by docker,docker-compose, and other Docker tools to connect to the Docker daemon from the previous step.6 Maps, or publishes, port 8080 of the current container to port 8080 on the host machine. The first number represents the port on the host, while the last represents the container’s port. For example, to access Jenkins on your host machine through port 49000, enter -p 49000:8080for this option.7 ( Optional ) Maps port 50000 of the current container to port 50000 on the host machine. This is only necessary if you have set up one or more inbound Jenkins agents on other machines, which in turn interact with your jenkins-blueoceancontainer, known as the Jenkins "controller". Inbound Jenkins agents communicate with the Jenkins controller through TCP port 50000 by default. You can change this port number on your Jenkins controller through the Security page. For example, if you update the TCP port for inbound Jenkins agents of your Jenkins controller to 51000, you need to re-run Jenkins via thedocker run …command. Specify the "publish" option as follows: the first value is the port number on the machine hosting the Jenkins controller, and the last value matches the changed value on the Jenkins controller, for example,--publish 52000:51000. Inbound Jenkins agents communicate with the Jenkins controller on that port (52000 in this example). Note that WebSocket agents do not need this configuration.8 Maps the /var/jenkins_homedirectory in the container to the Docker volume with the namejenkins-data. Instead of mapping the/var/jenkins_homedirectory to a Docker volume, you can also map this directory to one on your machine’s local file system. For example, specify the option--volume $HOME/jenkins:/var/jenkins_hometo map the container’s/var/jenkins_homedirectory to thejenkinssubdirectory within the$HOMEdirectory on your local machine — typically/Users/<your-username>/jenkinsor/home/<your-username>/jenkins. NOTE: If you change the source volume or directory for this, the volume from thedocker:dindcontainer above needs to be updated to match this.9 Maps the /certs/clientdirectory to the previously createdjenkins-docker-certsvolume. The client TLS certificates required to connect to the Docker daemon are now available in the path specified by theDOCKER_CERT_PATHenvironment variable.10 The name of the Docker image, which you built in the previous step. If you have problems copying and pasting the command snippet, use the annotation-free version below: docker run --name jenkins-blueocean --restart=on-failure --detach \ --network jenkins --env DOCKER_HOST=tcp://docker:2376 \ --env DOCKER_CERT_PATH=/certs/client --env DOCKER_TLS_VERIFY=1 \ --publish 8080:8080 --publish 50000:50000 \ --volume jenkins-data:/var/jenkins_home \ --volume jenkins-docker-certs:/certs/client:ro \ myjenkins-blueocean:2.555.3-1 -
Proceed to the Post-installation setup wizard.
On Windows
The Jenkins project provides a Linux container image, not a Windows container image.
Be sure that your Docker for Windows installation is configured to run Linux Containers rather than Windows Containers.
Refer to the Docker documentation for instructions to switch to Linux containers.
Once configured to run Linux Containers, the steps are:
-
Open up a command prompt window and similar to the macOS and Linux instructions above do the following:
-
Create a bridge network in Docker
docker network create jenkins -
Run a docker:dind Docker image
docker run --name jenkins-docker --rm --detach ^ --privileged --network jenkins --network-alias docker ^ --env DOCKER_TLS_CERTDIR=/certs ^ --volume jenkins-docker-certs:/certs/client ^ --volume jenkins-data:/var/jenkins_home ^ --publish 2376:2376 ^ docker:dind -
Customize the official Jenkins Docker image, by executing the following two steps:
-
Create a Dockerfile with the following content:
FROM jenkins/jenkins:2.555.3-jdk21 USER root RUN apt-get update && apt-get install -y lsb-release RUN curl -fsSLo /usr/share/keyrings/docker-archive-keyring.asc \ https://download.docker.com/linux/debian/gpg RUN echo "deb [arch=$(dpkg --print-architecture) \ signed-by=/usr/share/keyrings/docker-archive-keyring.asc] \ https://download.docker.com/linux/debian \ $(lsb_release -cs) stable" > /etc/apt/sources.list.d/docker.list RUN apt-get update && apt-get install -y docker-ce-cli USER jenkins RUN jenkins-plugin-cli --plugins "blueocean docker-workflow json-path-api" -
Build a new docker image from this Dockerfile and assign the image a meaningful name, e.g. "myjenkins-blueocean:2.555.3-1":
docker build -t myjenkins-blueocean:2.555.3-1 .If you have not yet downloaded the official Jenkins Docker image, the above process automatically downloads it for you.
-
-
Run your own
myjenkins-blueocean:2.555.3-1image as a container in Docker using the followingdocker runcommand:docker run --name jenkins-blueocean --restart=on-failure --detach ^ --network jenkins --env DOCKER_HOST=tcp://docker:2376 ^ --env DOCKER_CERT_PATH=/certs/client --env DOCKER_TLS_VERIFY=1 ^ --volume jenkins-data:/var/jenkins_home ^ --volume jenkins-docker-certs:/certs/client:ro ^ --publish 8080:8080 --publish 50000:50000 myjenkins-blueocean:2.555.3-1 -
Proceed to the Setup wizard.
Accessing the Docker container
If you want to access your Docker container through a terminal/command prompt using the docker exec command, add an option like --name jenkins-tutorial to the docker exec command.
That will access the Jenkins Docker container named "jenkins-tutorial".
You can access your docker container (through a separate terminal/command prompt window) with a docker exec command such as:
docker exec -it jenkins-blueocean bash
Accessing the Docker logs
You may want to access the Jenkins console log, for instance, when Unlocking Jenkins as part of the Post-installation setup wizard.
Access the Jenkins console log through the terminal/command prompt window from which you executed the docker run … command.
Alternatively, you can also access the Jenkins console log through the Docker logs of your container using the following command:
docker logs <docker-container-name>
Your <docker-container-name> can be obtained using the docker ps command.
Accessing the Jenkins home directory
You can access the Jenkins home directory, to check the details of a Jenkins build in the workspace subdirectory, for example.
If you mapped the Jenkins home directory (/var/jenkins_home) to one on your machine’s local file system, for example, in the docker run … command above, access the directory contents through your machine’s usual terminal/command prompt.
If you specified the --volume jenkins-data:/var/jenkins_home option in the docker run … command, access the contents of the Jenkins home directory through your container’s terminal/command prompt using the docker container exec command:
docker container exec -it <docker-container-name> bash
As per the previous section, get your <docker-container-name> using the docker container ls command.
If you specified the --name jenkins-blueocean option in the docker container run … command above (refer to Accessing the Jenkins/Blue Ocean Docker container if needed), use the docker container exec command:
docker container exec -it jenkins-blueocean bash
Using custom CA certificates with Jenkins in Docker and Kubernetes
If your Jenkins instance needs to trust custom root CA certificates (for corporate proxies, internal services, or self-signed certificates), you have several options to configure this securely.
|
The system truststore ( |
Option 1: Docker Compose with Init Container (Recommended for Docker)
This approach uses an init container to prepare a custom truststore before Jenkins starts.
How It Works
-
An init container runs as root
-
Copies the system truststore to a shared volume
-
Imports your custom certificates into the copy
-
Jenkins container uses the prepared truststore (read-only)
-
System truststore remains untouched
Example: Docker Compose
Create a docker-compose.yml:
version: '3.8'

services:
  # Init container: prepares truststore with custom CA certificates
  cert-init:
    image: jenkins/jenkins:lts-jdk21
    user: root
    volumes:
      - ./custom-certs:/certs:ro
      - jenkins-cacerts:/cacerts-volume
    command: >
      bash -c '
        cp "$${JAVA_HOME}/lib/security/cacerts" /cacerts-volume/cacerts &&
        for cert in /certs/*.crt /certs/*.pem; do
          [ -f "$$cert" ] || continue;
          alias="custom-$$(basename "$${cert%.*}")";
          "$${JAVA_HOME}/bin/keytool" -importcert -noprompt \
            -keystore /cacerts-volume/cacerts \
            -storepass changeit \
            -alias "$$alias" \
            -file "$$cert" || true;
        done &&
        echo "Custom CA certificates imported successfully"
      '

  # Main Jenkins container
  jenkins:
    image: jenkins/jenkins:lts-jdk21
    depends_on:
      cert-init:
        condition: service_completed_successfully
    ports:
      - "8080:8080"
      - "50000:50000"
    volumes:
      - jenkins_home:/var/jenkins_home
      - jenkins-cacerts:/cacerts:ro
    environment:
      JAVA_OPTS: "-Djavax.net.ssl.trustStore=/cacerts/cacerts -Djavax.net.ssl.trustStorePassword=changeit"

volumes:
  jenkins_home:
  jenkins-cacerts:
Usage
-
Create a directory named
custom-certsin the same location as yourdocker-compose.yml -
Place your
.crtor.pemcertificate files incustom-certs/ -
Run:
docker compose up -dThe init container will import all certificates from custom-certs/ into a shared truststore, then Jenkins will start with those certificates trusted.
Option 2: Kubernetes with Init Container
For Kubernetes deployments, use an init container in your Pod specification.
Using the Official Helm Chart
The official Jenkins Helm chart supports custom init containers via the controller.initContainers parameter.
Create a values.yaml:
controller:
  # Mount custom certificates as a ConfigMap or Secret
  additionalExistingSecrets:
    - name: custom-ca-certs
      keyName: certs

  # Init container to prepare truststore
  initContainers:
    - name: prepare-truststore
      image: "jenkins/jenkins:lts-jdk21"
      imagePullPolicy: Always
      securityContext:
        runAsUser: 0
        runAsNonRoot: false
      command:
        - sh
        - -c
        - |
          cp "${JAVA_HOME}/lib/security/cacerts" /cacerts-volume/cacerts
          for cert in /custom-certs/*.crt /custom-certs/*.pem; do
            [ -f "$cert" ] || continue
            alias="custom-$(basename "${cert%.*}")"
            "${JAVA_HOME}/bin/keytool" -importcert -noprompt \
              -keystore /cacerts-volume/cacerts \
              -storepass changeit \
              -alias "$alias" \
              -file "$cert" || true
          done
          echo "Custom CA certificates imported"
      volumeMounts:
        - name: cacerts-volume
          mountPath: /cacerts-volume
        - name: custom-ca-certs
          mountPath: /custom-certs
          readOnly: true

  # Additional volume mounts for the main Jenkins container
  additionalVolumeMounts:
    - name: cacerts-volume
      mountPath: /cacerts
      readOnly: true

  # Java options to use custom truststore
  javaOpts: >-
    -Djavax.net.ssl.trustStore=/cacerts/cacerts
    -Djavax.net.ssl.trustStorePassword=changeit

  # Additional volumes
  additionalVolumes:
    - name: cacerts-volume
      emptyDir: {}
    - name: custom-ca-certs
      secret:
        secretName: custom-ca-certs
Create the Secret
First, create a Kubernetes secret with your certificates:
kubectl create secret generic custom-ca-certs \
  --from-file=ca1.crt=./path/to/your/cert1.crt \
  --from-file=ca2.crt=./path/to/your/cert2.crt \
  --namespace jenkins
Deploy Jenkins
helm repo add jenkinsci https://charts.jenkins.io
helm repo update
helm install jenkins jenkinsci/jenkins -f values.yaml --namespace jenkins
Plain Kubernetes Manifest
If you’re not using Helm, here’s a Pod spec example:
apiVersion: v1
kind: Pod
metadata:
  name: jenkins
spec:
  initContainers:
    - name: prepare-truststore
      image: jenkins/jenkins:lts-jdk21
      securityContext:
        runAsUser: 0
      command:
        - sh
        - -c
        - |
          cp "${JAVA_HOME}/lib/security/cacerts" /cacerts-volume/cacerts
          for cert in /custom-certs/*.crt; do
            [ -f "$cert" ] || continue
            alias="custom-$(basename "${cert%.*}")"
            "${JAVA_HOME}/bin/keytool" -importcert -noprompt \
              -keystore /cacerts-volume/cacerts \
              -storepass changeit \
              -alias "$alias" \
              -file "$cert"
          done
      volumeMounts:
        - name: cacerts-volume
          mountPath: /cacerts-volume
        - name: custom-ca-certs
          mountPath: /custom-certs
          readOnly: true

  containers:
    - name: jenkins
      image: jenkins/jenkins:lts-jdk21
      env:
        - name: JAVA_OPTS
          value: "-Djavax.net.ssl.trustStore=/cacerts/cacerts"
      volumeMounts:
        - name: cacerts-volume
          mountPath: /cacerts
          readOnly: true
        - name: jenkins-home
          mountPath: /var/jenkins_home

  volumes:
    - name: cacerts-volume
      emptyDir: {}
    - name: custom-ca-certs
      secret:
        secretName: custom-ca-certs
    - name: jenkins-home
      persistentVolumeClaim:
        claimName: jenkins-home-pvc
Option 3: Custom Docker Image
For static certificate requirements, build a custom image with certificates baked in.
Example Dockerfile
Create a Dockerfile:
FROM jenkins/jenkins:lts-jdk21

# Switch to root to modify truststore
USER root

# Copy your custom CA certificates
COPY custom-certs/*.crt /usr/local/share/ca-certificates/

# Import certificates into Java truststore
RUN for cert in /usr/local/share/ca-certificates/*.crt; do \
      [ -f "$cert" ] || continue; \
      alias="custom-$(basename "${cert%.*}")"; \
      keytool -importcert -noprompt \
        -keystore "${JAVA_HOME}/lib/security/cacerts" \
        -storepass changeit \
        -alias "$alias" \
        -file "$cert"; \
    done

# Switch back to jenkins user
USER jenkins
Build and Run
# Build the custom image
docker build -t my-jenkins:lts-jdk21 .

# Run the container
docker run -d -p 8080:8080 -p 50000:50000 \
  -v jenkins_home:/var/jenkins_home \
my-jenkins:lts-jdk21|
This approach is suitable when:
|
Certificate Format Requirements
Supported Formats
-
PEM format (
.pem): Text file with-----BEGIN CERTIFICATE-----header -
DER/CRT format (
.crt,.cer): Binary or PEM-encoded certificate
Converting Certificates
If you have a certificate in a different format:
From DER to PEM:
openssl x509 -inform der -in certificate.cer -out certificate.pemFrom P7B/PKCS#7 to PEM:
openssl pkcs7 -print_certs -in certificate.p7b -out certificate.pemExtract from JKS keystore:
keytool -exportcert -alias myalias -keystore keystore.jks \
  -rfc -file certificate.pem
Troubleshooting
Verify Certificate Import
Check if your certificate was imported successfully:
# Docker
docker exec jenkins ${JAVA_HOME}/bin/keytool -list \
  -keystore /cacerts/cacerts \
  -storepass changeit | grep custom-

# Kubernetes
kubectl exec jenkins-0 -- ${JAVA_HOME}/bin/keytool -list \
  -keystore /cacerts/cacerts \
  -storepass changeit | grep custom-
Test SSL Connection
Test if Jenkins can connect to your internal service:
docker exec jenkins curl -v https://your-internal-service.example.comCommon Issues
Issue: PKIX path building failed: unable to find valid certification path
Solution: The CA certificate wasn’t imported correctly. Verify:
-
Certificate is in PEM or DER format
-
Certificate file has
.crtor.pemextension -
Init container completed successfully
-
JAVA_OPTSincludes-Djavax.net.ssl.trustStore=/cacerts/cacerts
Issue: Init container fails with "keytool error: Invalid keystore format"
Solution: The cacerts file is corrupted. Ensure the init container copies the original truststore before modifying it.
Issue: Certificates import successfully but Jenkins still doesn’t trust the connection
Solution: Verify the Java truststore path:
docker exec jenkins bash -c 'echo $JAVA_OPTS'
# Should include: -Djavax.net.ssl.trustStore=/cacerts/cacerts
Security Considerations
|
Post-installation setup wizard
After downloading, installing, and running Jenkins using one of the procedures above (except when installing with the Jenkins Operator), the post-installation setup wizard begins.
The setup wizard takes you through a few quick one-time steps to unlock Jenkins, customize it with plugins, and create the first administrator user through which you can continue accessing Jenkins.
Unlocking Jenkins
When you first access a new Jenkins controller, you are asked to unlock it using an automatically-generated password.
-
Browse to
http://localhost:8080(or whichever port you configured for Jenkins when installing it) and wait until the Unlock Jenkins page appears.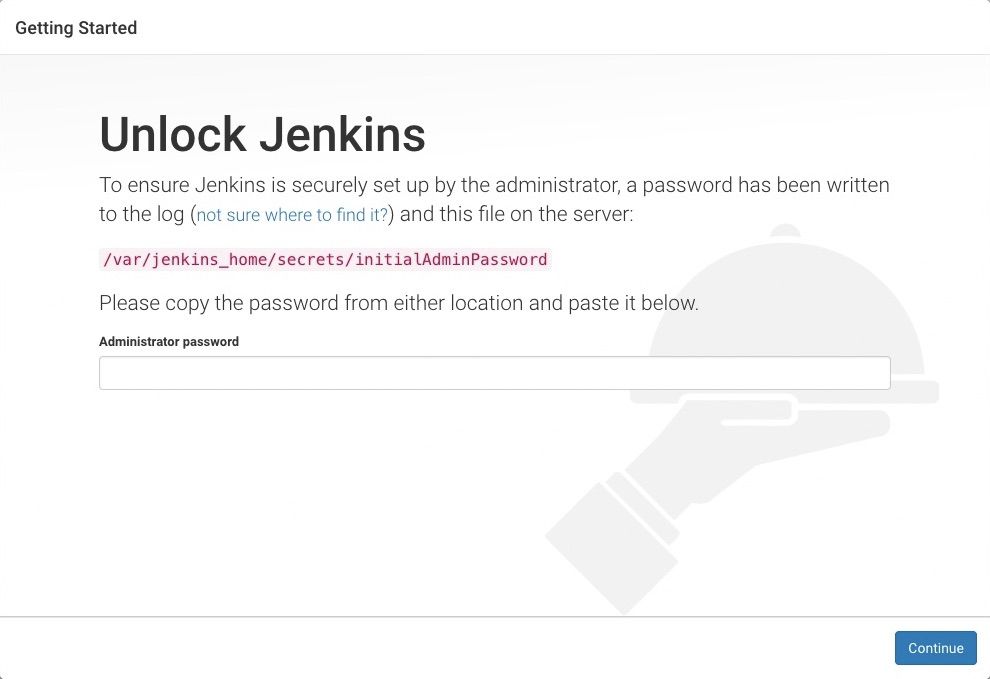
-
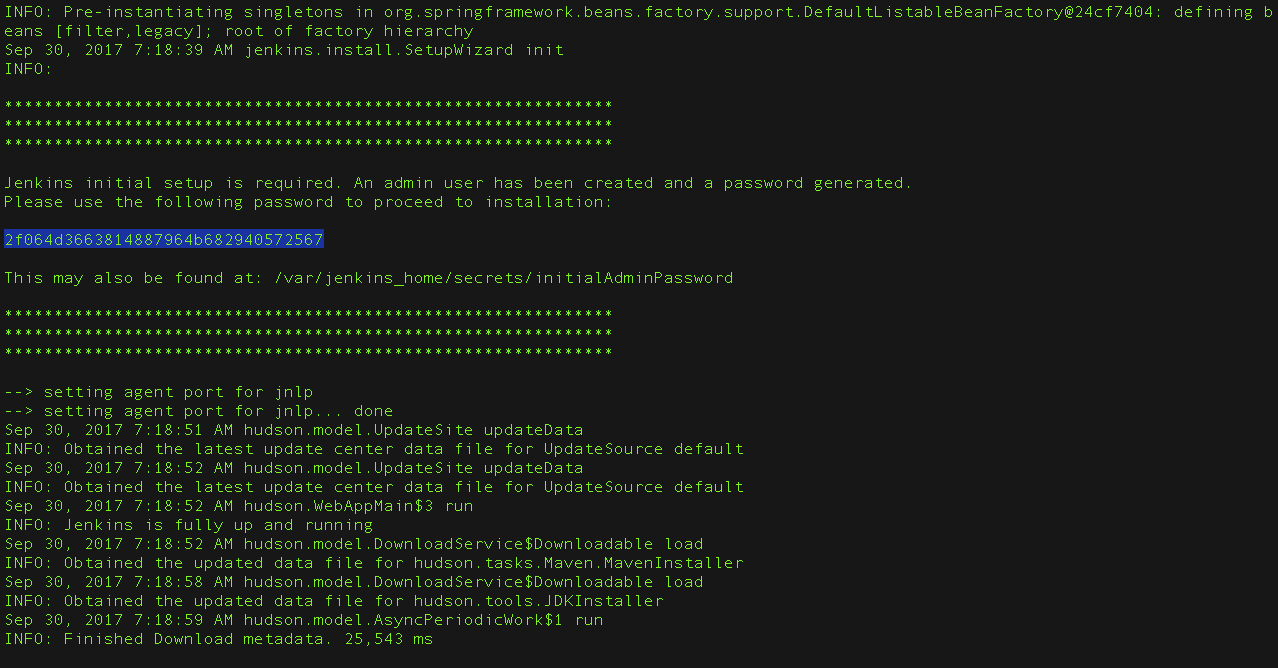
From the Jenkins console log output, copy the automatically generated alphanumeric password (between the 2 sets of asterisks).
Note:-
The command:
sudo cat /var/lib/jenkins/secrets/initialAdminPasswordwill print the password at console. -
If you are running Jenkins in Docker using the official
jenkins/jenkinsimage you can usesudo docker exec ${CONTAINER_ID or CONTAINER_NAME} cat /var/jenkins_home/secrets/initialAdminPasswordto print the password in the console without having to open an interactive shell inside the container.
-
-
On the Unlock Jenkins page, paste this password into the Administrator password field and click Continue.
Note:-
The Jenkins console log indicates the location (in the Jenkins home directory) where this password can also be obtained. This password must be entered in the setup wizard on new Jenkins installations before you can access Jenkins’s main UI. This password also serves as the default administrator account’s password (with username "admin") if you happen to skip the subsequent user-creation step in the setup wizard.
-
Customizing Jenkins with plugins
After unlocking Jenkins, the Customize Jenkins page appears. Here you can install any number of useful plugins as part of your initial setup.
Click one of the two options shown:
-
Install suggested plugins - to install the recommended set of plugins, which are based on most common use cases.
-
Select plugins to install - to choose which set of plugins to initially install. When you first access the plugin selection page, the suggested plugins are selected by default.
| If you are not sure what plugins you need, choose Install suggested plugins. You can install or remove additional Jenkins plugins later via the Manage Jenkins > Plugins page in Jenkins. |
The setup wizard shows the progression of Jenkins being configured and your chosen set of Jenkins plugins being installed. This process may take a few minutes to complete.
Creating the first administrator user
Finally, after customizing Jenkins with plugins, Jenkins asks you to create your first administrator user.
-
When the Create First Admin User page appears, specify the details for your administrator user in the respective fields and click Save and Finish.
-
When the Jenkins is ready page appears, click Start using Jenkins.
Notes:-
This page may display Jenkins is almost ready! instead and if so, click Restart.
-
If the page does not automatically refresh after a minute, use your web browser to refresh the page manually.
-
-
If required, log in to Jenkins using the credentials of the user you just created and you are ready to start using Jenkins!
Please submit your feedback about this page through this quick form.
Alternatively, if you don't wish to complete the quick form, you can simply indicate if you found this page helpful?
See existing feedback here.