Using Jenkins agents
The Jenkins architecture is designed for distributed build environments. It allows us to use different environments for each build project balancing the workload among multiple agents running jobs in parallel.
The Jenkins controller is the original node in the Jenkins installation. The Jenkins controller administers the Jenkins agents and orchestrates their work, including scheduling jobs on agents and monitoring agents. Agents may be connected to the Jenkins controller using either local or cloud computers.
The agents require a Java installation and a network connection to the Jenkins controller. View the 3 minute video below for a brief explanation of Jenkins agents.
Agent concepts
Jenkins agents provide executors that perform work when requested by the Jenkins controller. Agents can run Pipeline steps, freestyle jobs, and other jobs.
Specific capabilities of agents are often noted by assigning labels to the agents.
An agent running on an Arm64 computer might be assigned the aarch64 label so that jobs can limit themselves to only run on agents with the Arm64 processor.
An agent running with a code signing application might be assigned the code-signing label so that jobs that need to sign executables would run there.
Agents may be allowed to run any job or they may be restricted to only run jobs that are specifically assigned to the agent.
Number of executors
The number of executors determines how many concurrent tasks can be run on an agent.
For Jenkins controllers, it is recommended to set this to 0 to avoid resource contention.
Executors should be configured on agents (nodes) instead.
|
Why set executors to 0 on the controller?
Setting executors to For instance, agents with specific capabilities can be configured with multiple executors to handle concurrent builds effectively. |
Labels
Labels are used to group agents (nodes) based on specific criteria. They help in assigning jobs to specific agents. For example, you can label agents based on their operating system or hardware capabilities.
Example:
linux, windows, docker, high-memory
Labels can be assigned in the agent configuration settings.
Configuring agents with Docker
Jenkins agents can be launched in physical machines, virtual machines, Kubernetes clusters, and with Docker images. This section connects Docker agents to Jenkins with SSH.
Environment
To run this guide you will need a machine with:
-
Java installation
-
Jenkins installation
-
Docker installation
-
SSH key pair
|
If you need help to install Java, Jenkins and Docker please visit the section Installing Jenkins. |
Generating an SSH key pair
To generate the SSH key pair, you have to execute a command line tool named ssh-keygen on a machine you have access to. It could be:
-
the machine on which your Jenkins controller runs
-
the host (if using containers)
-
a machine on which you have an agent running
-
or even your developer machine
|
The SSH key pair generation can be done on any operating system:
|
| Note that you will have to be able to copy the key value to your controller and agent afterwards, so check that you can copy a file content into the clipboard beforehand. |
-
In a terminal window run the command:
ssh-keygen -f ~/.ssh/jenkins_agent_key -
Provide a passphrase to use with the key (it can be empty)
-
Confirm the output looks something like this:
ubuntu@desktop:~$ ssh-keygen -f ~/.ssh/jenkins_agent_key
Generating public/private rsa key pair.
Enter passphrase (empty for no passphrase):
Enter same passphrase again:
Your identification has been saved in /home/ubuntu/.ssh/jenkins_agent_key
Your public key has been saved in /home/ubuntu/.ssh/jenkins_agent_key.pub
The key fingerprint is:
SHA256:XqxxjqsLlvDD0ZHm9Y2iR7zC6IbsUlMEHo3ffy8TzGs
The key's randomart image is:
+---[RSA 3072]----+
|  o+             |
| ...o  .         |
|  .o .+ .        |
|    o+.+ o o     |
|  ... o.So* .    |
|  o+ = +.X=      |
| o oO + *..+     |
|. oo.o o .E .    |
| o... oo.. o     |
+----[SHA256]-----+
Create a Jenkins SSH credential
-
From your Jenkins dashboard, navigate to Manage Jenkins.
-
In the Security section, select Credentials.
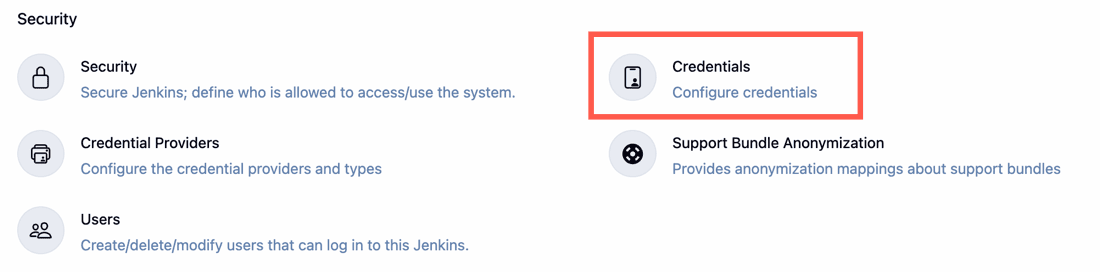
-
Under Stores scoped to Jenkins, select
Add Credentialsfrom the global option.
-
Fill in the following information, as shown in the example, substituting your information as needed:
-
Kind: SSH username with private key
-
ID: jenkins
-
Description: The Jenkins SSH key
-
Username: jenkins
-
Private Key: Select Enter directly and then select Add to insert the content of your private key file (
~/.ssh/jenkins_agent_key). -
Passphrase: Enter the passphrase used to generate the SSH key pair (or leave it empty if you didn’t use one in the previous step).
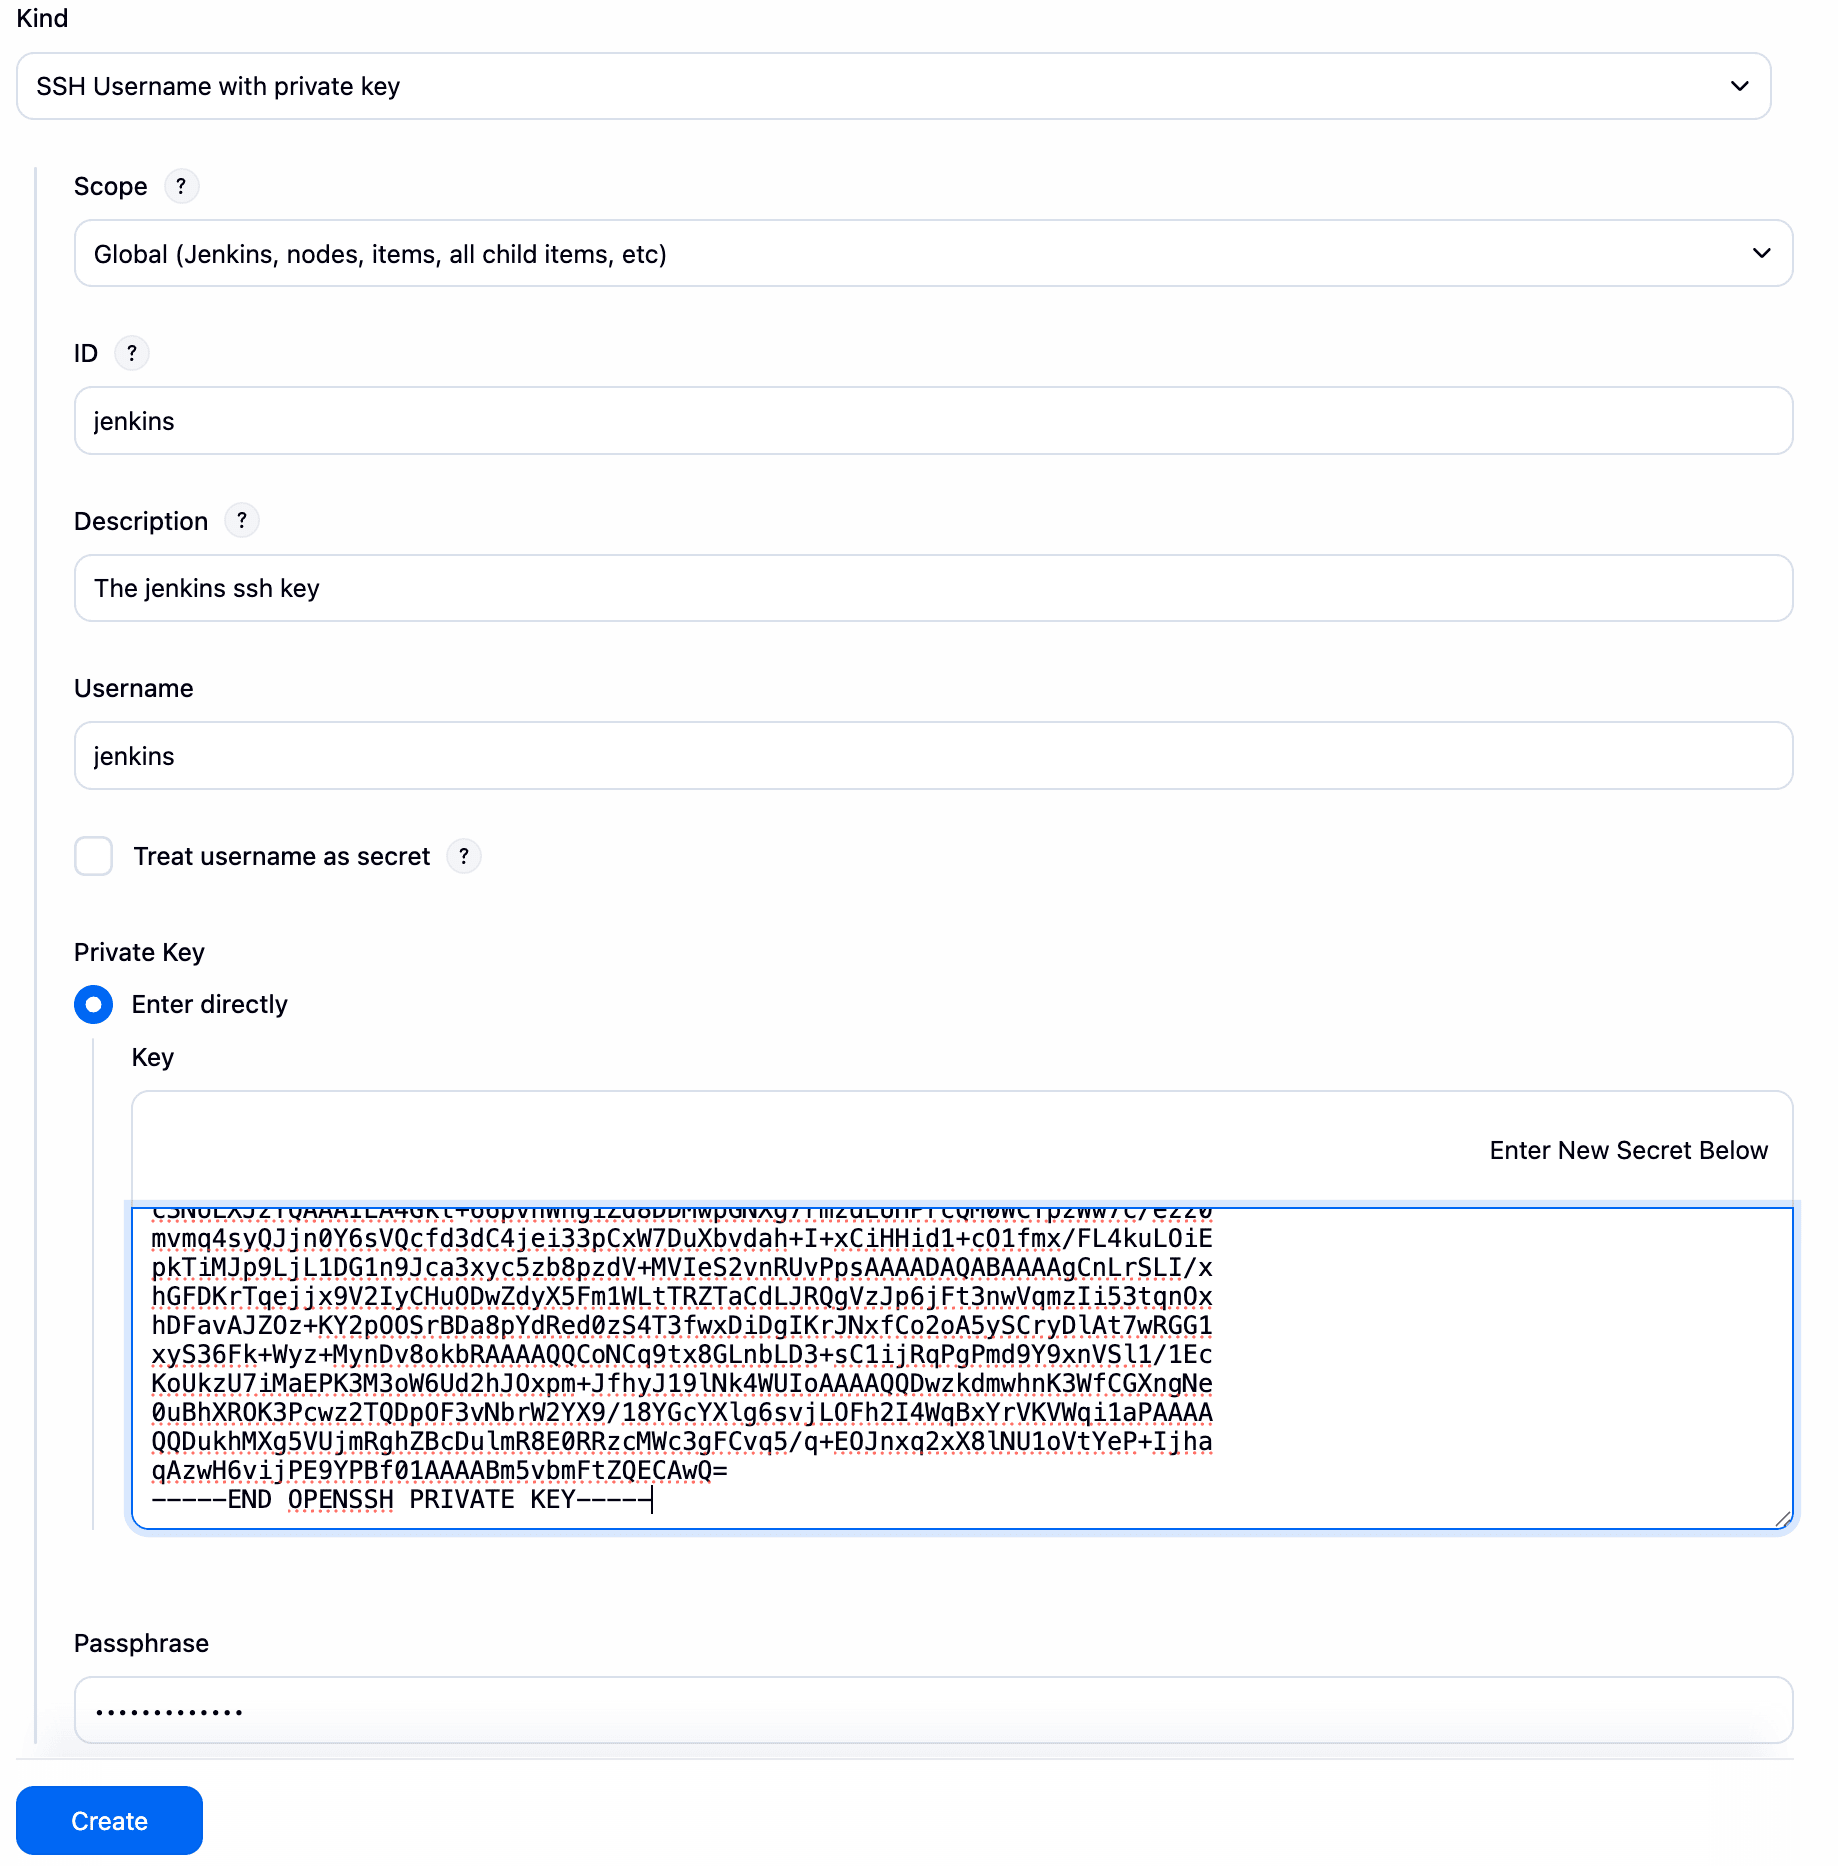
-
-
Select Create to complete your credential configuration.
Creating your Docker agent
On Linux
Here we will use the docker-ssh-agent image to create the agent containers.
-
run the command to start your first agent:
docker run -d --rm --name=agent1 -p 22:22 \ -e "JENKINS_AGENT_SSH_PUBKEY=<your_public_key>" \ jenkins/ssh-agent:alpine-jdk21 -
Now the container
agent1is running.
Hint: the commanddocker pscan be used to check if the container is running as expected.
On Windows
Here we will use the docker-ssh-agent image to create the agent containers.
-
run the command to start your first agent:
docker run -d --rm --name=agent1 --network jenkins -p 22:22 ` -e "JENKINS_AGENT_SSH_PUBKEY=<your_public_key>" ` jenkins/ssh-agent:jdk21-
Remember to replace the tag <your_public_key> for your own SSH public key.
-
Your public key in this example is:
Get-Content $Env:USERPROFILE\.ssh\jenkins_agent_key.pub
-
-
Now the container
agent1is running.
Hint: the commanddocker pscan be used to check if the container is running as expected. Additionally, the commanddocker container inspect agent1 | Select-String -Pattern '"IPAddress": "\d+\.\d+\.\d+\.\d+"'can be used to see the Host to be set in Jenkins for the agent.
Set up agent1 on Jenkins
-
From your Jenkins dashboard, navigate to Manage Jenkins.
-
Select Nodes.
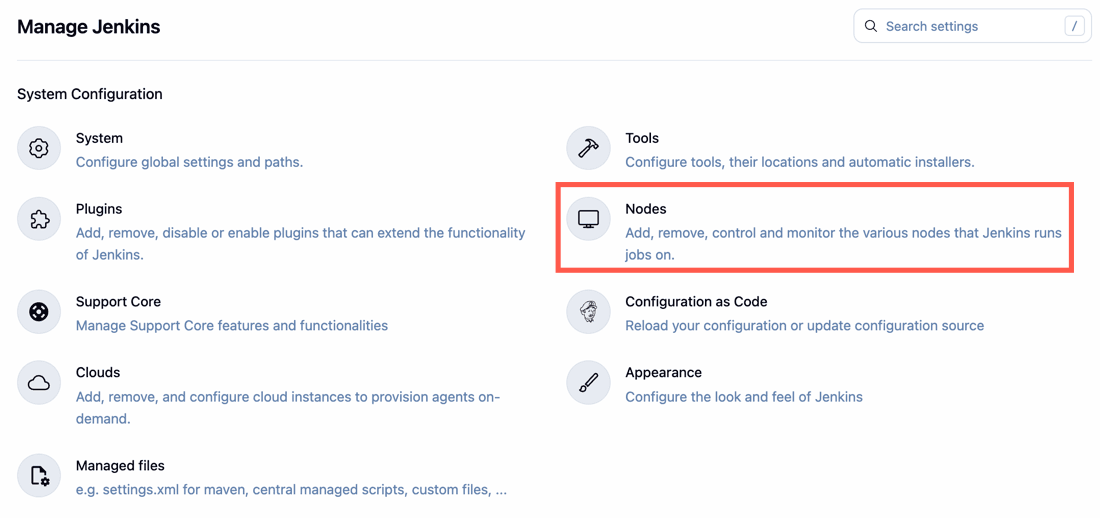
-
Select New Node to create your agent.
-
Enter your Node name, select the Permanent Agent option, and select Create.
-
On the agent creation page fill in the fields:
-
Remote root directory
-
Labels
-
Usage
-
Launch method
-
Host
-
Credentials
-
Host Key verification Strategy
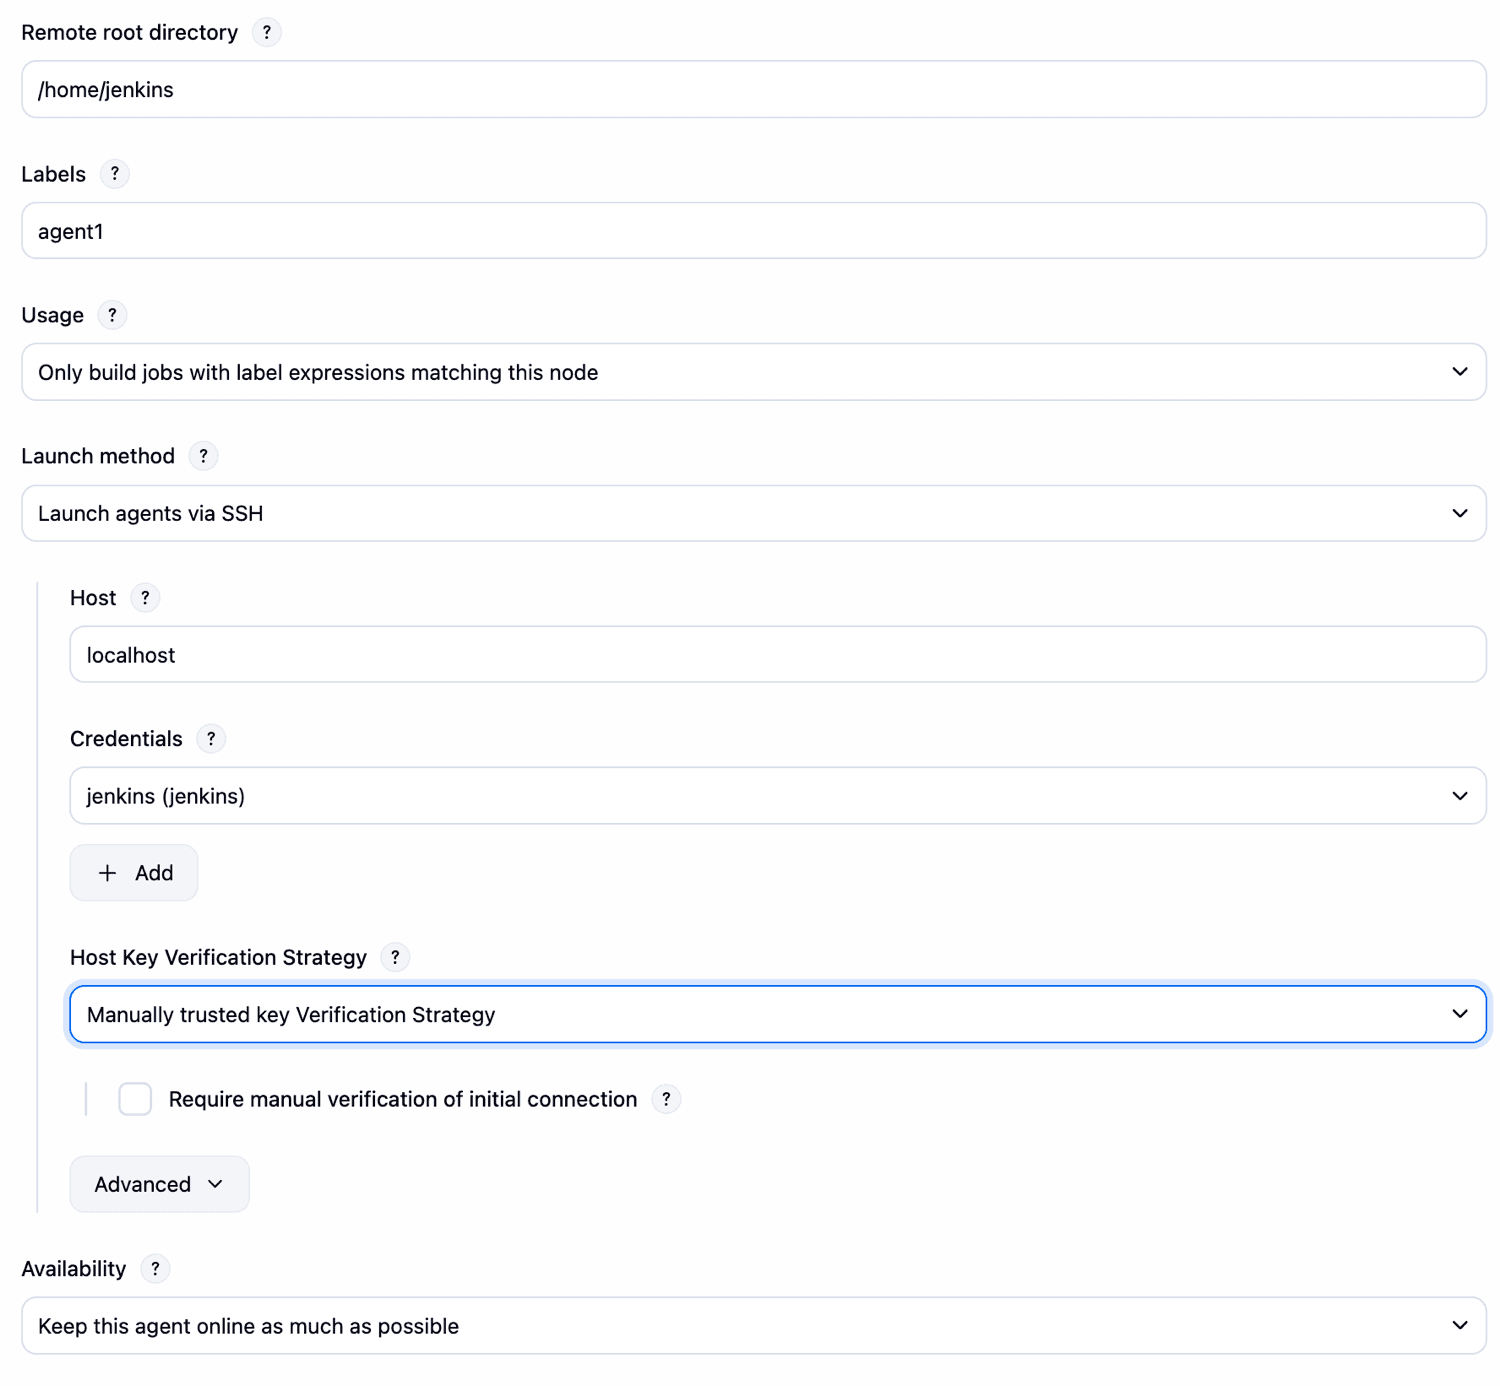
-
-
-
Select Save and
agent1will be registered, but offline for the time being. Select theagent1node to view its status. -
The status page should show the message:
This node is being launched.If that’s not the case, select Relaunch agent and wait a few seconds. -
After waiting, select the
Logoption to view the logs. At the bottom of the log, you should receive the message:Agent successfully connected and online.
If your Jenkins controller does not start the agent via ssh, please check the port you configured on your agent. Copy the port number and then select Advanced. Under Advanced, you can paste the port number into the Port field.
Delegating the first job to agent1
-
From your Jenkins dashboard select New Item.
-
Enter a name, for example,
First job on agent1. -
Select Freestyle project and select OK to create the job.
-
Select the option Restrict where this project can be run.
-
Enter the node label (
agent1) in the Label Expression field.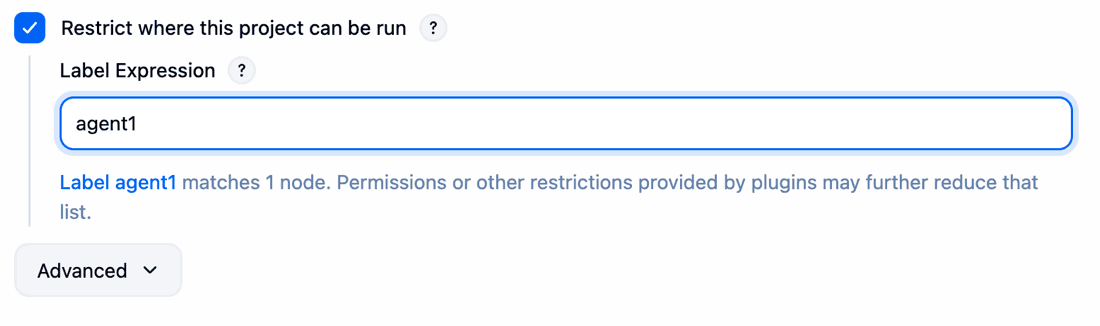
Be careful with white spaces before or after the label.
-
Select the Execute shell option from the Build Steps dropdown;
-
Add the command:
echo $NODE_NAMEin the Command field and the name of the agent will be printed inside the log when this job is run.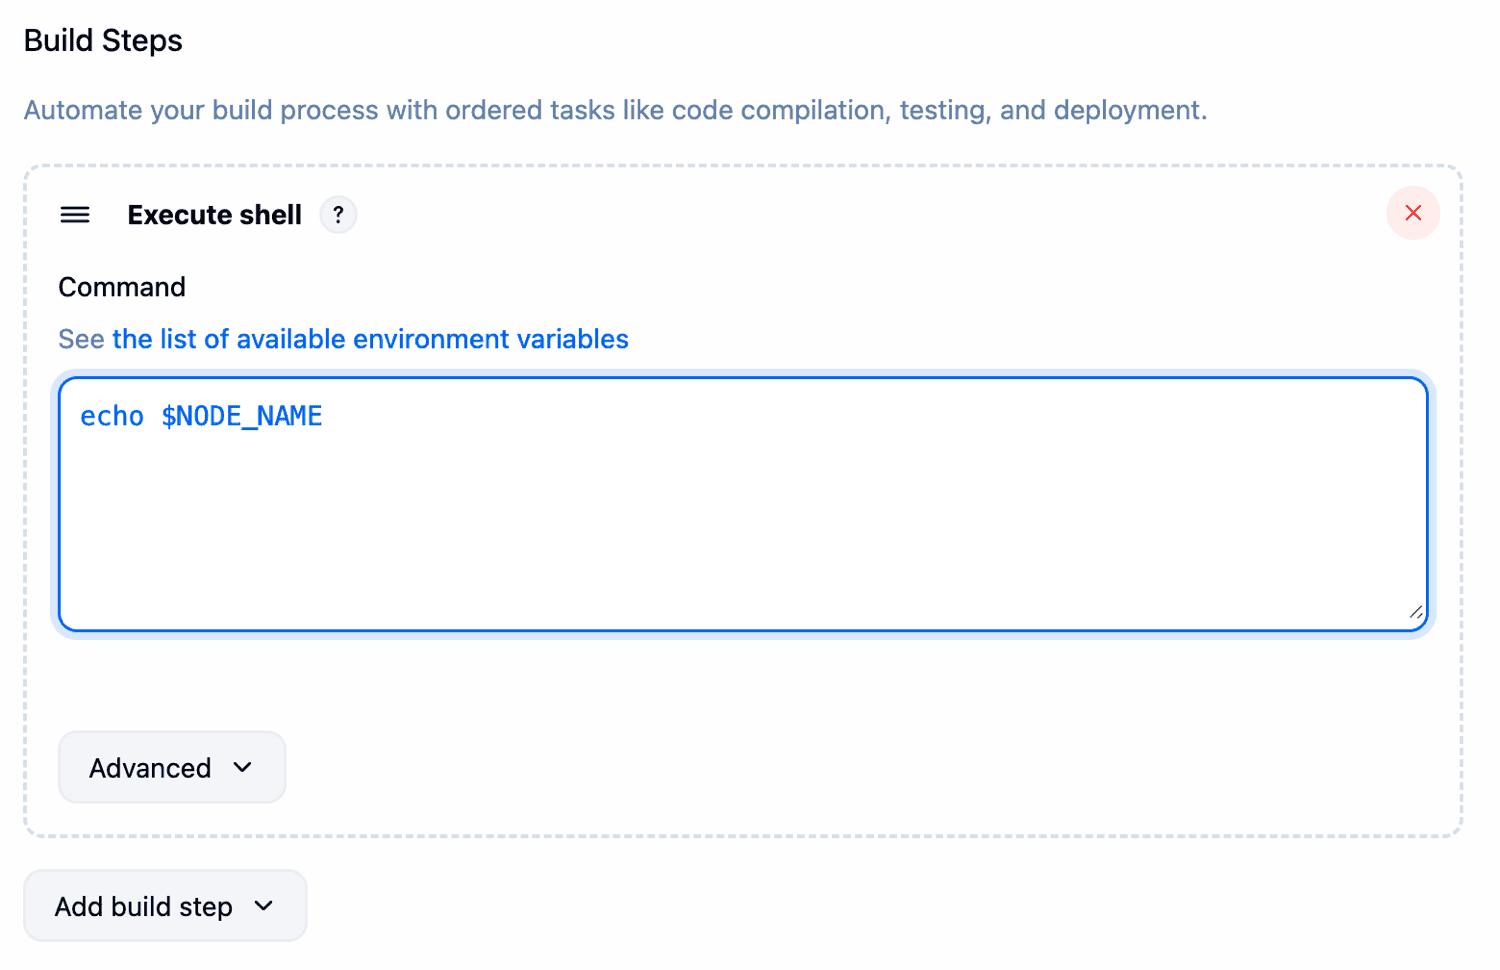
-
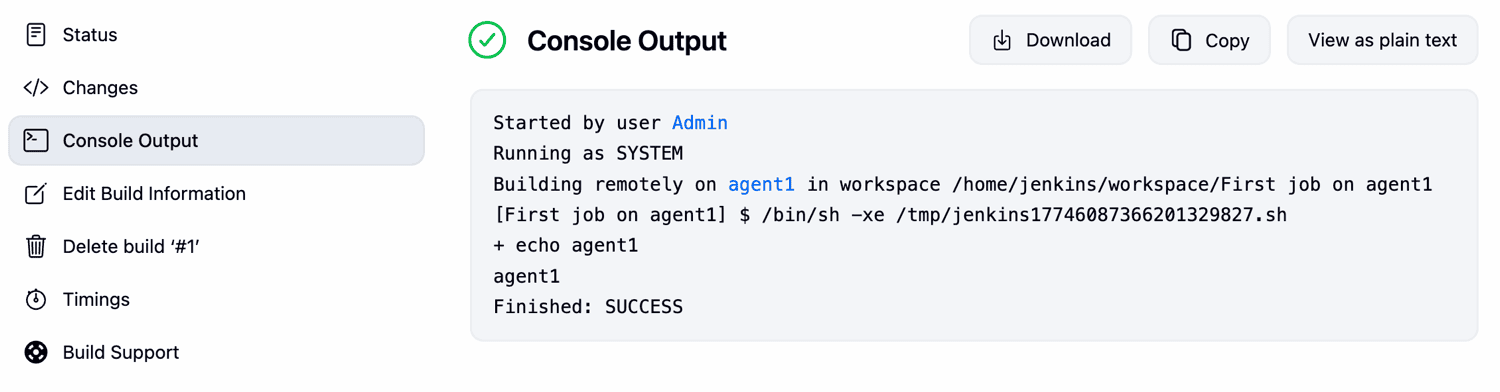
Select Save and then select Build Now.
-
Wait a few seconds, and then go to Console Output page. You should receive output similar to:
Please submit your feedback about this page through this quick form.
Alternatively, if you don't wish to complete the quick form, you can simply indicate if you found this page helpful?
See existing feedback here.