Create iOS Unity build pipelines on AWS with Jenkins and EC2 Mac instances


Create iOS Unity build pipelines on AWS with Jenkins and EC2 Mac instances
Every mobile game, whether it is a multiplayer or standalone game, must build binaries. Developers of high budget, high profile AAA and AA games tend to lean towards managing a build farm, whereas independent developers (indies) may rely on local or third-party solutions. Managing compute infrastructure is a time consuming and ongoing task for many companies and developers, especially in relation to iOS builds, which require applications to be signed before submission to the App Store. Given the overhead required to run and maintain a local build environment, it rarely makes sense to maintain physical build farms for many teams.
Amazon EC2 Mac instances launched at re:Invent 2020, introduced macOS as a supported instance type for the first time. Later in 2022, Apple M1-based Mac instances were released, enabling Apple silicon in the cloud alongside the x86 architecture. Today, EC2 Mac instances are being leveraged by thousands of customers today to build and run their macOS workloads on the AWS cloud. By using EC2 Mac instances in combination with EC2 Spot instances and Jenkins CI/CD, Unity developers were able to build scalable, cost efficient, and fast iOS pipelines for building, testing, signing, and publishing to the App Store.
In this blog post, we discover how to build a scalable and cost-efficient iOS build pipeline on AWS that can be deployed within hours.
Overview of solution
This solution is possible due to Unity`s ability to split a build process into two parts:
-
Xcode Project preparation: a first phase involving processing compute-intensive images, videos, music, and compiling additional assets.
-
Xcode Build, packaging, and signature: the second and final phase of building an iOS app which must be done using macOS, an EC2 Mac instance in our solution.
The high-level architecture looks like the following:
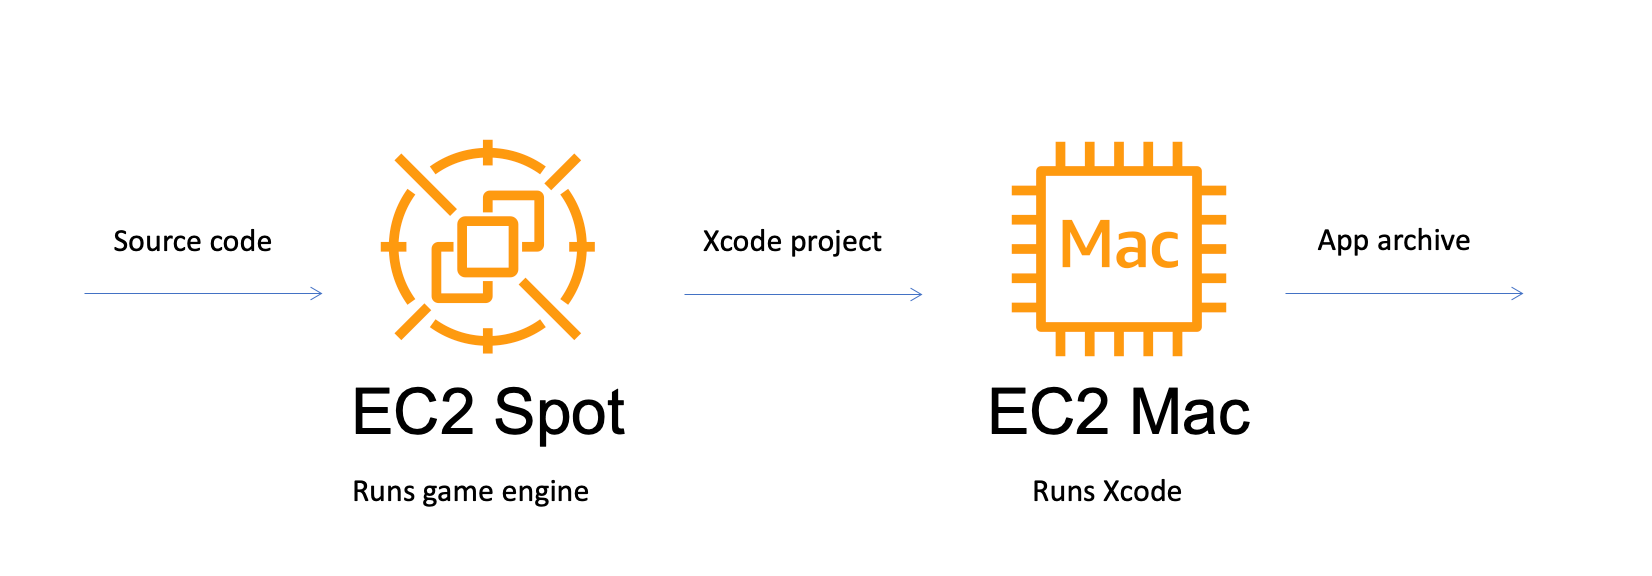
We will build upon these concepts and will use EC2 Spot instances for the compute-heavy phase of asset compilation in conjunction with the EC2 Autoscaling feature. We will also use an EC2 Mac instance to complete the second, final Xcode build step. For the whole pipeline, orchestration is done with Jenkins CI/CD. We will also use the ability of the Unity engine to be Dockerized to implement scalability and flexibility.
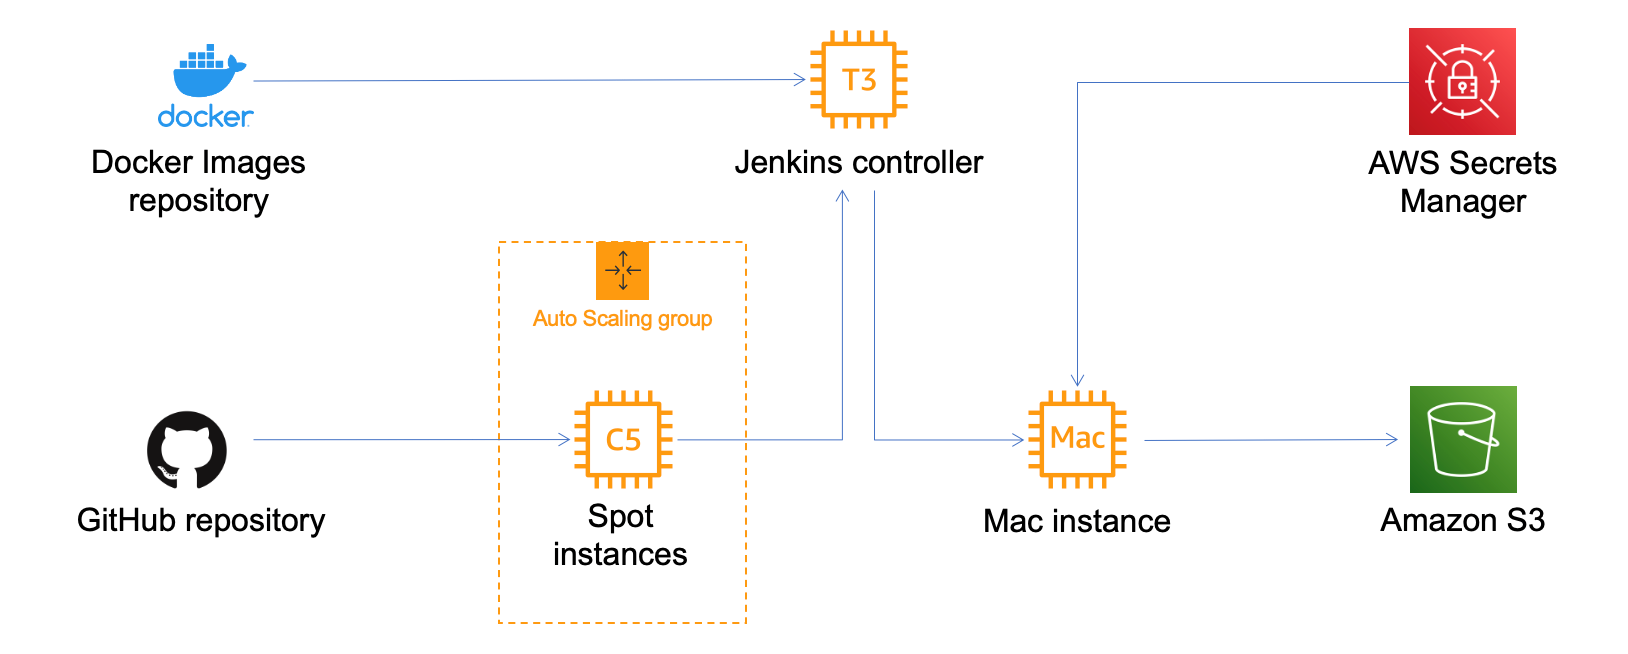
Services and dependencies used in our solution are shown on the following diagram:
Key pieces
In this blog I will not explain the solution step by step; instead, I will emphasize key pieces of the solution, which you can setup on your own. You can follow the whole procedure by going through the workshop here, a repository with code and a sample project can be found here.
Networking template
To setup the whole solution, I have created the following
CloudFormation
template. It prepares the environment by creating a VPC, subnets, a
Jenkins Manager installation and an EC2 bastion host. To deploy the
stack in us-east-2 (Ohio) region, click the button:
![]()
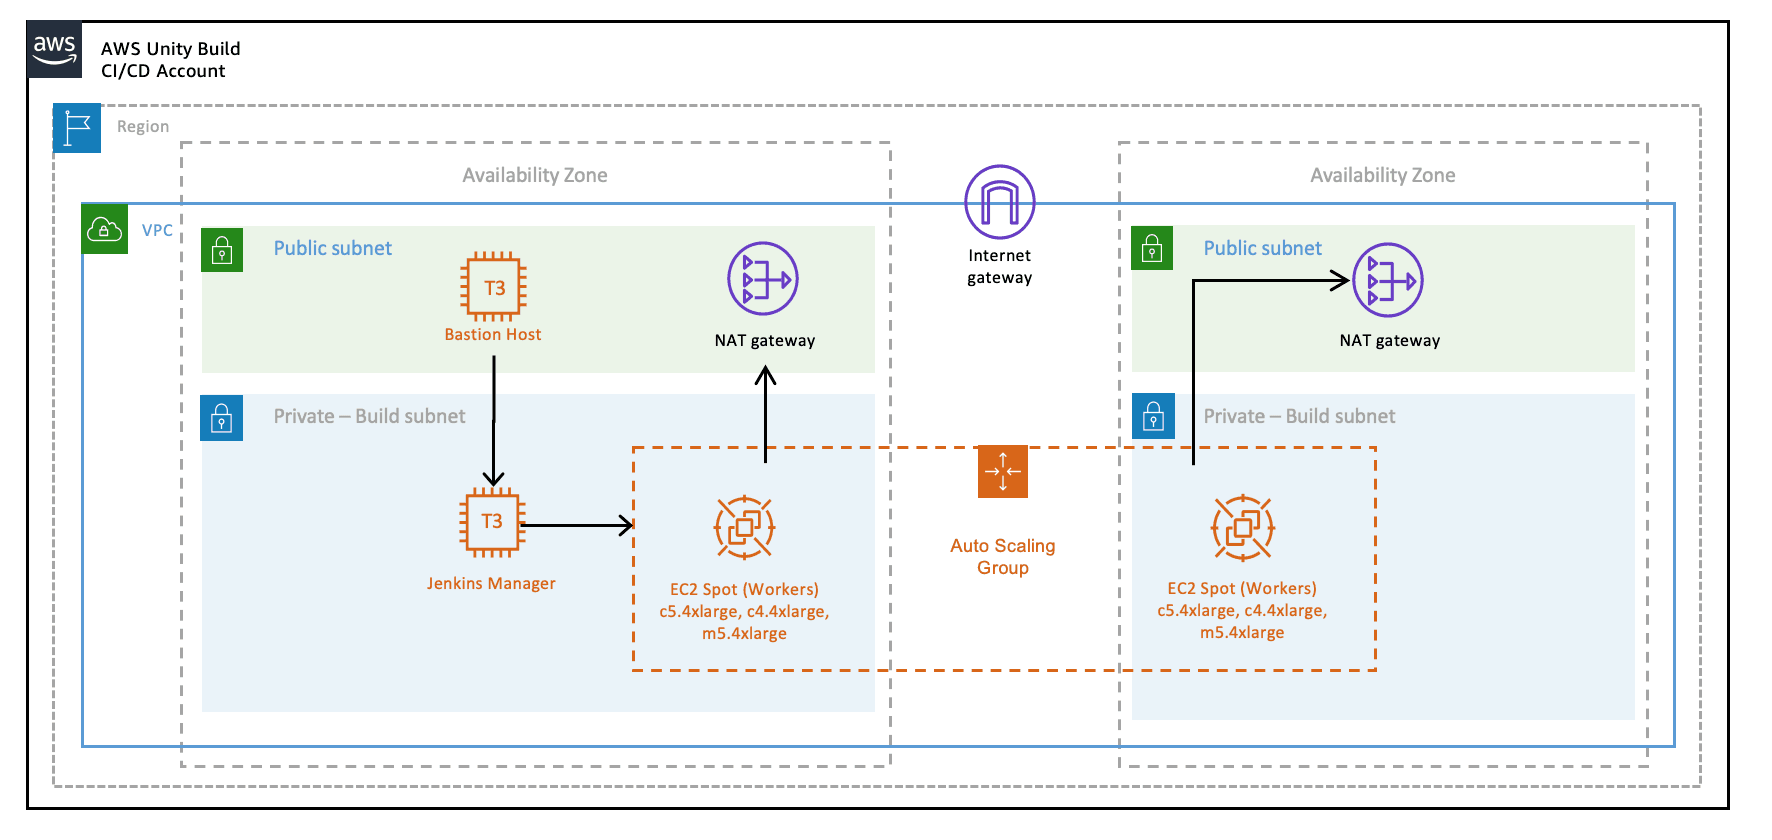
The stack incorporates VPC with two availability zones (AZs), and with two private and two public subnets. To follow best practices, we will place Jenkins Manager and execution nodes within the private subnet. The stack also sets up a bastion host in order to access resources in the private subnet.
Internal resources will use NAT gateway to reach the internet in two availability zones to reduce inter-AZ traffic costs.
Unity container and build server
The demonstration repository includes a sample Unity project to build. The Unity engine can be containerized—the Linux-based solution uses Docker to pull a specific Unity version from a repository, set up a license, and build the Xcode project. Since the process is compute-heavy, the types of instance used in this case is a C5.4xlarge instance, which are compute-optimized instances.
Unity part that needs to be legally validated
In order to build a Unity project and create an Xcode project in a production environment, you will need a license. For that, Unity provides several options: in our example, we will use “Unity Build Server” licenses. (You can read more here.) Here are some AWS cloud-specific steps to implement in order to ensure the Build Server is setup in resilient way.
-
Build server installations maintain a number of “seats” or licenses which are loaned to workers and released after the build process is done; however, the build server is bound to number of cores on the instance, as well as the network interface’s MAC address. This means that once you “bind” seats to an instance of Build Server and you need to launch it on a new instance, if the number of cores or network interface do not match, you will lose your seats. In order to avoid such a problem, you’ll need to provision an additional ENI, attach it to the instance, and use its MAC address to bind Build Server to that ENI’s address. Once that is done, you can launch new instances from AMIs with Build server, attach the ENI, and your licenses are secure and assigned.
-
To ensure that the process is automated, set up an autoscaling group (ASG) with the Build Server AMI— a single instance—and set it to attach the specific ENI to any new instance each time it is launched.
-
For a multi-AZ setup, you need two separate build servers with their own distinct seat groups.
-
You can expose Build Server via AWS Service Endpoint by setting up a Network Load Balancer in front of the Build Server instance’s ASG and providing a link to the endpoint to your consumers.
-
Unity editor within workers need to be configured in order to connect to Build server. This can be achieved by providing configuration file each time a Docker container is started via Jenkinsfile. Configuration might look like the following:
{
    "licensingServiceBaseUrl": "\{http(s)://\{server dns name}}",
    "enableEntitlementLicensing": true,
    "enableFloatingApi": true,
    "clientConnectTimeoutSec": 5,
    "clientHandshakeTimeoutSec": 10
}
and the file should be saved as '/usr/share/unity3d/config/services-config.json' of the container. The License server DNS name can be stored in Secrets Manager.
End of Unity Part
EC2 Mac and Secrets Manager
In order to build and sign iOS applications, we need an EC2 Mac instance. To launch an Amazon EC2 Mac instance, you must first allocate a dedicated host in Amazon EC2. A dedicated host is a physical server that is wholly allocated for your use. Please keep in mind that currently EC2 Mac dedicated hosts cannot be released earlier than 24 hours after being launched. There is no restriction on how often you can launch an EC2 Mac instance on a dedicated host, however. Depending on the architecture (mac1 for x86, mac2 for Apple silicon), you will need different dedicated hosts.

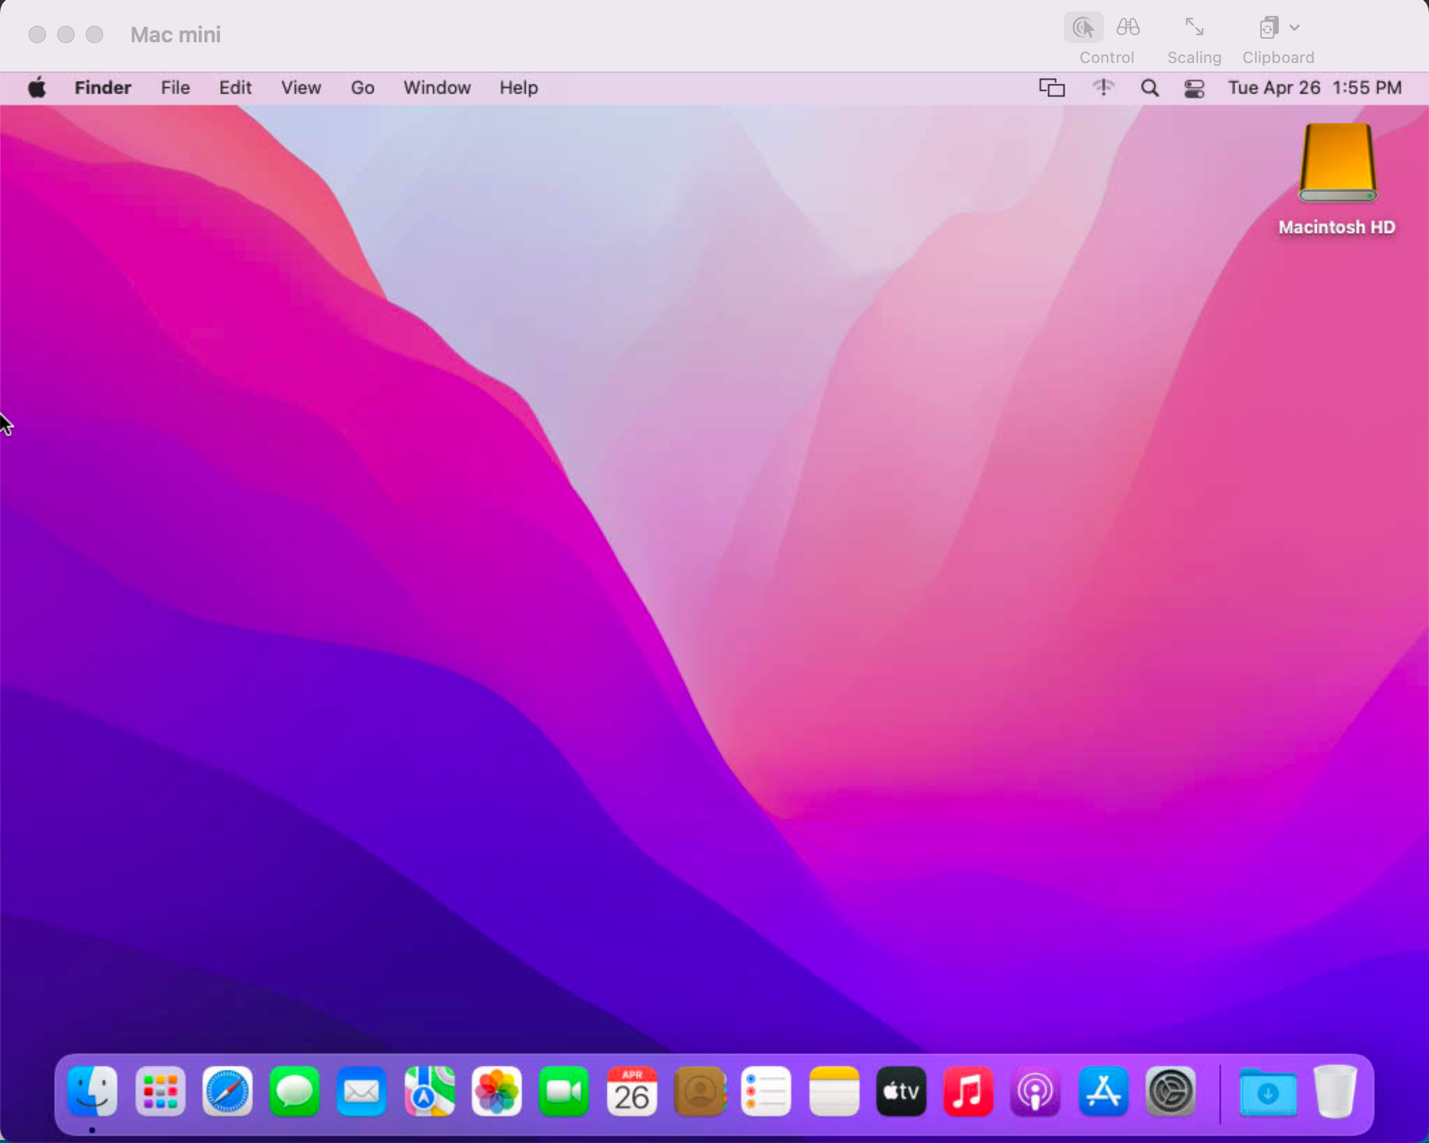
Once the instance is launched, you will need to enable VNC to connect to it via the graphical user interface (GUI). That process is described here.
EC2 Mac instances use most of the same tools that you have already been using with other EC2 instances. These instances live in the VPC, support IAM, support user data, and can boot from EBS volumes, so you can create golden AMIs with all the required software installed; for example, Xcode. EC2 Mac instances can be configured by Systems Manager, for example to install patches. It is also integrated with Cloudwatch for logs. Basically, treat it the same as any EC2 instance that you need to configure and then use as a part of the unattended CI/CD pipeline to run your builds.
In our case, the instance also needs to have Java and Xcode installed, as well as an IAM role to call to other services, such as Amazon Secrets Manager.
Build signing and AWS Secrets Manager
To sign the build for the App Store, we need to have a signing certificate and a provisioning profile. It is possible to also generate an application package that can later be signed by another certificate. This is common for companies that want to separate test environments’ certificates from their production environment.
The development certificate, its password, and the provisioning profile can be stored in AWS Secrets Manager, a great way to save your secrets and have secure access to resources.
To set up a temporary keychain with signature files, you can use either Fastlane or create the temporary keychain manually.
Linux worker instances
In order for Linux workers to be able to run build instructions from Jenkins, several features have to be enabled for Linux worker instances:
-
Docker engine and Java must be installed
-
The attached EBS storage has to be large enough to incorporate the docker images
-
The instance’s security group should allow communication from Jenkins Manager node port 22 (Manager node uses ssh to connect to the worker and setup agent)
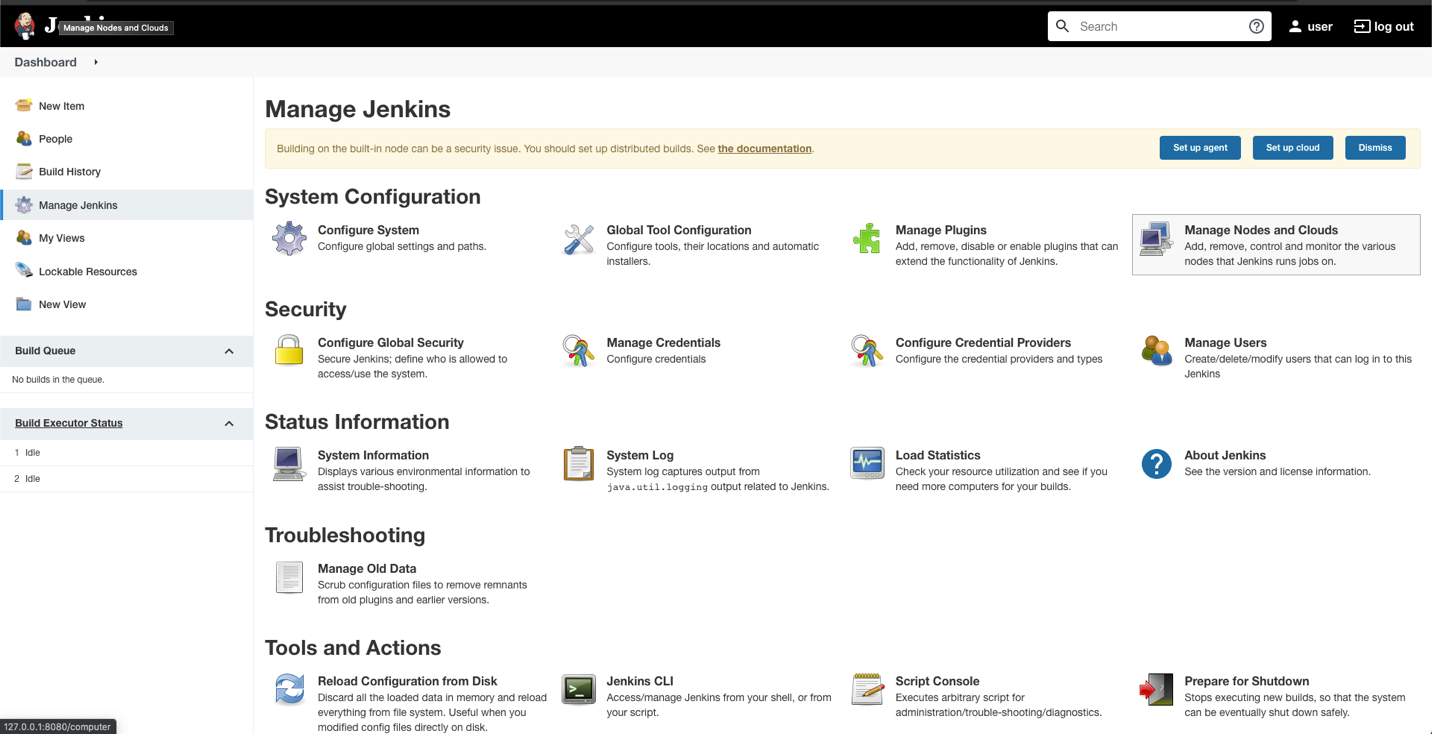
Jenkins setup
Jenkins uses a manager node to orchestrate builds. Build jobs will run either on EC2 Mac or on EC2 Spot instances managed by the EC2 Fleet plugin. Jenkins manager stores configurations, provides a user interface, and orchestrates build jobs. It can also store build artifacts, however I find it’s better to use Amazon S3 as it provides virtually unlimited storage, and can easily be used from within Jenkins pipeline.
In order to orchestrate Linux build instances, Jenkins needs the following plugins:
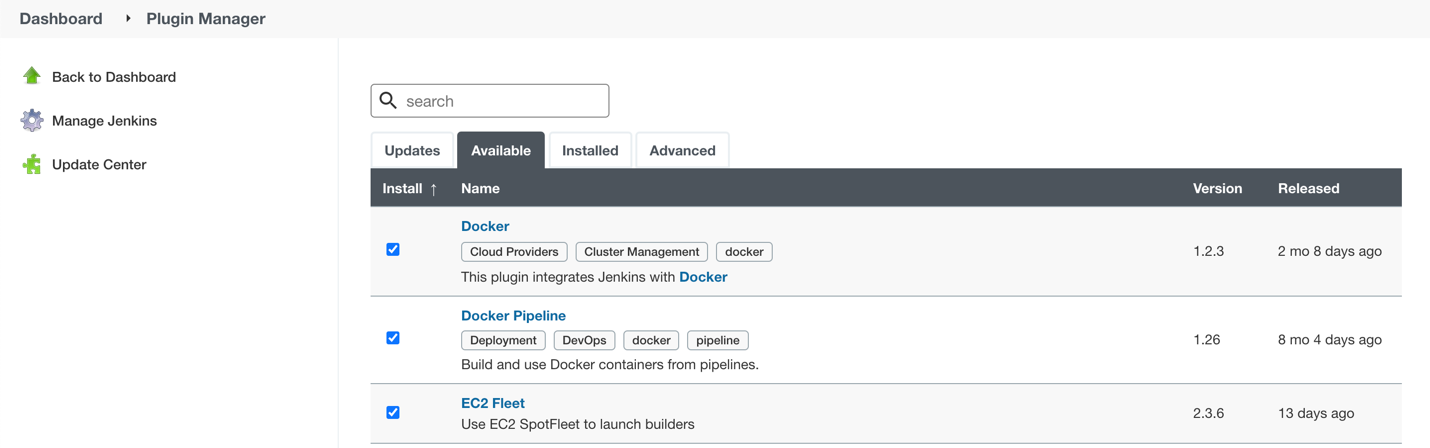
The Docker and Docker pipeline plugins allow us to run docker pipeline steps. These are required to launch Unity containers and run the first part of the build within.
The EC2 Fleet plugin allows for simple integration with Autoscaling groups, significantly reducing the overhead of launching new instances, starting a Jenkins agent, and running a build. The EC2 Fleet plugin is decoupled from the Auto Scaling group, which allows for full control of the kinds of instances to be launched. This way, we can utilize the full power of Spot instances as temporary workers, thus significantly reducing costs.
In order to orchestrate Mac instances, the instance has to have port 22 enabled as well as Java installed. You can add the instance manually, or launch it via CloudFormation or Terraform and use the self-registration method described here.
Please note that currently dynamic provisioning of EC2 Mac instances via Auto Scaling groups is not possible due to the minimum 24 hour reservation time for which an EC2 Mac dedicated host has to be reserved. However, we can use several Jenkins executors on a single EC2 Mac instance:
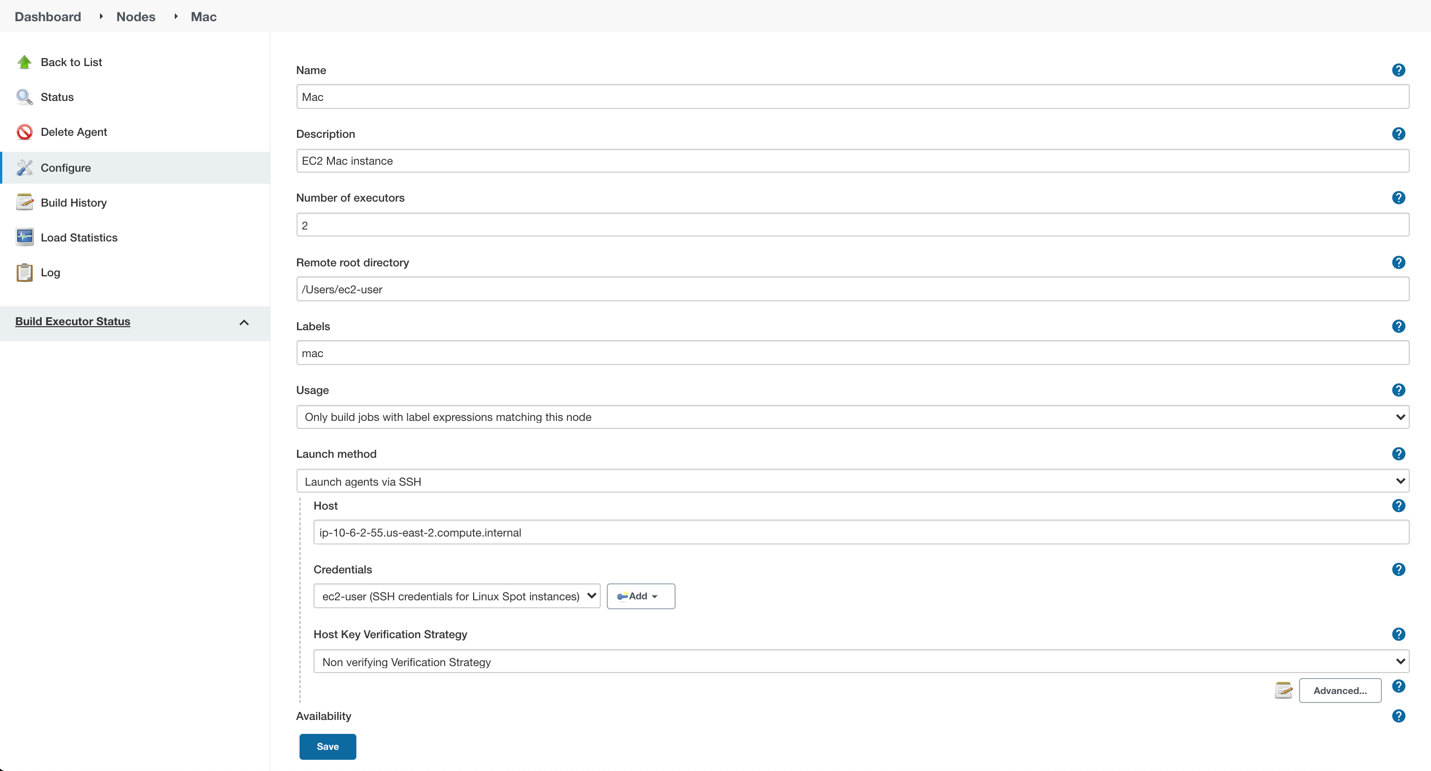
Also, labels can be used in order to separate kinds of workers within a pipeline. Note that on a screenshot above I use label “mac”.
Build pipeline and running a build
Every Jenkins pipeline can be described using a Jenkinsfile file. It is a YAML-formatted document which describes all the steps for the pipeline. You can read more here. I already have such a file stored in my repository. The file contents are following:
Click to reveal the Jenkinsfile
pipeline {
    agent none

    environment {
        UNITY_PROJECT_DIR='UnityProjectSample'
        IMAGE='unityci/editor'
        UNITY_VERSION='2021.3.6f1-ios-1.0'
        // Build parameters
        UNITY_LICENSE_FILE='UNITY_LICENSE_FILE'
        PROVISIONING_PROFILE_NAME='UnityBuildSample-profile'
        // secret from Secrets Manager
        TEAM_ID_KEY='TEAM_ID'
        LICENSE_SERVER_ENDPOINT='LICENSE_SERVER_ENDPOINT'
        SIGNING_CERT='SIGNING_CERT'
        SIGNING_CERT_PRIV_KEY='SIGNING_CERT_PRIV_KEY'
        SIGNING_CERT_PRIV_KEY_PASSPHRASE='SIGNING_CERT_PRIV_KEY_PASSPHRASE'
        APPLE_WWDR_CERT='APPLE_WWDR_CERT'
        PROVISIONING_PROFILE='PROVISIONING_PROFILE'
    }

    stages {
        stage('build Unity project on spot') {
            agent {
                docker {
                    image 'unityci/editor:2021.3.6f1-ios-1.0'
                    args '-u root:root'
                }
            }
            steps {
                // install stuff for Unity, build xcode project, archive the result
                sh '''
                    printenv
                    echo "===Installing stuff for unity"
                    apt-get update
                    apt-get install -y curl unzip zip
                    curl "https://awscli.amazonaws.com/awscli-exe-linux-x86_64.zip" -o
                    "awscliv2.zip"
                    unzip -o awscliv2.zip
                    ./aws/install
                    apt-get install sudo
                    # Following section can be uncommented if Unity Build server is used
                    # just to push it through
                    # sudo mkdir -p /usr/share/unity3d/config/
                    # endpoint=`aws secretsmanager get-secret-value \
                    # --secret-id $LICENSE_SERVER_ENDPOINT --output text --query
                    # 'SecretString' | cut -d '"' -f4`
                    # configfile='\{
                    # "licensingServiceBaseUrl": "'$endpoint'",
                    # "enableEntitlementLicensing": true,
                    # "enableFloatingApi": true,
                    # "clientConnectTimeoutSec": 5,
                    # "clientHandshakeTimeoutSec": 10
                    # }'
                    # Copying Unity .ulf license file from S3 to container
                    # aws s3 cp "s3://$\{S3_BUCKET}/Unity_2021.3.6f1-ios-1.0.ulf"
                    # "/root/.local/share/unity3d/Unity/Unity_lic.ulf"
                    # mkdir -p "/root/.local/share/unity3d/Unity"
                    # aws secretsmanager get-secret-value --secret-id $UNITY_LICENSE_FILE
                    # --output text --query SecretBinary |
                    # base64 -d > "/root/.local/share/unity3d/Unity/Unity_lic.ulf"
                    # echo "===Building Xcode project"
                    # We also pull in additional repository with actual Unity Project.
                    # We have several configuration files for our build configuration
                    # You can find those in UnityProjectSample folder
                    rm nodulus -rf
                    git clone https://github.com/Hyperparticle/nodulus.git
                    cp -nR nodulus/* UnityProjectSample/
                    cd $UNITY_PROJECT_DIR
                    mkdir -p ./iOSProj
                    mkdir -p ./Build/iosBuild
                    xvfb-run --auto-servernum --server-args='-screen 0 640x480x24' \
                        /opt/unity/Editor/Unity \
                        -quit \
                        -batchmode \
                        -nographics \
                        -executeMethod ExportTool.ExportXcodeProject \
                        -buildTarget iOS \
                        -customBuildTarget iOS \
                        -customBuildName iosBuild \
                        -customBuildPath ./Build/iosBuild \
                        -logFile /dev/stdout
                    echo "===Zipping Xcode project"
                    zip -r iOSProj iOSProj
                    '''
                    // pick up archive xcode project
                    dir("$\{env.UNITY_PROJECT_DIR}") {
                        stash includes: 'iOSProj.zip', name: 'xcode-project'
                    }
                }
                post {
                    always {
                        sh "chmod -R 777 ."
                    }
                }
            }
            stage('build and sign iOS app on mac')\{
                // we don't need the source code for this stage
                options {
                    skipDefaultCheckout()
                }
                agent {
                    label "mac"
                }
                environment {
                    HOME_FOLDER='/Users/jenkins'
                    PROJECT_FOLDER='iOSProj'
                }
                steps {
                    unstash 'xcode-project'
                    sh '''
                    pwd
                    ls -l
                    # Remove old project and unpack a new one
                    rm -rf $\{PROJECT_FOLDER}
                    unzip iOSProj.zip
                    '''

                    // create export options file
                    writeFile file: "$\{env.PROJECT_FOLDER}/ExportOptions.plist", text: """
                    <?xml version="1.0" encoding="utf-8"?>
                    <!DOCTYPE plist PUBLIC "-//Apple//DTD PLIST 1.0//EN"
                    "http://www.apple.com/DTDs/PropertyList-1.0.dtd">
                    <plist version="1.0">
                        <dict>
                            <key>signingStyle</key>
                            <string>manual</string>
                        </dict>
                    </plist>
                """

                sh '''
                PATH=$PATH:/usr/local/bin
                cd $\{PROJECT_FOLDER}
                # Update project settings
                # sed -i "" 's|^#!/bin/sh|#!/bin/bash|' MapFileParser.sh
                # extra backslash for groovy
                TEAM_ID=`aws secretsmanager get-secret-value \
                    --secret-id $TEAM_ID_KEY --output text --query 'SecretString' | cut -d '"' -f4`
                # extra backslash for groovy
                sed -i "" "s/DEVELOPMENT_TEAM = \\"\\"/DEVELOPMENT_TEAM = $TEAM_ID/g" Unity-iPhone.xcodeproj/project.pbxproj
                #############################################
                # setup certificates in a temporary keychain
                #############################################

                echo "===Setting up a temporary keychain"
                pwd
                # Unique keychain ID
                MY_KEYCHAIN="temp.keychain.`uuidgen`"
                MY_KEYCHAIN_PASSWORD="secret"
                security create-keychain -p "$MY_KEYCHAIN_PASSWORD" "$MY_KEYCHAIN"
                # Append the temporary keychain to the user search list
                # double backslash for groovy
                security list-keychains -d user -s "$MY_KEYCHAIN" $(security list-keychains -d user | sed s/\\"//g)
                # Output user keychain search list for debug
                security list-keychains -d user
                # Disable lock timeout (set to "no timeout")
                security set-keychain-settings "$MY_KEYCHAIN"
                # Unlock keychain
                security unlock-keychain -p "$MY_KEYCHAIN_PASSWORD" "$MY_KEYCHAIN"
                echo "===Importing certs"
                # Import certs to a keychain; bash process substitution doesn't work with security for some reason
                aws secretsmanager get-secret-value --secret-id $SIGNING_CERT --output text --query SecretBinary | base64 -d -o /tmp/cert && security -v import /tmp/cert -k "$MY_KEYCHAIN" -T "/usr/bin/codesign"
                rm /tmp/cert
                PASSPHRASE=`aws secretsmanager get-secret-value \
                    --secret-id $SIGNING_CERT_PRIV_KEY_PASSPHRASE --output text --query 'SecretString' | cut -d '"' -f4`
                aws secretsmanager get-secret-value --secret-id $SIGNING_CERT_PRIV_KEY --output text --query SecretBinary |
base64 -d -o /tmp/priv.p12 &&
                security -v import /tmp/priv.p12 -k "$MY_KEYCHAIN" -P "$PASSPHRASE" -t priv -T "/usr/bin/codesign"
                rm /tmp/priv.p12; PASSPHRASE=''
                #aws secretsmanager get-secret-value --secret-id $APPLE_WWDR_CERT --output text --query SecretBinary | \
                # base64 -d -o /tmp/cert &&
                # security -v import /tmp/cert -k "$MY_KEYCHAIN"
                # rm /tmp/cert
                # Dump keychain for debug
                security dump-keychain "$MY_KEYCHAIN"
                # Set partition list (ACL) for a key
                security set-key-partition-list -S apple-tool:,apple:,codesign: -s -k $MY_KEYCHAIN_PASSWORD $MY_KEYCHAIN
                # Get signing identity for xcodebuild command
                security find-identity -v -p codesigning $MY_KEYCHAIN
                # double backslash for groovy
                CODE_SIGN_IDENTITY=`security find-identity -v -p codesigning $MY_KEYCHAIN | awk '/ *1\\)/ \{print $2}'`
                echo code signing identity is $CODE_SIGN_IDENTITY
                security default-keychain -s $MY_KEYCHAIN
                #############################################
                # setup provisioning profile
                #############################################
                echo ===setting up a provisioning profile
                pwd
                # # if the provisioning profile already exists, don't overwrite
                # PROV_PROFILE_FILENAME="$\{HOME}/Library/MobileDevice/Provisioning Profiles/$\{PROVISIONING_PROFILE_NAME}.mobileprovision"
                # if [ ! -f "$PROV_PROFILE_FILENAME" ]; then
                # aws secretsmanager get-secret-value --secret-id $PROVISIONING_PROFILE --output text --query SecretBinary | \
                # base64 -d -o "$\{PROV_PROFILE_FILENAME}"
                # fi
                # # lock, since multiple jobs can use the same provisioning profile
                # if [ -f "$\{PROV_PROFILE_FILENAME}.lock" ]; then
                # n=`cat "$\{PROV_PROFILE_FILENAME}.lock"`
                # n=$((n+1))
                # else
                # n=1
                # fi
                # echo $n > "$\{PROV_PROFILE_FILENAME}.lock"
                #############################################
                # Build
                #############################################
                echo ===Building
                pwd
                # xcodebuild -scheme Unity-iPhone -sdk iphoneos -configuration AppStoreDistribution archive -archivePath "$PWD/build/Unity-iPhone.xcarchive" CODE_SIGN_STYLE="Manual" PROVISIONING_PROFILE_SPECIFIER_APP="$PROVISIONING_PROFILE_NAME" CODE_SIGN_IDENTITY=$CODE_SIGN_IDENTITY OTHER_CODE_SIGN_FLAGS="--keychain=$MY_KEYCHAIN" -UseModernBuildSystem=0
                xcodebuild -scheme Unity-iPhone -sdk iphoneos -configuration AppStoreDistribution archive -archivePath "$PWD/build/Unity-iPhone.xcarchive" CODE_SIGN_STYLE="Manual" CODE_SIGN_IDENTITY=$CODE_SIGN_IDENTITY OTHER_CODE_SIGN_FLAGS="--keychain=$MY_KEYCHAIN" -UseModernBuildSystem=0 CODE_SIGNING_REQUIRED=NO CODE_SIGNING_ALLOWED=NO
                # Generate ipa
                echo ===Exporting ipa
                pwd
                # xcodebuild -exportArchive -archivePath "$PWD/build/Unity-iPhone.xcarchive" -exportOptionsPlist ExportOptions.plist -exportPath "$PWD/build"
                #############################################
                # Upload
                #############################################
                # Upload to S3
                # /usr/local/bin/aws s3 cp ./build/*.ipa s3://$\{S3_BUCKET}/
                #############################################
                # Cleanup
                #############################################
                # Delete keychain - should be moved to a post step, but this would require a global variable or smth
                security delete-keychain "$MY_KEYCHAIN"
                # Delete a provisioning profile if no jobs use it anymore
                n=0
                if [ -f "$\{PROV_PROFILE_FILENAME}.lock" ]; then
                n=`cat "$\{PROV_PROFILE_FILENAME}.lock"`
                n=$((n-1))
                echo $n > "$\{PROV_PROFILE_FILENAME}.lock"
                fi
                if [ "$n" -le "0" ]; then
                rm -f "$\{PROV_PROFILE_FILENAME}"
                rm -f "$\{PROV_PROFILE_FILENAME}.lock"
                fi
                '''
            }
            post {
                always {
                    sh '''
                    #############################################
                    # cleanup
                    #############################################
                    zip -r iOSProj/build/Unity-iPhone.zip iOSProj/build/Unity-iPhone.xcarchive
                    rm -rf iOSProj/build/Unity-iPhone.xcarchive
                    '''
                    archiveArtifacts artifacts: '**/Unity-iPhone.zip', onlyIfSuccessful: true, caseSensitive: false
                }
            }
        }
    }
    post {
        success {
            echo 'Success ^_^'
        }
        failure {
            echo 'Failed :('
        }
    }
}
The key pieces of the file:
-
agent – describes which instances the build should run on. In my case label “mac” is used to separate EC2 Mac instances from Spot instances
-
environment – describes environment variables used by the build
-
stage(‘Name’) – describes separate stage
-
docker – describes docker image that is pulled and is later used to run Unity build in
-
xvfb-run /opt/unity/Editor/Unity – runs unity editor in headless mode within a container
-
security create-keychain – creates private keychain to store secrets like signing certificate. The keychain is later deleted.
-
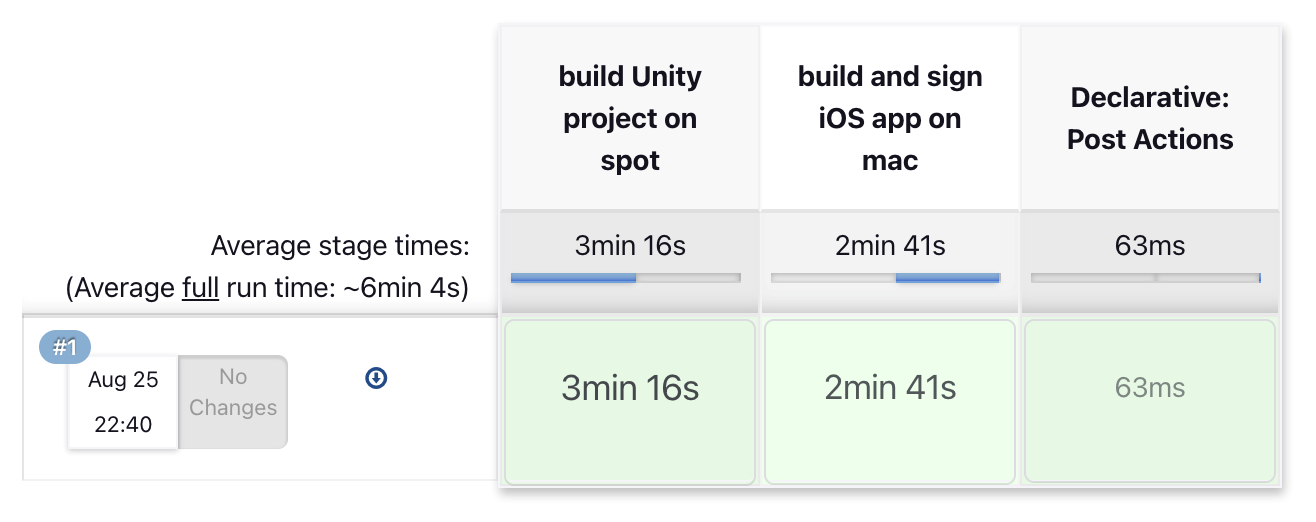
To pass Artifacts between stages, Jenkins` stash function is used
And once done, the basic pipeline should look like the following:
Final architecture
Once the all the key pieces mentioned in this post are assembled, the final picture is as following:
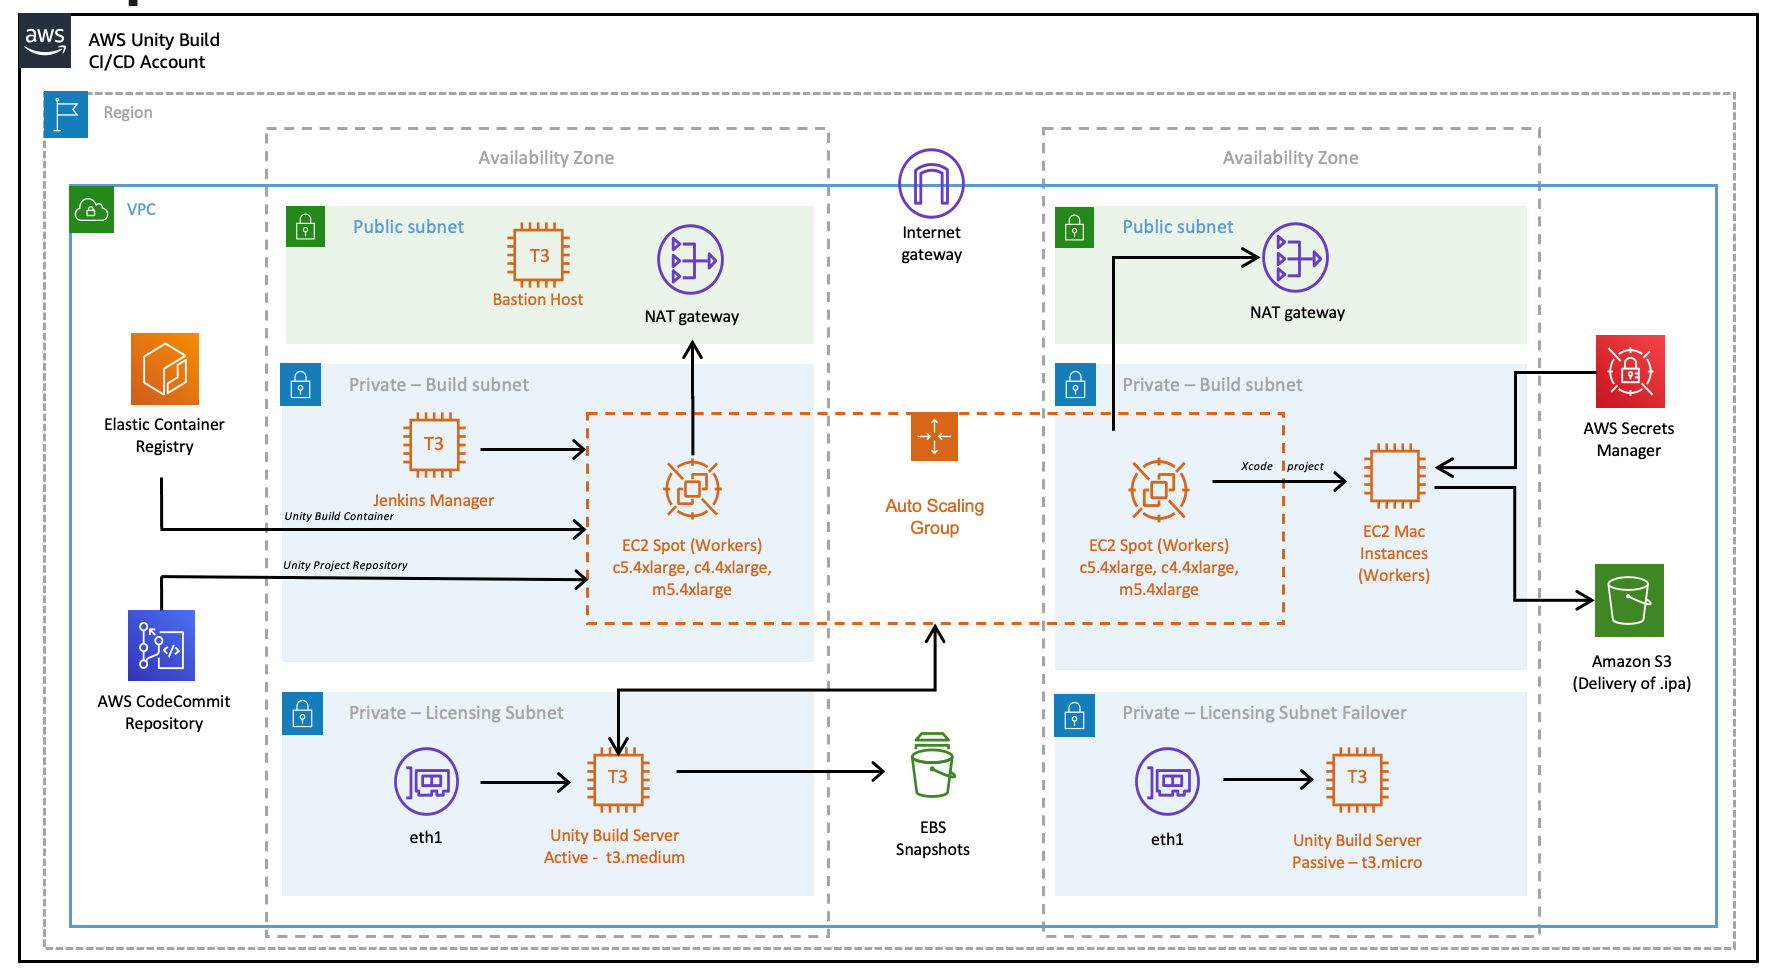
Also refer to the full diagram with additional details explained. For this diagram, we assume that code and Docker images are located within the AWS account as well, to reduce data transfer charges and improve latency.
Main solution benefits and costs
There are several factors that are important to consider when building this solution:
-
Unity version control.
This solution allows for flexible control of which Unity version is used for the build. By simply using tagging for Docker images, the pipeline can run different versions of Unity without changing the configuration of the pipeline in general. -
Flexible Xcode version control
By utilizing AMI images for EC2 Mac, it is possible to build a library of iOS and preinstalled Xcode versions to quickly launch on EC2 Mac hosts. This process can be further automated by using tools like Packer or EC2 Image Builder to create AMIs for different versions of environments. -
Cost benefits when using Spot instances and using less Mac instances
Since this solution implements a split-build approach, it allows us to take 30 to 70% of the computing time from EC2 Mac instances. This allows for better parallelization of builds and reduces time required by the EC2 Mac instance to process the code, resulting in much faster builds in general. Spot instances are also used instead of on-demand instances. Thus, depending on a build, the approach can reduce the cost by around 30-40%. -
It is also possible to setup “layers” of EC2 Mac instances by using several Macs for development and production builds separately, this allows for secure separation of environments.
-
Automatization of the pipeline via versioned Jenkinsfiles and Amazon CloudFormation templates allows for consistent and controllable approach to build environments.
Conclusion
This post explains key pieces of the of cost-effective Unity build pipeline. It utilizes a mechanism of separation of the build to Linux instances and EC2 Mac instances. The compute-heavy part can be done on cost-efficient Spot instances, which reduces load to Mac instances and allows for more parallel builds at a time. We went through Unity and iOS build environments, key elements, licensing, workers and overall CI/CD process automation with Jenkins.
This approach has already been adopted by our Game tech clients: https://aws.amazon.com/ec2/instance-types/mac/customers/ - Riot Games, Pokemon Company and others. The pipelines speed being improved up to 400% (Pokemon Company), Improving management time (Riot games) and reduced complexity (Jamcity).
We will be speaking more on this topic at the Jenkins Contributor Summit, on September 27 at DevOps World in Orlando, Florida. Hope to see you there!
Suggested tags: Amazon Game Development, Amazon EC2 Mac, AWS for Games, AWS game development, AWS Game Tech, Unity
About the authors