MPL - Modular Pipeline Library

| This is a guest post by Sergei Parshev from Grid Dynamics, originally posted on the Grid Dynamics Blog. |
Despite speeding up development with deployment automation, one of our clients was experiencing slow time-to-market due to a lack of collaboration in DevOps. While they had invested in DevOps, every production pipeline was set up individually, forcing teams to remake the wheel for each project. Making matters worse, there was no cross-team collaboration, so any bug in the platform was present in each new pipeline. Many of our clients have similar issues, so we decided that we should develop a common tool which would both help current clients, and be adaptable for use in the future. While the most obvious option was standardizing the CI/CD platform with a common framework, this led to a monolithic structure, which was inflexible and ultimately unworkable. Since each team needed to work on their own pipelines, we developed a solution that would store each reusable part of the DevOps pipeline for later use: a Jenkins-powered modular pipeline library.
Solution: a modular pipeline library
The modular pipeline library (MPL) we created is a highly-flexible shared library for a Jenkins Pipeline that enables easy sharing of best practices across the entire company. It has a clear modular structure, an advanced testing framework, multi-level nesting, a pipeline configuration system, improved error handling, and many other useful components.
We will take a look under the hood and explain how our solution works in several parts:
-
Explore the technologies and tools we used to build the MPL
-
Review the MPL, and illustrate why it’s effective
-
Follow a step-by-step guide to operate the MPL on a sample pipeline
-
Dive into some of the more important components of the solution, such as the test framework and nested libraries
So now let’s jump right into an explanation of the crucial features we used to build our solution.
Building the MPL with shared libraries and Jenkins pipelines
Jenkins, our main automation platform, recently received some updates to Jenkins Pipeline. These updates allow us to create one Jenkinsfile that describes the entire pipeline, and the steps that need to be executed with a series of self-explanatory scripts. This increases the visibility of CI/CD automation processes for end users, and improves supportability by DevOps teams.
However, there’s a large issue with Pipeline: it’s hard to support multiple Jenkinsfiles (and therefore multiple projects) with unique pipelines. We need to store the common logic somewhere, which is where Jenkins Shared Libraries come in. They are included in the Jenkinsfile, and allow the use of prepared interfaces to simplify automation and store common pieces.
While shared libraries allow you to store logic and manipulate Jenkins, they don’t provide a good way to utilize all the common information. Therefore, the MPL optimizes the pipeline and shared libraries by allowing users to create easy-to-follow descriptions for processes, which are then stored for later use by other teams.
The MPL works to create collaborative DevOps processes across teams
With the MPL, we are now able to collaborate and share our DevOps practices across teams, easily adopt existing pipelines for specific projects, and debug and test features before we actually integrate them into the library. Each team can create a nested library, add a number of pipelines and modules inside, and use it with pipeline automation to create great visibility of the processes for the end user. The MPL can also work on any project to prepare a Jenkinsfile, and manage it as flexibly as the project team wants.
At its core, the MPL provides a simple way to:
-
Separate pipelines and steps by introducing modules
-
Describe steps in the modules with an easy configuration interface
-
Test the described modules and share the results with other pipelines and projects
There are a lot of other features in the MPL, but it’s essentially a platform to solve general DevOps collaboration issues. To simplify development and manual testing, the MPL provides modules overriding and an inheritance model, allowing users to test specific fixes in the project without affecting anything else. In Jenkins, a module is a file with scripted steps and logic to reach a simple goal (build an artifact, run tests, create an image, etc.). These modules are combined in the pipeline stages, and are easily readable for anyone who knows the Jenkins Pipeline syntax.
The MPL allows users to use the core features of the library (structure, modules, pipelines) and create nested libraries for specific DevOps team needs. A DevOps team can prepare complete pipelines with any custom logic and use it for their projects. They can also override and inherit the core MPL modules in a number of ways, or prepare custom modules which are easy to share with other teams. Check out the infographic below to see how modules fit in:
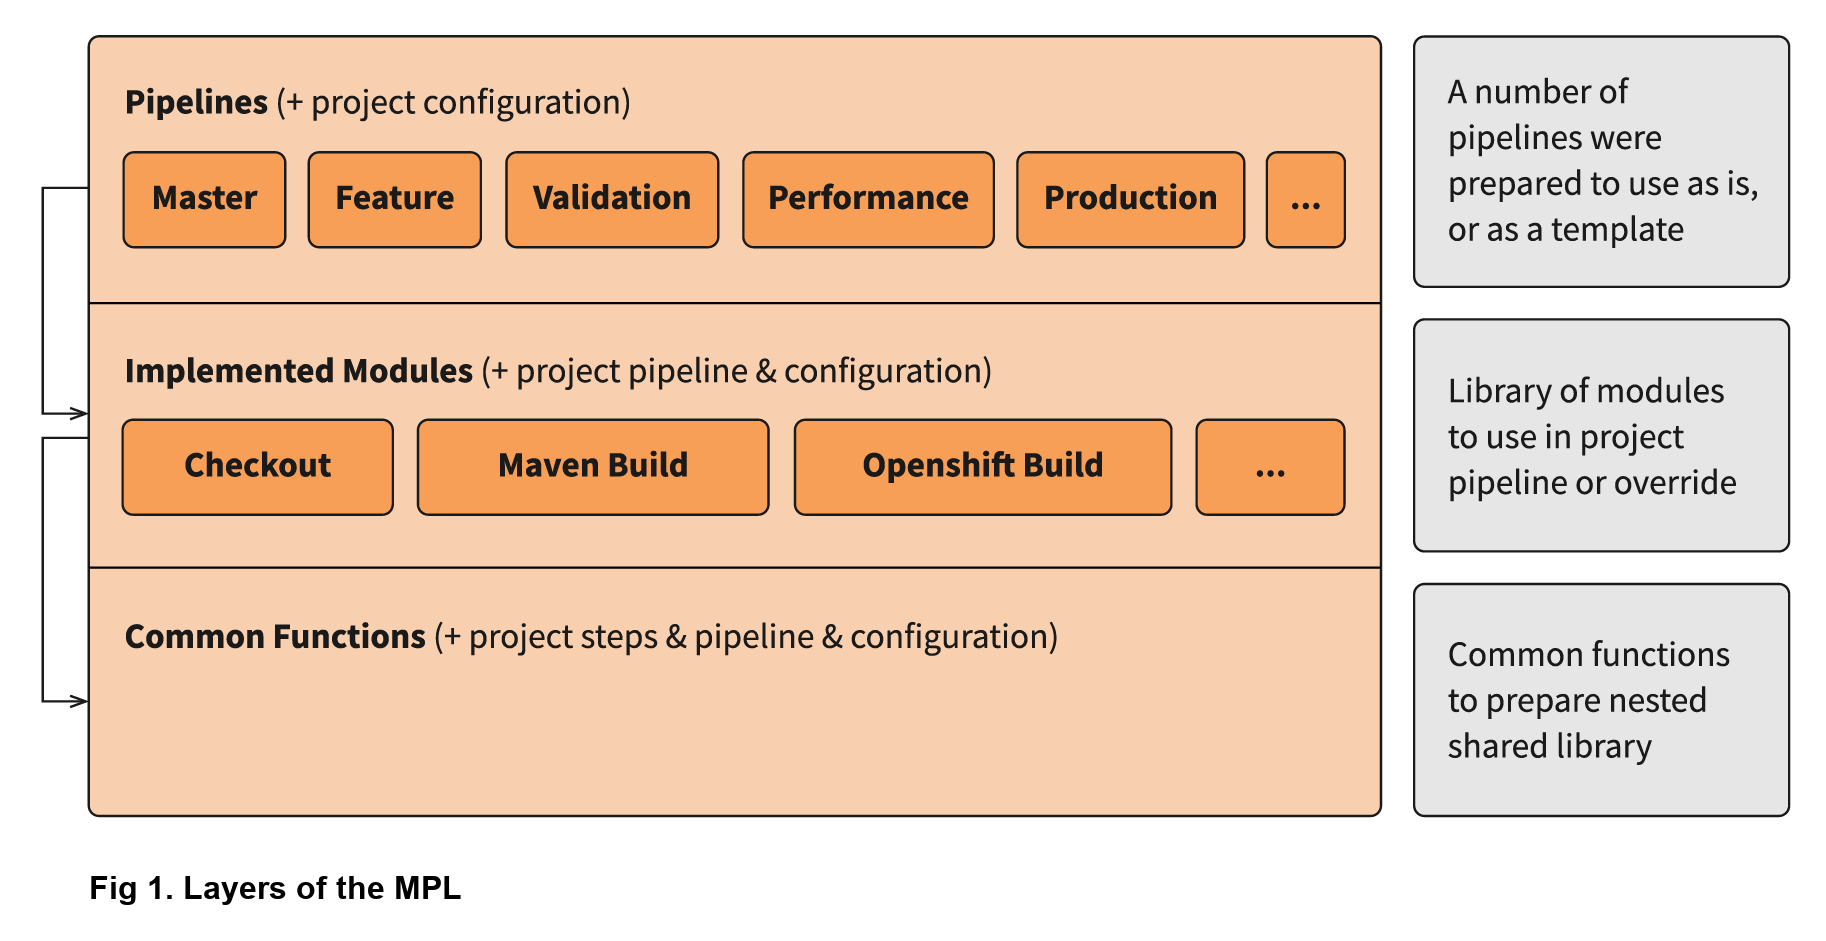
You can also specify certain pipeline required poststeps in a module. For example, a dynamic deployment module creates the test environment, which needs to be destroyed when the pipeline ends. To take a closer look at the MPL calling process, check out the infographic below:
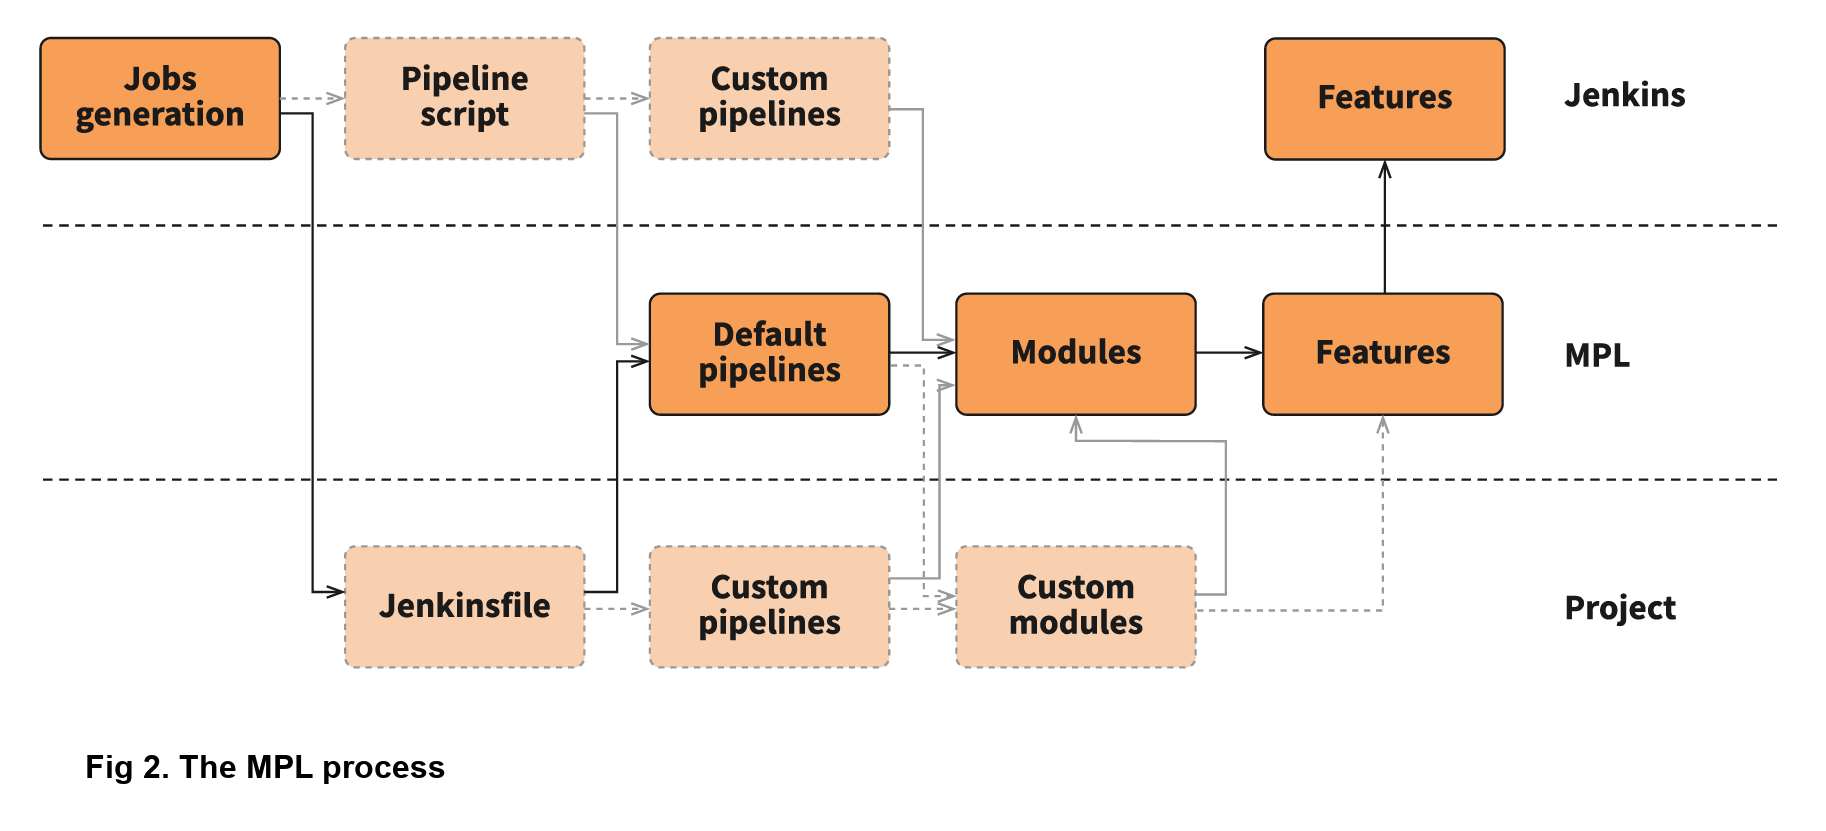
This infographic shows how calls are executed in the MPL. First, you need a job on your Jenkins, which will call a Jenkinsfile (for example, when the source code is changed), after which the Jenkinsfile will call a pipeline. The pipeline could be described on the MPL side, in the pipeline script in the job, in the nested library, or in the project Jenkinsfile. Finally, the stages of the pipeline will call the modules, and these modules will use features, which could be groovy logic, pipeline steps, or steps in the shared libraries.
Now that we’ve done an overview of the solution, let’s take a look at a simple pipeline execution to see how the MPL works in action.
An example of a pipeline execution in the MPL
For example, let’s say you have a common Java Maven project. You are creating a
Jenkinsfile in the repo, and want to use the default pipeline prepared by your
DevOps team. The MPL already has a simple pipeline: the core MPLPipeline. It’s
a really simple pipeline, but it’s a good start for anyone who wants to try the
MPL. Let’s look at a simple Jenkinsfile:
@Library('mpl') _
MPLPipeline {}
This Jenkinsfile contains a single line to load the MPL, and another line to run
the pipeline. Most of the shared libraries implement an interface like this,
calling one step and providing some parameters. MPLPipeline is merely a custom
Pipeline step, as it lies in the vars directory, and its structure is very
simple, following these steps:
-
Initialize the MPL
The MPL uses theMPLManagersingleton object to control the pipeline -
Merge configuration with default and store it
A default configuration needed to specify stages and predefine some useful configs -
Define a declarative pipeline with 4 stages and poststeps:
-
Checkout - Getting the project sources
-
Build - Compiling, validation of static, unit tests
-
Deploy - Uploading artifacts to the dynamic environment and running the app
-
Test - Checking integration with other components
-
Poststeps - Cleaning dynamic environment, sending notifications, etc.
-
-
Running the defined pipeline
This is where the MPL starts to work its magic and actually runs
Stages of the main MPL usually have just one step, the MPLModule.
This step contains the core functionality of the MPL: executing the modules
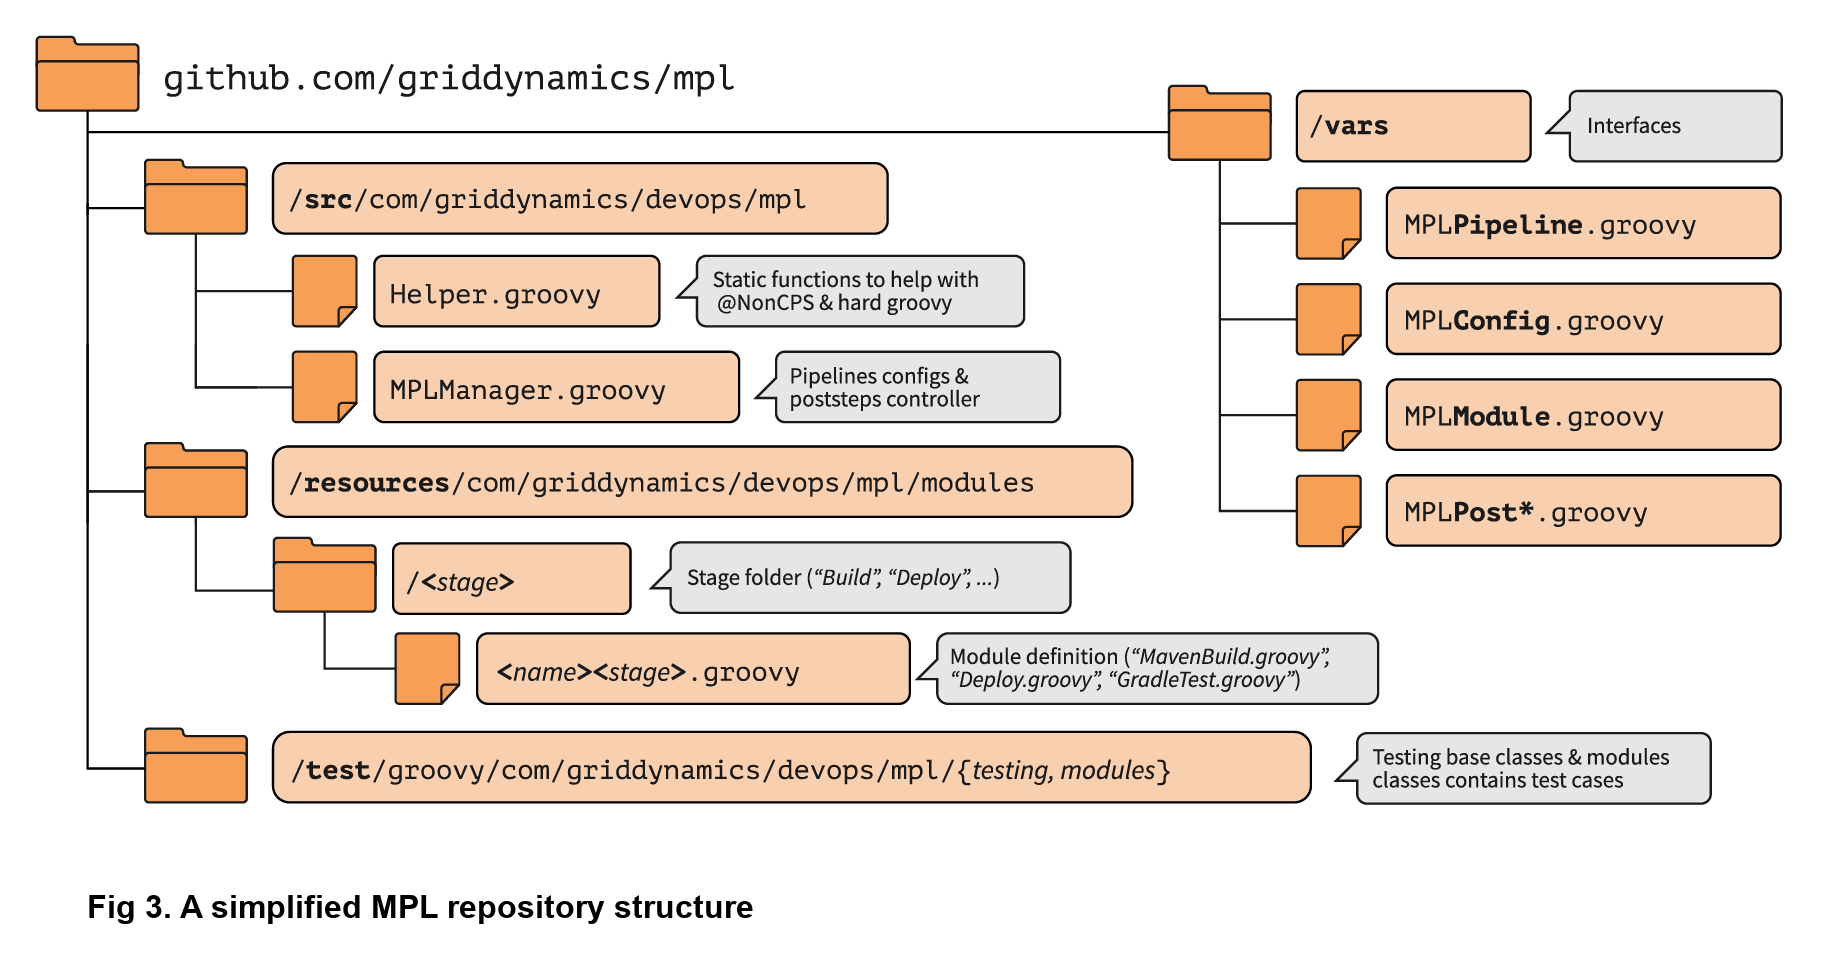
which contain the pipeline logic. You can find default modules in the MPL
repository, which are placed in resources/com/griddynamics/devops/mpl/modules.
Some of the folders include: Checkout, Build, Deploy, and Test, and in each of
them we can find Groovy files with the actual logic for the stages. This
infographic is a good example of a simplified MPL repository
structure:
When the Checkout stage starts, MPLModule loads the module by name (by default
a stage name), and runs the Checkout/Checkout.groovy
logic:
if( CFG.'git.url' )
  MPLModule('Git Checkout', CFG)
else
  MPLModule('Default Checkout', CFG)
If the configuration contains the git.url option, it will load a Git Checkout
module; otherwise, it will run the Default Checkout module. All the called
modules use the same configuration as the parent module, which is why CFG was
passed to the MPLModule call. In this case, we have no specific configuration,
so it will run the
Checkout/DefaultCheckout.groovy
logic. The space in the name is a separator to place the module into a specific
folder.
In the Default Checkout module, there is just one line with checkout scm
execution, which clones the repository specified in the Jenkins job. That’s all
the Checkout stage does, as the MPL functionality is excessive for such a small
stage, and we only need to talk about it here to show how the MPL works in
modules.
The same process applies to the Build stage, as the pipeline runs the Maven Build module:
withEnv(["PATH+MAVEN=${tool(CFG.'maven.tool_version' ?: 'Maven 3')}/bin"]) {
  def settings = CFG.'maven.settings_path' ? "-s '${CFG.'maven.settings_path'}'" : ''
  sh """mvn -B ${settings} -DargLine='-Xmx1024m -XX:MaxPermSize=1024m' clean install"""
}
This stage is a little bit more complicated, but the action is simple: we take
the tool with the default name Maven 3, and use it to run mvn clean install.
The modules are scripted pipelines, so you can do the same steps usually
available in the Jenkins Pipeline. The files don’t need any specific and
complicated syntax, just a plain file with steps and CFG as a predefined
variable with a stage configuration. The MPL modules inherited the sandbox from
the parent, so your scripts will be safe and survive the Jenkins restart, just
like a plain Jenkins pipeline.
In the Deploy folder, we find the sample structure of the Openshift Deploy
module. Its main purpose here is to show how to use poststep definitions in the
modules:
MPLPostStep('always') {
  echo "OpenShift Deploy Decommission poststep"
}
echo 'Executing Openshift Deploy process'
First, we define the always poststep. It is stored in the MPLManager, and is
called when poststeps are executed. We can call MPLPostStep with always as
many times as we want: all the poststeps will be stored and executed in FILO
order. Therefore, we can store poststep logic for actions that need to be done,
and then undone, in the same module, such as the decommission of the dynamic
environment. This ensures that the actions will be executed when the pipeline
is complete.
After the deploy stage, the pipeline executes the Test stage, but nothing too interesting happens there. However, there is an aspect of testing which is very important, and that’s the testing framework of the MPL itself.
Testing of the MPL
The testing framework of the MPL is based on the JenkinsPipelineUnit from LesFurets, with the one small difference being its ability to test the MPL modules. Testing the whole pipeline doesn’t work, as pipelines can be really complicated, and writing tests for such monsters is a Sisyphean task. It is much easier to test a black box with a small amount of steps, ensuring that this particular task is working correctly.
In the MPL, you can find Build module testing examples: all the tests are
stored in the
test/groovy/com/griddynamics/devops/mpl/modules
directory, and you can find the
Build/BuildTest.groovy
file with a number of test cases there. Tests are executed during the MPL build
process, allowing users to see traces like this:
Loading shared library mpl with version snapshot
  MPLModule.call(Build, {maven={tool_version=Maven 2}})
    Build.run()
      Build.MPLModule(Maven Build, {maven.tool_version=Maven 2})
        MavenBuild.run()
          MavenBuild.tool(Maven 2)
          MavenBuild.withEnv([PATH+MAVEN=Maven 2_HOME/bin], groovy.lang.Closure)
            MavenBuild.sh(mvn -B  -DargLine='-Xmx1024m -XX:MaxPermSize=1024m' clean install)
      Build.fileExists(openshift)
The test runs the MPLModule with custom configuration and mocked steps to
check that, during execution, the tool was changed to Maven 2 according to the
provided configuration. We cover all test cases with such tests, ensuring that
the modules are working as expected, and that the pipeline will work properly.
You can test the whole pipeline if you want, but testing by modules is just an
additional way to simplify the testing process.
Now that we’ve looked at how to test the MPL modules, it’s time to look at one of the key features of the MPL, which is nested libraries.
The benefits of nested libraries
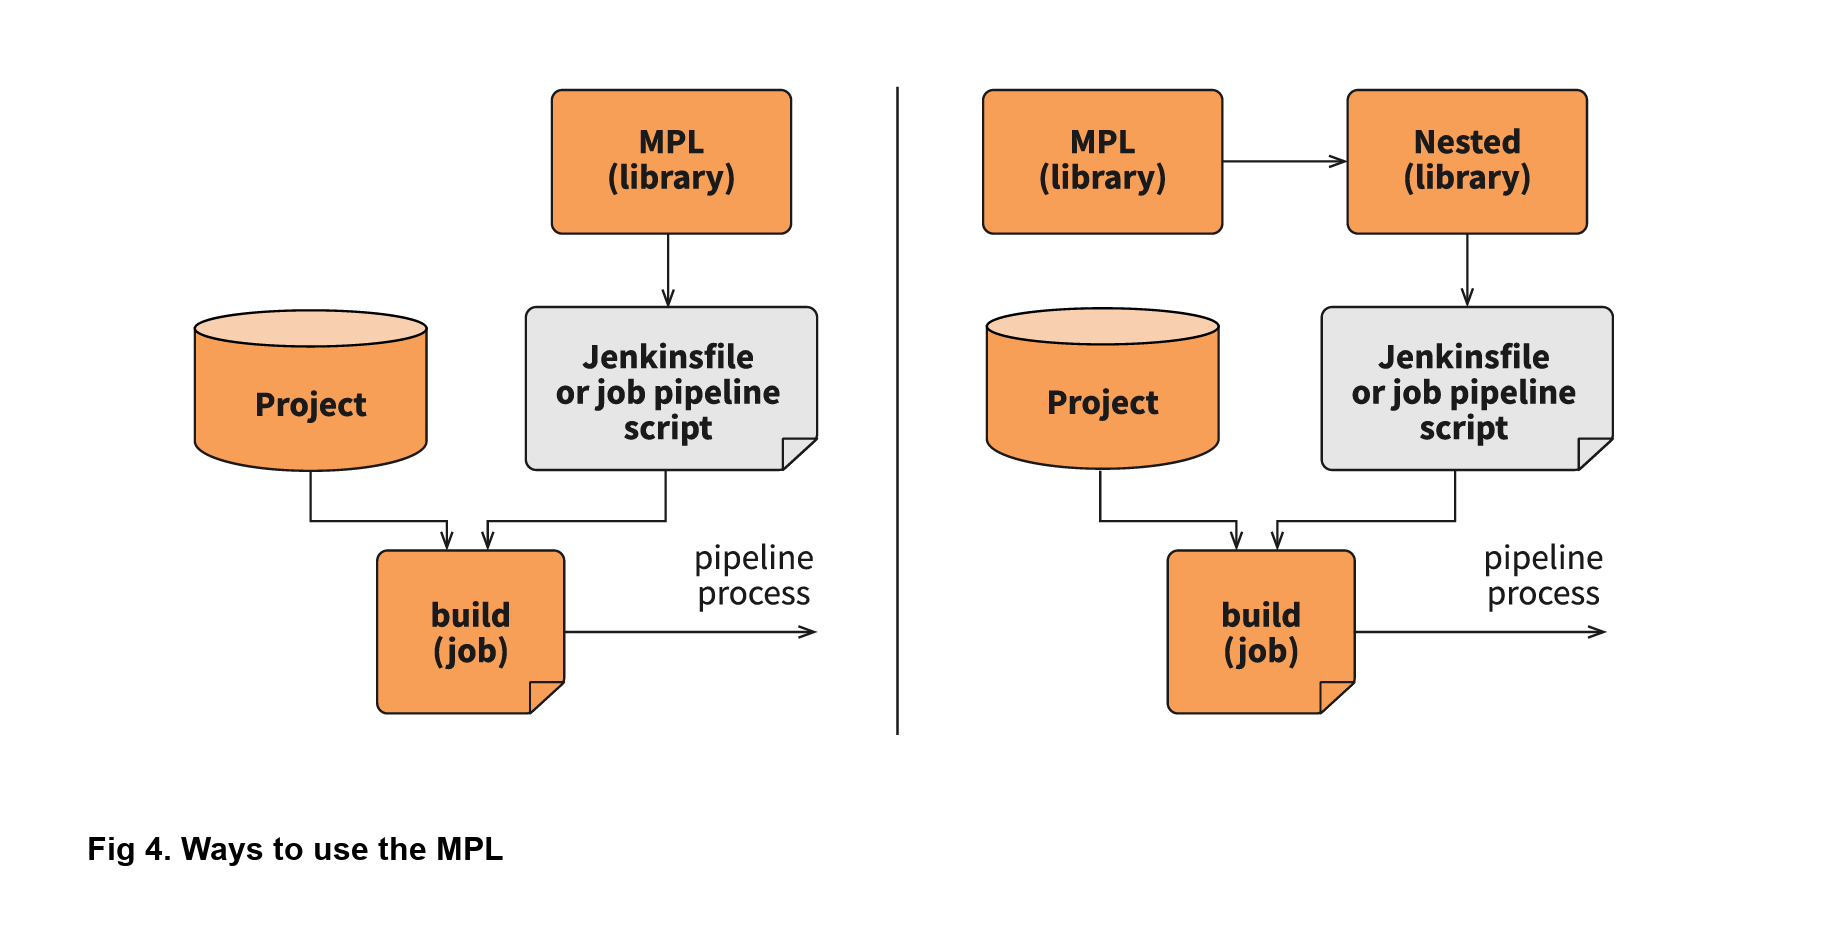
When working with a large company, supporting one big library makes no sense. Each department requires multiple configuration options and tuning for a somewhat standard pipeline, which creates extra work. The MPL solves such problems by introducing nested libraries. This infographic displays how a nested library compares to just using the main library:
A nested library is the same as a shared library that imports the MPL and uses its functionality, modules, and pipelines. Also, it allows the separation of some team-related logic from the company common logic. Here is the structure of the MPL with nested libraries:
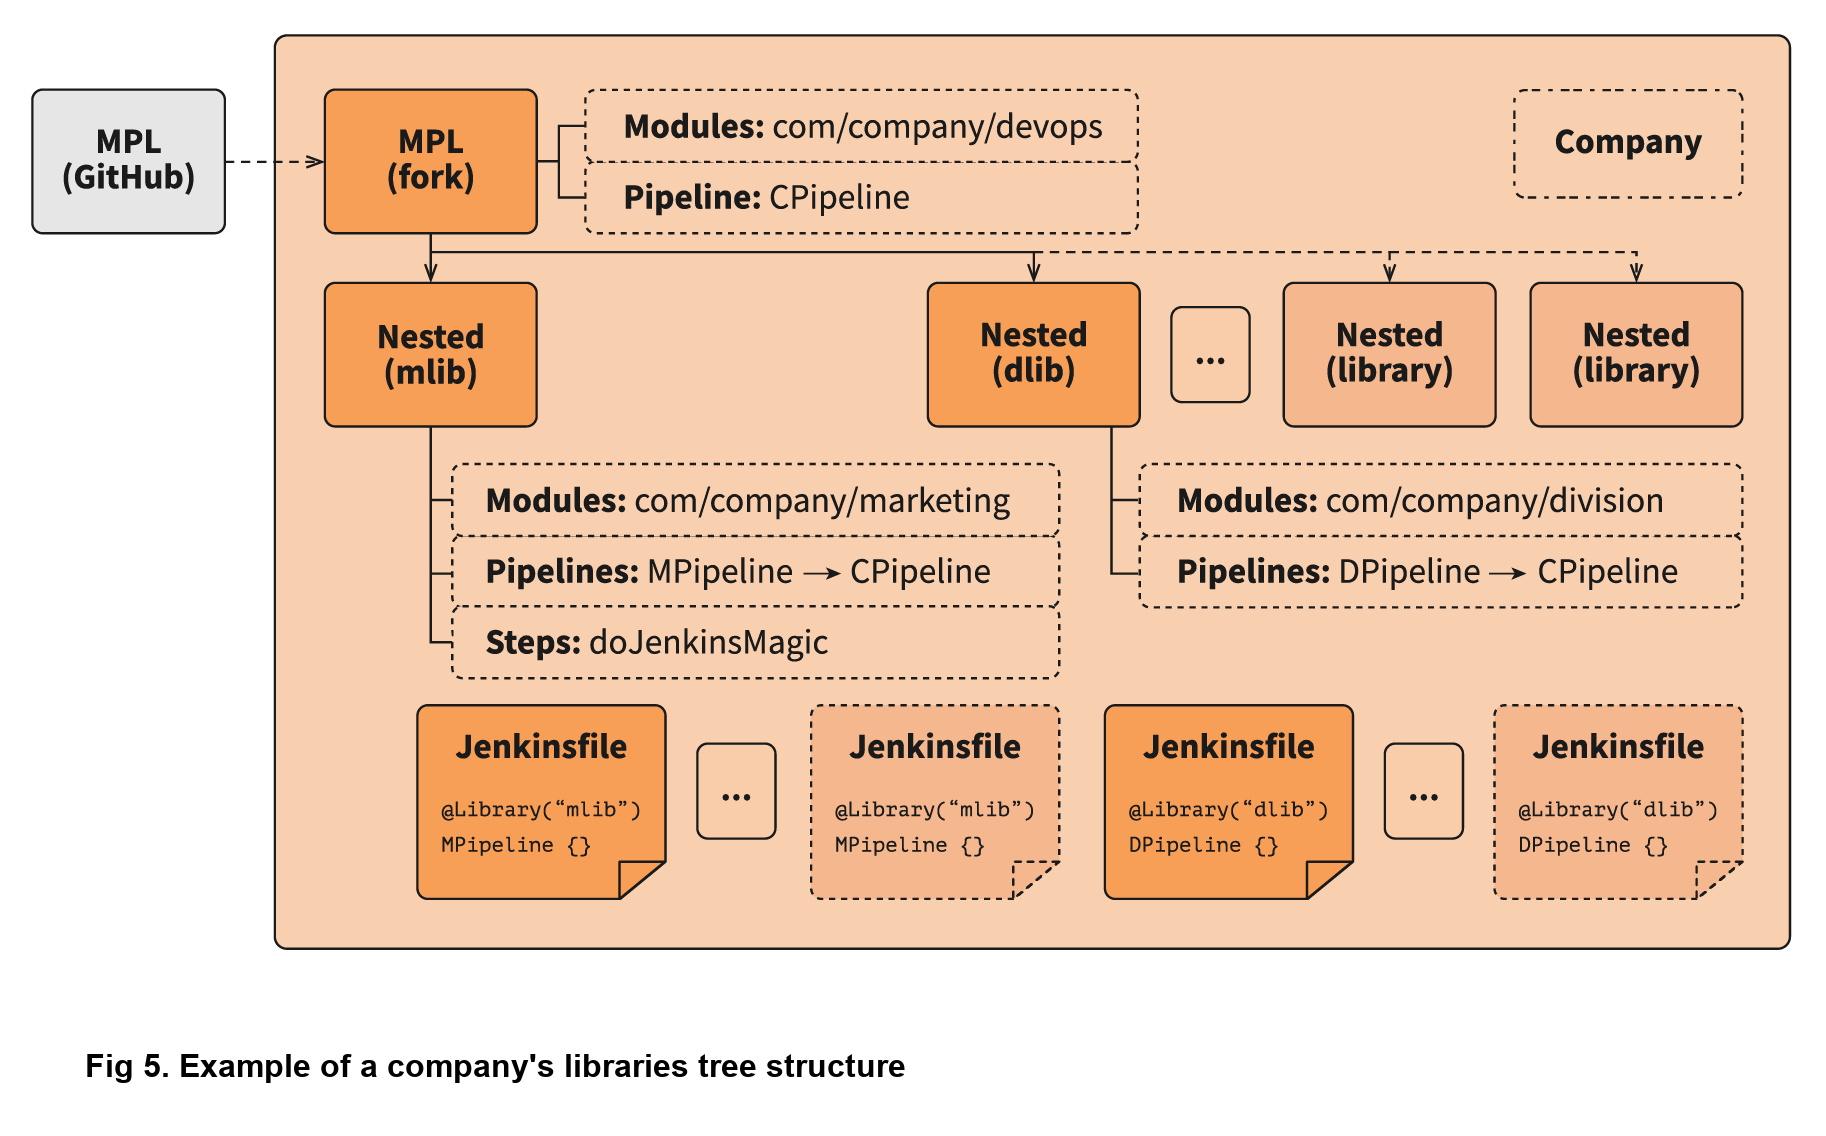
You can import the MPL in the overridden pipeline, specify the path of some additional modules, override module logic, and use Jenkins power moves: there are no limitations. When another team needs your unique module, you can just create a change request to the basic company MPL repo, and share your functional module with the others.
With nested libraries, it’s possible to debug and modify MPL-provided steps
(MPLModule for example) and pipelines. This is because nested libraries can
override low-level functionalities of the MPL or the Jenkins Pipeline. There are
no limitations to what you can or can’t change, as these overrides only affect
your own pipeline. This enables experimentation to be done, and then discussed
with other teams to see if it will work in other nested libraries as well.
There are also no limits to the number of nesting levels created, but we recommend using just two (MPL and nested), because additional levels make configuration and testing of the nested libraries on lower levels very complicated.
The power of module overriding
Further into the nested libraries or project-side modules, it’s possible to store a module with the same name as one in the upper-level library. This is a good way to override the logic - you can just replace Build/Build.groovy with your own - as the functional module will be executed instead of the upper-level module. For example, this infographic shows module overriding:
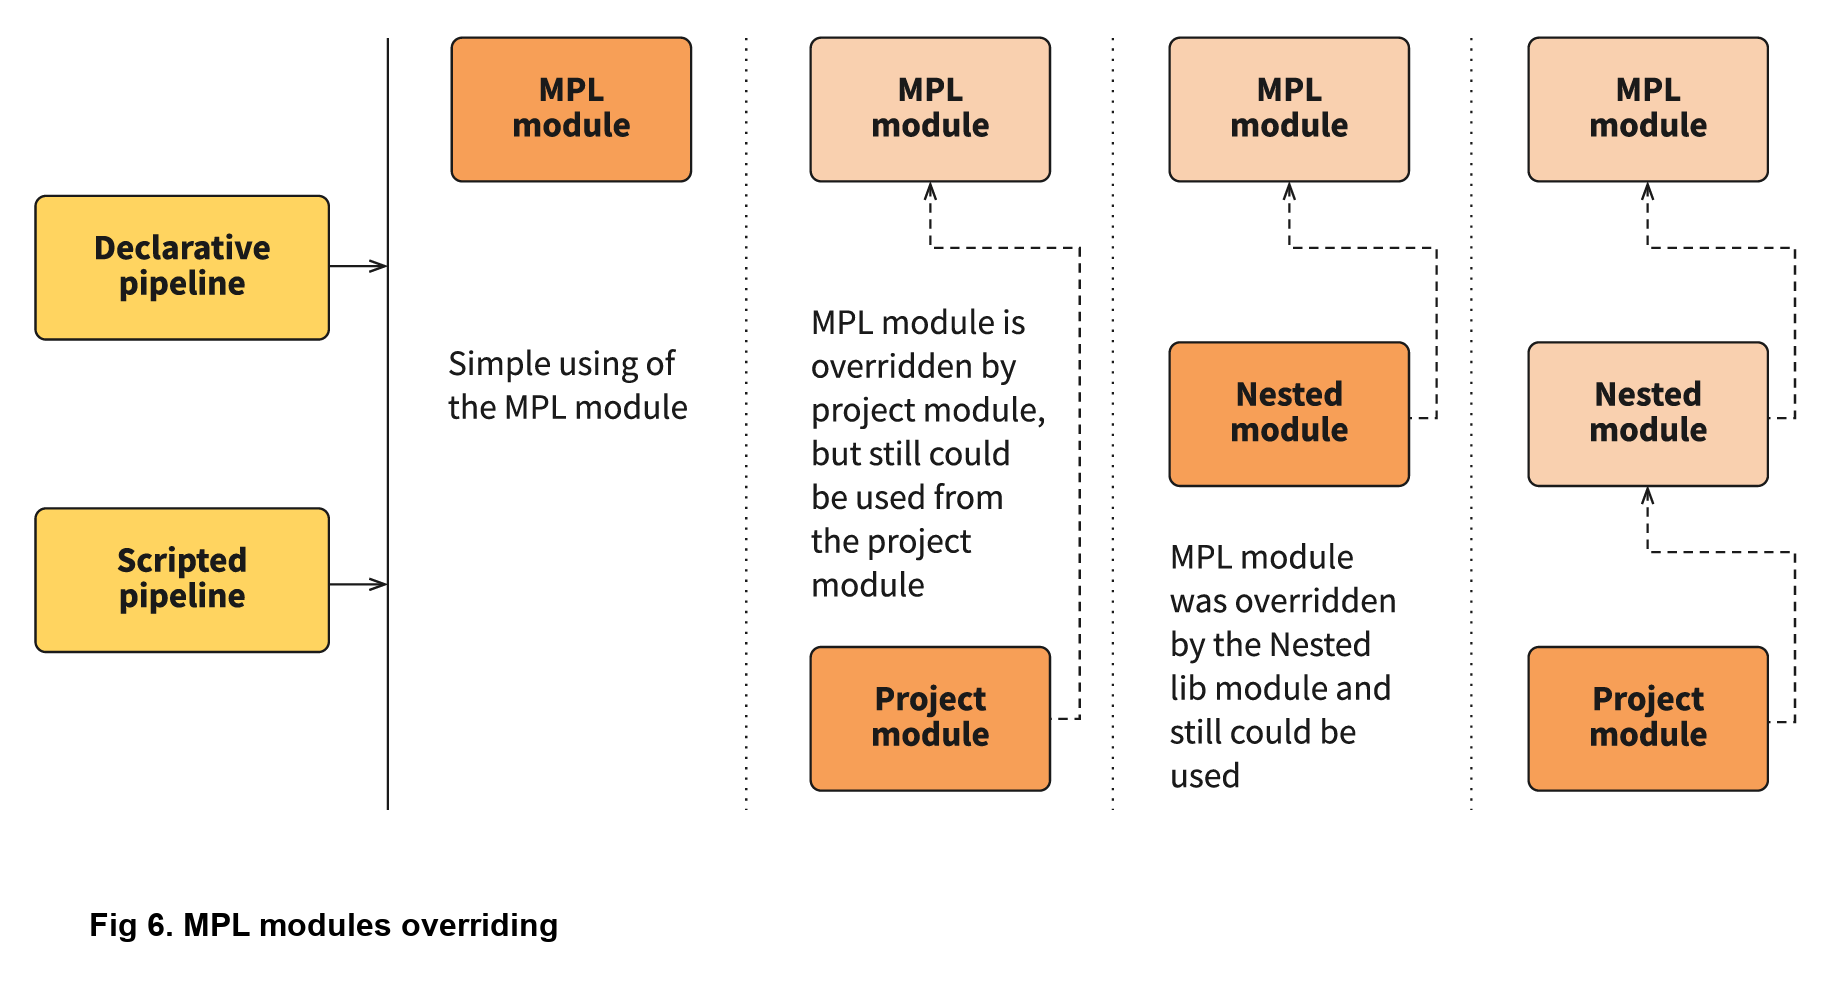
Even better, one of the strengths of the MPL is that you still can use the upper-level module! The MPL has mechanisms to prevent loops, so the same module can’t be executed in the same executing branch again. However, you can easily call the original module a name from another module to use the upper-level logic.
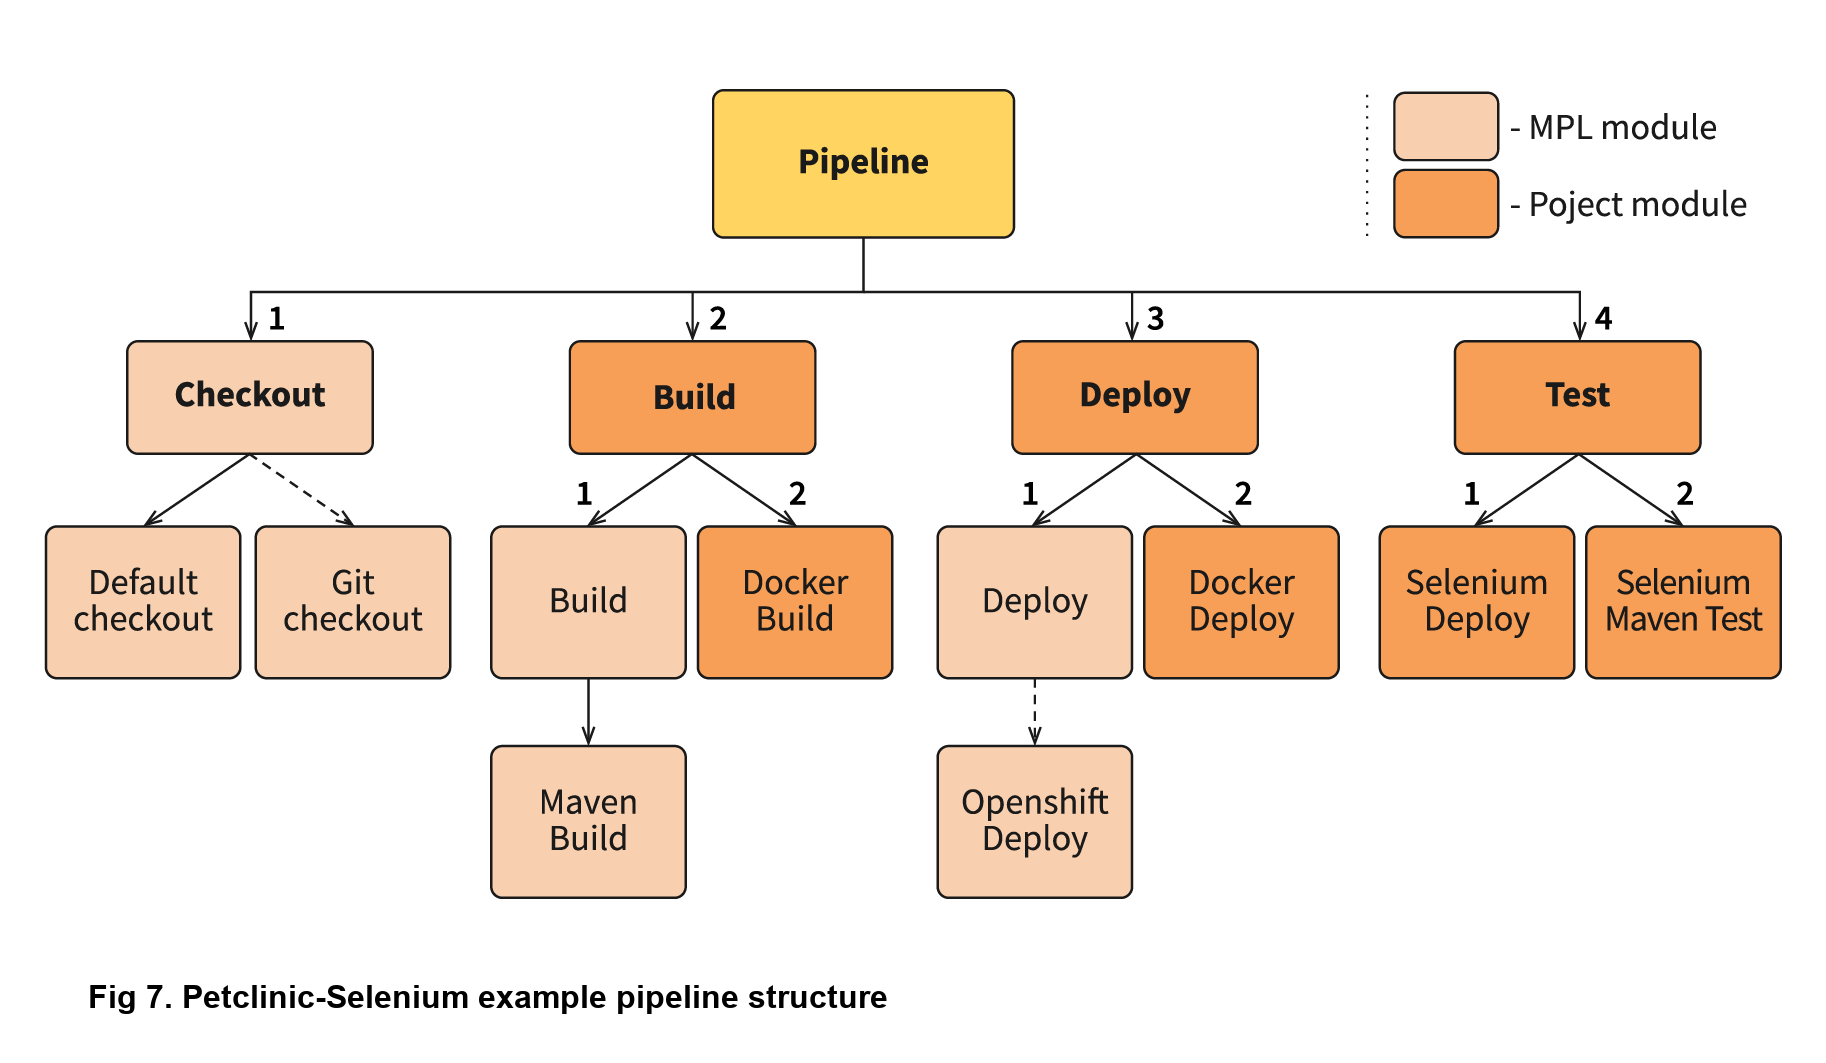
The Petclinic-Selenium example above uses the default MPLPipeline (you can
find it on the MPL Wiki-page), and
contains project-side modules in a .jenkins directory. These modules will be
called before the library modules. For example, the Checkout module is not
placed on the project side, so it will be called from the MPL, but the Build
module exists in a .jenkins directory on the project side, and it will be
called:
MPLPostStep('always') {
  junit 'target/surefire-reports/*.xml'
}

MPLModule('Build', CFG)

if( fileExists('Dockerfile') ) {
  MPLModule('Docker Build', CFG)
}
As you can see, the Build module from the project registers the poststep,
calls the original Build module from the MPL, and then calls the additional
Docker Build module. The following stages of the pipeline are more
complicated, but all module overriding essentially works like this. Some
projects can be tricky, and need some small tunings for the existing modules.
However, you can easily implement those changes on the project level, and think
about how to move the functionality to the nested library or MPL later.
Conclusion: what the MPL brings to DevOps
Many DevOps teams and companies work with bloated, restrictive, and buggy CI/CD automation platforms. These increase the learning curve for users, cause teams to work slower, and raise production costs. DevOps teams frequently run into similar issues on different projects, but a lack of collaboration means that they have to be individually fixed each time.
However, with the MPL, DevOps teams have a shared, simple, and flexible CI/CD platform to improve user support, collaboration, and overall project source code to the production process. By utilizing the MPL, your company can find an automation consensus, reach cross-company collaboration goals, and reuse the best practices from a large community, all with open source tools. If you’re interested in building an MPL, please contact us to learn more!
About the author