Refactoring a Jenkins plugin for compatibility with Pipeline jobs
| This is a guest post by Chris Price. Chris is a software engineer at Puppet, and has been spending some time lately on automating performance testing using the latest Jenkins features. |
In this blog post, I’m going to attempt to provide some step-by-step notes on how to refactor an existing Jenkins plugin to make it compatible with the new Jenkins Pipeline jobs. Before we get to the fun stuff, though, a little background.
How’d I end up here?
Recently, I started working on a project to automate some performance tests for my company’s products. We use the awesome Gatling load testing tool for these tests, but we’ve largely been handling the testing very manually to date, due to a lack of bandwidth to get them automated in a clean, maintainable, extensible way. We have a years-old Jenkins server where we use the gatling jenkins plugin to track the history of certain tests over time, but the setup of the Jenkins instance was very delicate and not easy to reproduce, so it had fallen into a state of disrepair.
Over the last few days I’ve been putting some effort into getting things more
automated and repeatable so that we can really maximize the value that we’re
getting out of the performance tests. With some encouragement from the fine
folks in the #jenkins IRC channel, I ended up exploring
the JobDSL
plugin and the new Pipeline jobs. Combining those two
things with some Puppet code to provision a Jenkins server via the
jenkins puppet module gave me
a really nice way to completely automate my Jenkins setup and get a seed job in
place that would create my perf testing jobs. And the Pipeline job format is
just an awesome fit for what I wanted to do in terms of being able to easily
monitor the stages of my performance tests, and to make the job definitions
modular so that it would be really easy to create new performance testing jobs
with slight variations.
So everything’s going GREAT up to this point. I’m really happy with how it’s all shaping up. But then… (you knew there was a "but" coming, right?) I started trying to figure out how to add the Gatling Jenkins plugin to the Pipeline jobs, and kind of ran into a wall.
As best as I could tell from my Googling, the plugin was probably going to require some modifications in order to be able to be used with Pipeline jobs. However, I wasn’t able to find any really cohesive documentation that definitively confirmed that or explained how everything fits together.
Eventually, I got it all sorted out. So, in hopes of saving the next person a little time, and encouraging plugin authors to invest the time to get their plugins working with Pipeline, here are some notes about what I learned.
Spoiler: if you’re just interested in looking at the individual git commits that I made on may way to getting the plugin working with Pipeline, have a look at this github branch.
Creating a pipeline step
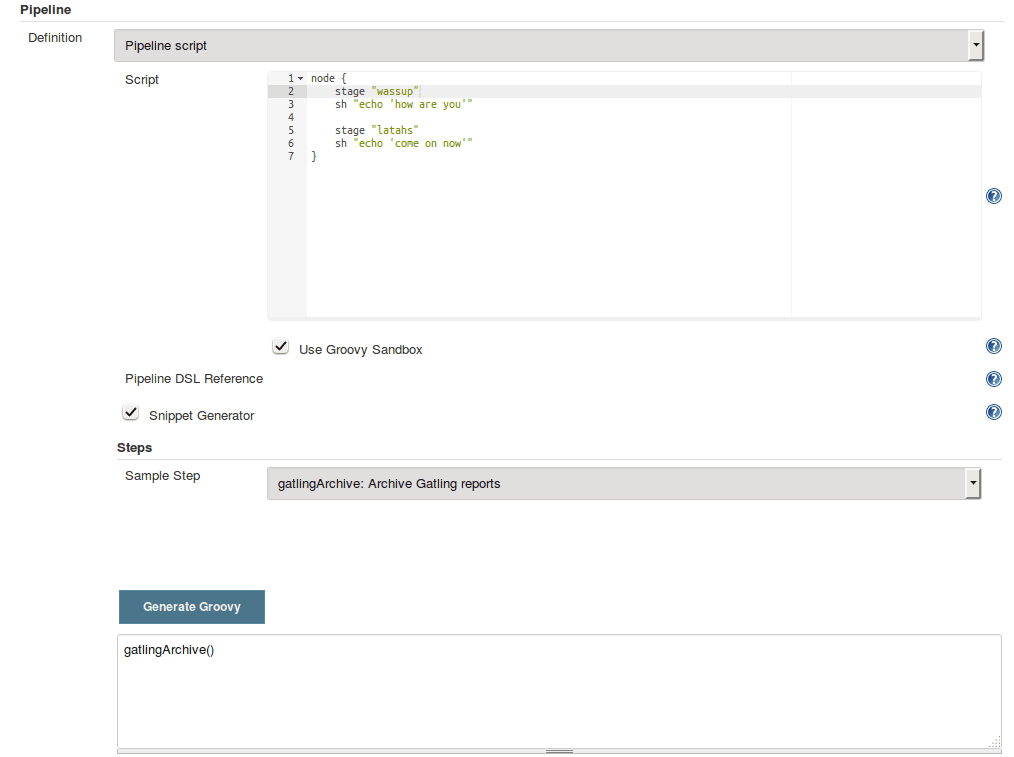
The main task that the Gatling plugin performs is to archive Gatling reports after a run. I figured that the end game for this exercise was that I was going to end up with a Pipeline "step" that I could include in my Pipeline scripts, to trigger the archiving of the reports. So my first thought was to look for an existing plugin / Pipeline "step" that was doing something roughly similar, so that I could use it as a model. The Pipeline "Snippet Generator" feature (create a pipeline job, scroll down to the "Definition" section of its configuration, and check the "Snippet Generator" checkbox) is really helpful for figuring out stuff like this; it is automatically populated with all of the steps that are valid on your server (based on which plugins you have installed), so you can use it to verify whether or not your custom "step" is recognized, and also to look at examples of existing steps.
Looking through the list of existing steps, I figured that the archive step
was pretty likely to be similar to what I needed for the gatling plugin:

So, I started poking around to see what magic it was that made that archive
step show up there. There are some mentions of this in the
pipeline-plugin
DEVGUIDE.md and the
workflow-step-api-plugin
README.md, but the real breakthrough for me was finding the definition of the
archive step in the workflow-basic-steps-plugin source
code.
With that as an example, I was able to start poking at getting a
gatlingArchive step to show up in the Snippet Generator. The first thing that
I needed to do was to update the gatling-plugin project’s pom.xml to depend
on a recent enough version of Jenkins, as well as specify dependencies on the
appropriate pipeline
plugins
Once that was out of the way, I noticed that the archive step had some tests
written for it, using what looks to be a pretty awesome test API for pipeline
jobs and plugins. Based on those archive
tests,
I added
a
skeleton for a test for the gatlingArchive step that I was about to write.
Then, I moved on to actually creating the step. The meat of the code was this:
public class GatlingArchiverStep extends AbstractStepImpl {
    @DataBoundConstructor
    public GatlingArchiverStep() {}

    @Extension
    public static class DescriptorImpl extends AbstractStepDescriptorImpl {
        public DescriptorImpl() { super(GatlingArchiverStepExecution.class); }

        @Override
        public String getFunctionName() {
            return "gatlingArchive";
        }

        @NonNull
        @Override
        public String getDisplayName() {
            return "Archive Gatling reports";
        }
    }
}
Note that in that commit I also added a config.jelly file. This is how you
define the UI for your step, which will show up in the Snippet Generator. In
the case of this Gatling step there’s really not much to configure, so my
config.jelly is basically empty.
With that (and the rest of the code from that commit) in place, I was able to
fire up the development Jenkins server (via mvn hpi:run, and note that you
need to go into the "Manage Plugins" screen on your development server and
install the Pipeline plugin once before any of this will work) and visit the
Snippet Generator to see if my step showed up in the dropdown:
GREAT SUCCESS!
This step doesn’t actually do anything yet, but it’s recognized by Jenkins and can be included in your pipeline scripts at that point, so, we’re on our way!
The step metastep
The step that we created above is a first-class DSL addition that can be used in
Pipeline scripts. There’s another way to make your plugin work usable from a
Pipeline job, without making it a first-class build step. This is by use of the
step "metastep", mentioned in the pipeline-plugin
DEVGUIDE.
When using this approach, you simply refactor your Builder or Publisher to
extend SimpleBuildStep, and then you can reference the build step from the
Pipeline DSL using the step method.
In the Jenkins GUI, go to the config screen for a Pipeline job and click on the Snippet Generator checkbox. Select 'step: General Build Step' from the dropdown, and then have a look at the options that appear in the 'Build Step' dropdown. To compare with our previous work, let’s see what "Archive the artifacts" looks like:
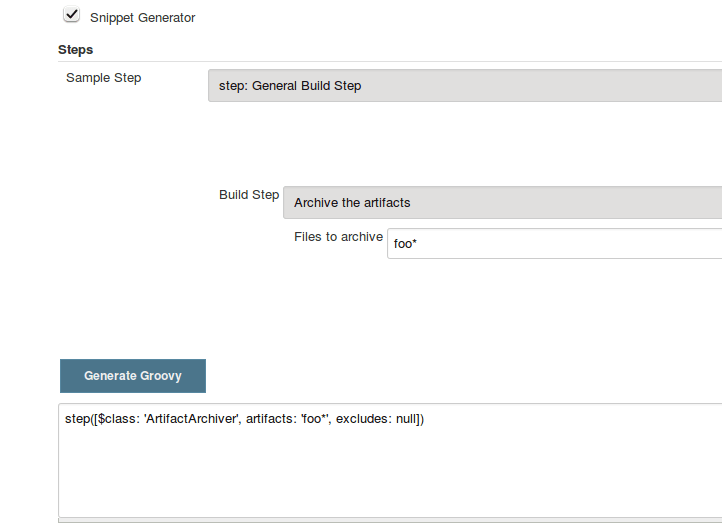
From the snippet generator we can see that it’s possible to trigger an Archive action with syntax like:
step([$class: 'ArtifactArchiver', artifacts: 'foo*', excludes: null])This is the "metastep". It’s a way to trigger any build action that implements
SimpleBuildStep, without having to actually implement a real "step" that
extends the Pipeline DSL like we did above. In many cases, it might only make
sense to do one or the other in your plugin; you probably don’t really need
both.
For the purposes of this tutorial, we’re going to do both. For a couple of reasons:
-
Why the heck not? :) It’s a good demonstration of how the metastep stuff works.
-
Because implementing the "for realz" step will be a lot easier if the Gatling action that we’re trying to call from our
gatlingArchive()syntax is using the newer Jenkins APIs that are required for subclasses ofSimpleBuildStep.
GatlingPublisher is the main build action that we’re interested in using in
Pipeline jobs. So, with all of that in mind, here’s our next goal: get
step([$class: 'GatlingPublisher', …) showing up in the Snippet Generator.
The javadocs for the SimpleBuildStep
class
have some notes on what you need to do when porting an existing Builder or
Publisher over to implement the SimpleBuildStep interface. In all
likelihood, most of what you’re going to end up doing is to replace occurrences
of AbstractBuild with references to the Run class, and replace occurrences
of AbstractProject with references to the Job class. The APIs are pretty
similar, so it’s not too hard to do once you understand that that’s the game.
There is some discussion of this in the pipeline-plugin
DEVGUIDE.
For the Gatling plugin, my
initial
efforts to port the GatlingPublisher over to implement SimpleBuildStep only
required the AbstractBuild → Run refactor.
After making these changes, I fired up the development Jenkins server, and, voila!
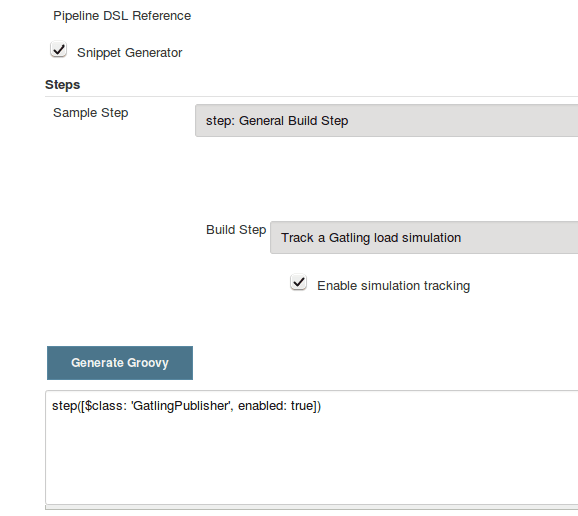
So, now, we can add a line like this to a Pipeline build script:
step([$class: 'GatlingPublisher', enabled: true])And it’ll effectively be the same as if we’d added the Gatling "Post-Build Action" to an old-school Freestyle project.
Well… mostly.
Build Actions vs. Project Actions
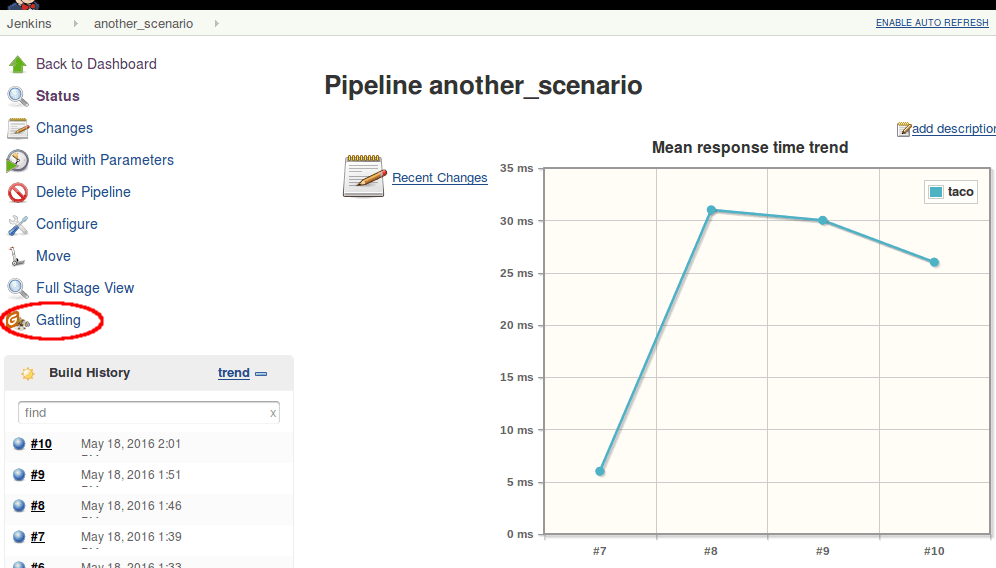
At this point our modified Gatling plugin should work the same way as it always did in a Freestyle build, but in a Pipeline build, it only partially works. Specifically, the Gatling plugin implements two different "Actions" to surface things in the Jenkins GUI: a "Build" action, which adds the Gatling icon to the left sidebar in the GUI when you’re viewing an individual build in the build history of a job, and a "Project" action, which adds that same icon to the left sidebar of the GUI of the main page for a job. The "Project" action also adds a "floating panel" on the main job page, which shows a graph of the historical data for the Gatling runs.
In a Pipeline job, though, assuming we’ve added a call to the metastep, we’re only seeing the "Build" actions. Part of this is because, in the last round of changes that I linked, we only modified the "Build" action, and not the "Project" action. Running the metastep in a Pipeline job has no visible effect at all on the project/job page at this point. So that’s what we’ll tackle next.
The key thing to know about getting "Project" actions working in a Pipeline job
is that, with a Pipeline job, there is no way for Jenkins to know up front what
steps or actions are going to be involved in a job. It’s only after the job
runs once that Jenkins has a chance to introspect what all the steps were. As
such, there’s no list of Builders or Publishers that it knows about up front to
call getProjectAction on, like it would with a Freestyle job.
This is where
SimpleBuildStep.LastBuildAction
comes into play. This is an interface that you can add to your Build actions,
which give them their own getProjectActions method that Jenkins recognizes and
will call when rendering the project page after the job has been run at least
once.
So, effectively, what we need to do is to
get
rid of the getProjectAction method on our Publisher class, modify the Build
action to implement SimpleBuildStep.LastBuildAction, and encapsulate our
Project action instances in the Build action.
The build action class now constructs an instance of the Project action and
makes it accessible via getProjectActions (which comes from the
LastBuildAction interface):
public class GatlingBuildAction implements Action, SimpleBuildStep.LastBuildAction {
    public GatlingBuildAction(Run<?, ?> build, List<BuildSimulation> sims) {
        this.build = build;
        this.simulations = sims;

        List<GatlingProjectAction> projectActions = new ArrayList<>();
        projectActions.add(new GatlingProjectAction(build.getParent()));
        this.projectActions = projectActions;
    }

    @Override
    public Collection<? extends Action> getProjectActions() {
        return this.projectActions;
    }
}
After making these changes, if we run the development Jenkins server, we can see
that after the first successful run of the Pipeline job that calls the
GatlingPublisher metastep, the Gatling icon indeed shows up in the sidebar on
the main project page, and the floating box with the graph shows up as well:
Making our DSL step do something
So at this point we’ve got the metastep syntax working from end-to-end, and
we’ve got a valid Pipeline DSL step (gatlingArchive()) that we can use in our
Pipeline scripts without breaking anything… but our custom step doesn’t
actually do anything. Here’s the part where we tie it all together… and it’s
pretty easy! All we need to do is to make our step "Execution" class
instantiate a Publisher and call perform on
it.
As per the
notes
in the pipeline-plugin DEVGUIDE, we can use the @StepContextParameter
annotation to inject in the objects that we need to pass to the Publisher’s
perform method:
public class GatlingArchiverStepExecution extends AbstractSynchronousNonBlockingStepExecution<Void> {

    @StepContextParameter
    private transient TaskListener listener;

    @StepContextParameter
    private transient FilePath ws;

    @StepContextParameter
    private transient Run build;

    @StepContextParameter
    private transient Launcher launcher;

    @Override
    protected Void run() throws Exception {
        listener.getLogger().println("Running Gatling archiver step.");

        GatlingPublisher publisher = new GatlingPublisher(true);
        publisher.perform(build, ws, launcher, listener);

        return null;
    }
}
After these changes, we can fire up the development Jenkins server, and hack up
our Pipeline script to call gatlingArchive() instead of the metastep
step([$class: 'GatlingPublisher', enabled: true]) syntax. One of these is
nicer to type and read than the other, but I’ll leave that as an exercise for
the reader.