Getting Started with Pipelines
Audience and Purpose
This document is intended for novice users of the Jenkins pipeline feature. The document explains what a pipeline is, why that matters, and how to create the different kinds of pipelines.
Why Pipeline?
While standard Jenkins “freestyle” jobs support simple continuous integration by allowing you to define sequential tasks in an application lifecycle, they do not create a persistent record of execution, enable one script to address all the steps in a complex workflow, or confer the other advantages of pipelines.
In contrast to freestyle jobs, pipelines enable you to define the whole application lifecycle. Pipeline functionality helps Jenkins to support continuous delivery (CD). The Pipeline plugin was built with requirements for a flexible, extensible, and script-based CD workflow capability in mind.
Accordingly, pipeline functionality is:
-
Durable: Pipelines can survive both planned and unplanned restarts of your Jenkins controller.
-
Pausable: Pipelines can optionally stop and wait for human input or approval before completing the jobs for which they were built.
-
Versatile: Pipelines support complex real-world CD requirements, including the ability to fork or join, loop, and work in parallel with each other.
-
Efficient: Pipelines can restart from any of several saved checkpoints.
-
Extensible: The Pipeline plugin supports custom extensions to its DSL (domain scripting language) and multiple options for integration with other plugins.
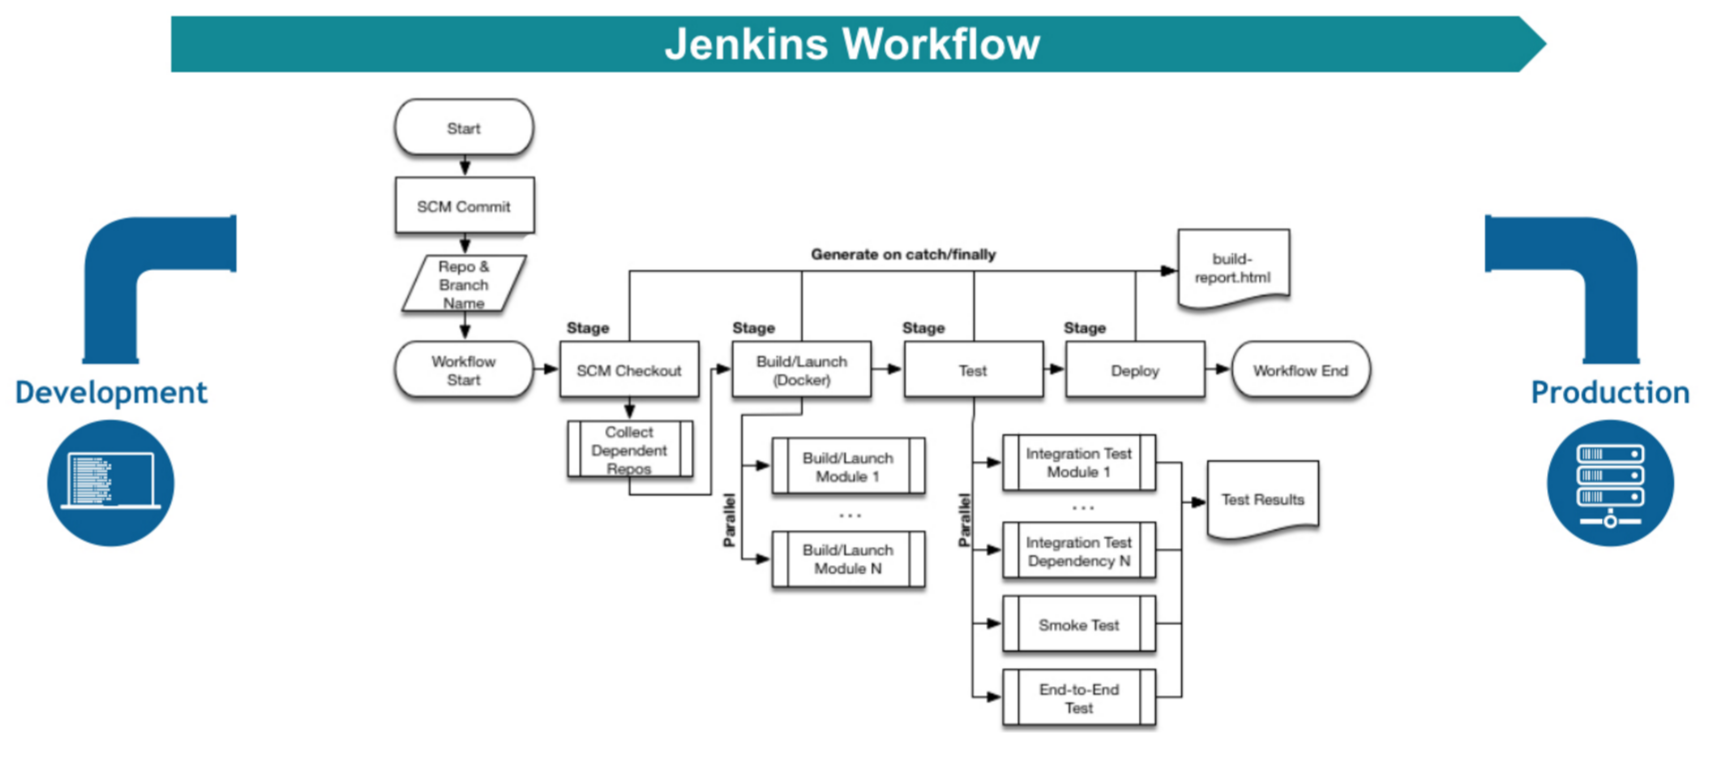
The flowchart below is an example of one continuous delivery scenario enabled by the Pipeline plugin:
Figure 1. Jenkins Workflow
Pipeline Defined
Pipelines are Jenkins jobs enabled by the Pipeline (formerly called “workflow”) plugin and built with simple text scripts that use a Pipeline DSL (domain-specific language) based on the Groovy programming language.
Pipelines leverage the power of multiple steps to execute both simple and complex tasks according to parameters that you establish. Once created, pipelines can build code and orchestrate the work required to drive applications from commit to delivery.
Pipeline Vocabulary
Pipeline terms such as “step,” “node,” and “stage” are a subset of the vocabulary used for Jenkins in general.
- Step
-
A “step” (often called a “build step”) is a single task that is part of sequence. Steps tell Jenkins what to do.
- Node
-
In pipeline coding contexts, as opposed to Jenkins generally, a “node” is a step that does two things, typically by enlisting help from available executors on agents:
-
Schedules the steps contained within it to run by adding them to the Jenkins build queue (so that as soon as an executor slot is free on a node, the appropriate steps run).
-
Creates a workspace, meaning a file directory specific to a particular job, where resource-intensive processing can occur without negatively impacting your pipeline performance. Workspaces last for the duration of the tasks assigned to them.
-
(In Jenkins generally, a “node” means any computer that is part of your Jenkins installation, whether that computer is used as a controller or as an agent).
- Stage
-
A “stage” is a step that calls supported APIs. Pipeline syntax is comprised of stages. Each stage can have one or more build steps within it.
Familiarity with Jenkins terms such as “controller,” “agent”, and “executor” also helps with understanding how pipelines work. These terms are not specific to pipelines:
-
controller - A “controller” is the basic installation of Jenkins on a computer; it handles tasks for your build system. Pipeline scripts are parsed on controllers, and steps wrapped in node blocks are performed on available executors.
-
agent - An “agent” (formerly "slave") is a computer set up to offload particular projects from the controller. Your configuration determines the number and scope of operations that an agent can perform. Operations are performed by executors.
-
executor - An “executor” is a computational resource for compiling code. It can run on controller or agent machines, either by itself or in parallel with other executors. Jenkins assigns a java.lang.Thread to each executor.
Preparing Jenkins to Run Pipelines
To run pipelines, you need to have a Jenkins instance that is set up with the appropriate plugins. This requires:
-
Jenkins 1.580.1 or later (Jenkins 2.0 is recommended)
-
The core Pipeline plugin
Installing the Pipeline Plugin
The Pipeline plugin is installed in the same way as other Jenkins plugins. Installing the Pipeline plugin also installs the suite of related plugins on which it depends: Open Jenkins in your web browser. On the Manage Jenkins page for your installation, navigate to Plugins. Find Pipeline Plugin from among the plugins listed on the Available tab. (You can do this by scrolling through the plugin list or by using “Pipeline” as a term to filter results) Select the checkbox for Pipeline Plugin. Select either Install without restart or Download now and install after restart. Pipeline plugin installation automatically includes all necessary dependencies. Restart Jenkins.
Pipeline Plugin Reference List
The Pipeline plugin works with a suite of related plugins that enhance the pipeline functionality of your Jenkins setup. The additional plugins typically introduce additional pipeline syntax or visualizations.
The table below describes pipeline-related plugins in terms of their importance to pipeline functionality (required, recommended, or optional). To get the basic pipeline functionality, you only need to install the main Pipeline plugin, but recommended plugins add additional capabilities that you will probably want.
Optional plugins are mainly useful if you are creating pipelines that are related to the technologies that they support.
| Plugin Name | Description | Status |
|---|---|---|
Pipeline (workflow-aggregator) |
Installs the core pipeline engine and its dependent plugins: Pipeline: API, Pipeline: Basic Steps, Pipeline: Durable Task Step, Pipeline: Execution Support, Pipeline: Global Shared Library for CPS pipeline, Pipeline: Groovy CPS Execution, Pipeline: Job, Pipeline: SCM Step, Pipeline: Step API |
required |
Pipeline: Stage View |
Provides a graphical swimlane view of pipeline stage execution (as well as a build history of the stages) |
recommended |
Multibranch Pipeline |
Adds "Multibranch Pipeline" item type which allows Jenkins to automatically build branches that contain jenkinsfile |
recommended |
CloudBees GitHub Branch Source |
Adds GitHub Organization Folder item type and adds "Github" as a branch source on Multibranch pipelines |
recommended for teams hosting repositories in Github |
CloudBees Bitbucket Branch Source |
Adds Bitbucket Team item type and adds "Bitbucket" as a branch source on Multibranch pipelines |
recommended for teams hosting repositories in Bitbucket |
CloudBees Docker Pipeline |
Enables pipeline to build and use Docker containers inside pipeline scripts. |
optional |
Pipeline-related plugins other than those listed above are regularly “whitelisted” as compatible with or designed for Pipeline usage. For more information, see the Plugin Compatibility With Pipeline wiki. Current contents of that wiki are summarized in the following table:
| SCMs | SCM Plugins |
|---|---|
GitSCM (git) |
|
SubversionSCM (subversion) |
|
MercurialSCM (mercurial) |
|
PerforceScm (p4, not the older perforce) |
|
IntegritySCM (integrity-plugin) |
|
RepoScm (repo) |
|
teamconcert |
|
CVSSCM (cvs) |
| Build/Post-Build | Build/Post-Build Plugins |
|---|---|
ArtifactArchiver (core) |
|
Fingerprinter (core) |
|
JUnitResultArchiver (junit) |
|
JavadocArchiver (javadoc) |
|
Mailer (mailer) |
|
CopyArtifact (copyartifact) |
|
Analysis publishers |
|
HtmlPublisher (htmlpublisher) |
|
LogParserPublisher (log-parser) |
|
SeleniumHtmlReportPublisher (seleniumhtmlreport) |
|
ScoveragePublisher (scoverage) |
|
AnsiblePlaybookBuilder (ansible) |
|
GitHubCommitNotifier, GitHubSetCommitStatusBuilder (github) |
|
XUnitPublisher and XUnitBuilder (xunit) |
| Build Wrappers | Build Wrapper Plugins |
|---|---|
ConfigFileBuildWrapper (config-file-provider) |
|
Xvnc (xvnc) |
|
BuildUser (build-user-vars) |
|
TimestamperBuildWrapper (timestamper) |
|
MaskPasswordsBuildWrapper (mask-passwords) |
|
XvfbBuildWrapper (xvfb) |
|
GCloudBuildWrapper (gcloud-sdk) |
|
NpmPackagesBuildWrapper (nodejs) |
|
AnsiColorBuildWrapper (ansicolor) |
| Triggers | Trigger Plugins |
|---|---|
gerrit-trigger |
|
github |
|
deployment-notification |
|
gitlab-plugin |
|
bitbucket |
| Clouds | Cloud Plugins |
|---|---|
mock-slave (for prototyping) |
|
docker |
|
Nectar-vmware |
|
operations-center-cloud |
|
ec2 |
| Miscellaneous | Miscellaneous Plugins |
|---|---|
rebuild |
|
parameterized-trigger |
|
build-token-root |
|
job-dsl |
|
zentimestamp |
|
claim |
|
listSubversionTagsParameterValue |
|
authorize-project |
|
customize-build-now |
|
embeddable-build-status |
|
groovy-postbuild |
|
buildtriggerbadge |
|
build-monitor-plugin |
|
radiatorview |
| Custom Steps | Custom Step Plugins |
|---|---|
docker-workflow |
|
credentials-binding |
|
ssh-agen |
|
parallel-test-executor |
|
mailer |
|
email-ext |
Note: Several plugins available in the Jenkins ecosystem but not actually related to the Pipeline feature set described in this guide also use the terms "pipeline" or "DSL" in their names. For example:
-
Build Pipeline plugin - provides a way to execute Jenkins jobs sequentially
-
Build Flow Plugin - introduces a job type that lets you define an orchestration process as a script.
More Information
As with any Jenkins plugin, you have the option of installing the Pipeline plugin from the Plugins web page at https://plugins.jenkins.io , but using the Plugin Manager interface is preferred because you do not then have to make allowances for plugin dependencies or compatibility issues. To investigate Pipeline without installing Jenkins separately or accessing your production system, you can run a Docker demo of Pipeline functionality.
Approaches to Defining Pipeline Script
You can create pipelines in either of the following ways:
-
Through script entered in the configuration page of the user interface for your Jenkins instance.
-
Through script that you create with a Groovy editor outside Jenkins but import into a designated Jenkins repository by selecting the Pipeline Script from SCM option during initial setup.
Creating a Simple Pipeline
Initial pipeline usage typically involves the following tasks:
-
Downloading and installing the Pipeline plugin (Unless it is already part of your Jenkins installation)
-
Creating a Pipeline of a specific type
-
Configuring your Pipeline
-
Controlling Flow through your Pipeline
-
Scaling your Pipeline
To create a simple pipeline from the Jenkins interface, perform the following steps:
-
Click New Item on your Jenkins home page, enter a name for your (pipeline) job, select Pipeline, and click OK.
-
In the Script text area of the configuration screen, enter your pipeline syntax. If you are new to pipeline creation, you might want to start by opening the Snippet Generator and selecting the “Hello World” snippet. Note: Pipelines are written as Groovy scripts that tell Jenkins what to do when they are run, but because relevant bits of syntax are introduced as needed, you do not need to be a Groovy expert to create them, although basic understanding of Groovy is helpful.
-
Check the Use Groovy Sandbox option below the Script text area. Note: If you are a Jenkins administrator (in other words, authorized to approve your own scripts), sandboxing is optional but efficient, because it lets scripts run without approval as long as they limit themselves to operations that Jenkins considers inherently safe.
-
Click Save.
-
Click Build Now to create the pipeline.
-
Click ▾ and select Console Output to see the output.
The following example shows a successful build of a pipeline created with a one-line script that uses the “echo” step to output the phrase, “hello from pipeline:”
Started by user anonymous
[Pipeline] echo
hello from Pipeline
[Pipeline] End of Pipeline
Finished: SUCCESS
Note: You can also create complex and multi-branch pipelines in the script entry area of the Jenkins configuration page, but because they contain multiple stages and the configuration page UI provides limited scripting space, pipeline creation is more commonly done using an editor of your choice from which scripts can be loaded into Jenkins using the Pipeline script from SCM option.
Creating Multi-branch Pipelines
The Multibranch Pipeline project type enables you to configure different jobs for different branches of the same project. In a multi-branch pipeline configuration, Jenkins automatically discovers, manages, and executes jobs for multiple source repositories and branches. This eliminates the need for manual job creation and management, as would otherwise be necessary when, for example, a developer adds a new feature to an existing product. Multi-branch pipelines also enable you to stop or suspend jobs automatically if circumstances make that appropriate.
A multi-branch pipeline project always includes a Jenkinsfile in its repository root. Jenkins automatically creates a sub-project for each branch that it finds in a repository with a Jenkinsfile.
Multi-branch pipelines use the same version control as the rest of your software development process. This “pipeline as code” approach has the following advantages:
-
You can modify pipeline code without special editing permissions.
-
Finding out who changed what and why no longer depends on whether developers remember to comment their code changes in configuration files.
-
Version control makes the history of changes to code readily apparent.
To create a Multi-branch Pipeline:
-
Click New Item on your Jenkins home page, enter a name for your job, select Multibranch Pipeline, and click OK.
-
Configure your SCM source (options include Git, GitHub, Mercurial, Subversion, and Bitbucket), supplying information about the owner, scan credentials, and repository in appropriate fields. For example, if you select Git as the branch source, you are prompted for the usual connection information, but then rather than enter a fixed refspec (Git’s name for a source/destination pair), you would enter a branch name pattern (Use default settings to look for any branch).
-
Configure the other multi-branch pipeline options:
-
API endpoint - an alternate API endpoint to use a self-hosted GitHub Enterprise
-
Checkout credentials - alternate credentials to use when checking out the code (cloning)
-
Include branches - a regular expression to specify branches to include
-
Exclude branches - a regular expression to specify branches to exclude; note that this will take precedence over the contents of include expressions
-
Property strategy - where you can optionally define custom properties for each branch
-
-
Save your configuration.
Jenkins automatically scans the designated repository and creates appropriate branches.
For example (again in Git), if you started with a master branch, and then wanted to experiment with some changes, and so did git checkout -b newfeature and pushed some commits, Jenkins would automatically detect the new branch in your repository and create a new sub-project for it. That sub-project would have its own build history unrelated to the trunk (main line).
If you choose, you can ask for the sub-project to be automatically removed after its branch is merged with the main line and deleted. To change your Pipeline script—for example, to add a new Jenkins publisher step corresponding to new reports that your Makefile/pom.xml/etc. is creating—you edit the Jenkinsfile in your change. Your Pipeline script is always synchronized with the rest of the source code you are working on: the checkout scm command checks out the same revision as the script is loaded from.
Writing Pipeline Scripts in the Jenkins UI
Because Pipelines are comprised of text scripts, they can be written (edited) in the same script creation area of the Jenkins user interface where you create them:
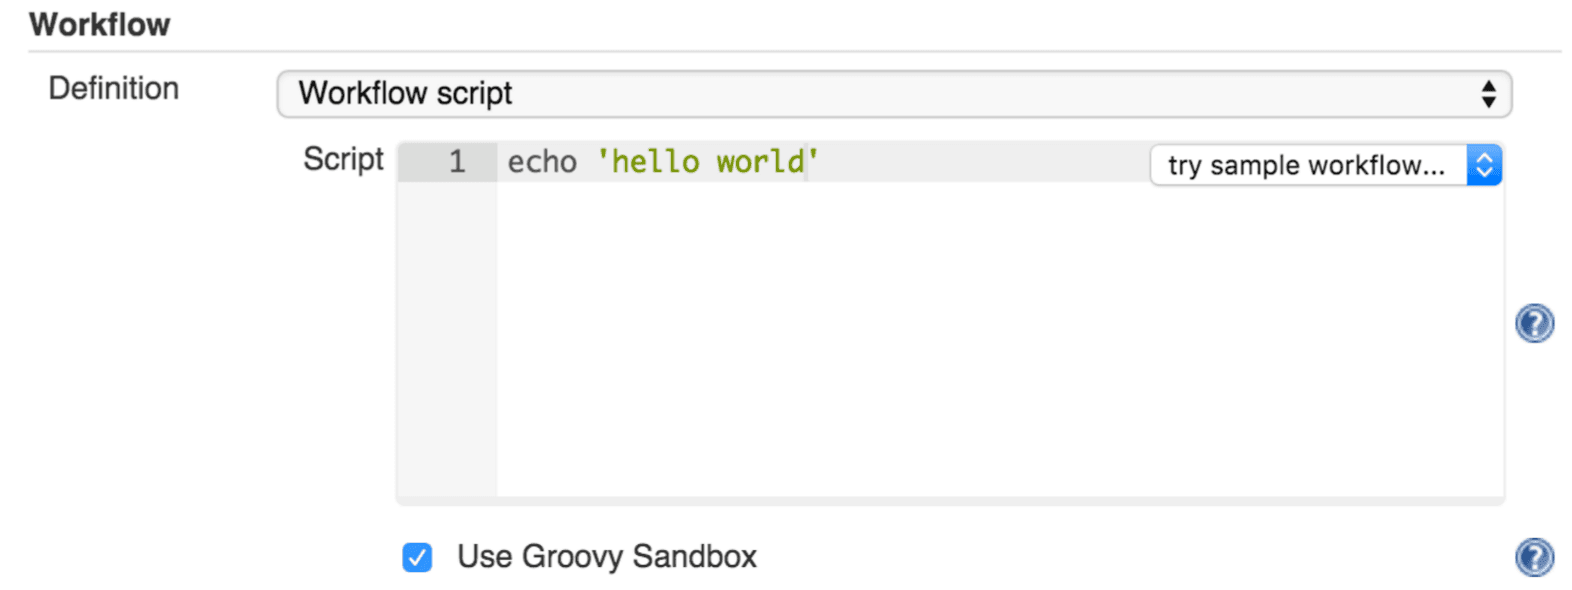
Figure 2. Pipeline Editor
Note: Pipeline script writing adds stages and steps to a pipeline; it does not convert one pipeline type into another. You determine which kind of pipeline you want to set up before writing it.
Using Snippet Generator
You can automate much of the pipeline configuration process by using the Snippet Generator tool.
Snippet Generator is dynamically populated with a list of the steps available for pipeline configuration. Depending on the plugins installed to your Jenkins environment, you may see more or fewer items in the list exposed by Snippet Generator.
To add one or more steps from Snippet Generator to your pipeline code:
-
Open Snippet Generator
-
Scroll to the step you want
-
Click that step
-
Configure the selected step, if presented with configuration options
-
Click Generate Groovy to see a Groovy snippet that runs the step as configured
-
Optionally select and configure additional steps
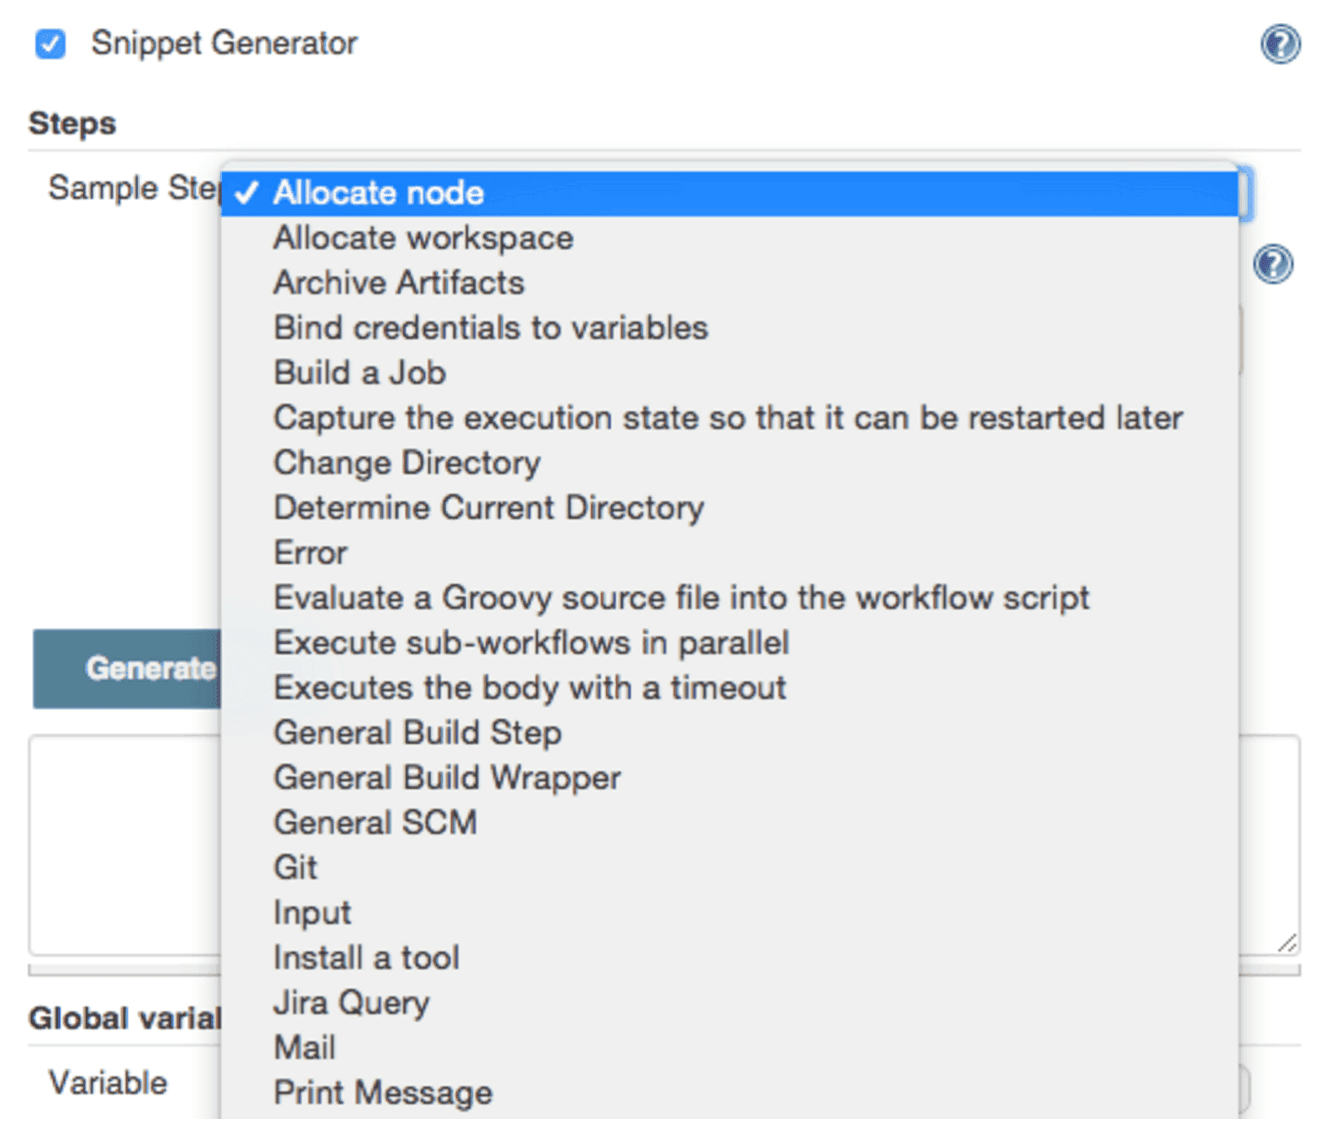
Figure 3. Snippet Generator
When you click Generate Groovy after selecting a step, you see the function name used for that step, the names of any parameters it takes (if they are not default parameters), and the syntax used by Snippet Generator to create that step.
You can copy and paste the generated code right into your Pipeline, or use it as a starting point, perhaps deleting any optional parameters that you do not need.
To access information about steps marked with the help icon (question mark), click on that icon.
Basic Groovy Syntax for Pipeline Configuration
You typically add functionality to a new pipeline by performing the following tasks:
-
Adding nodes
-
Adding more complex logic (usually expressed as stages and steps)
-
Using the “ws” step to create additional workspace on an agent without taking another executor slot
To configure a pipeline you have created through the Jenkins UI, select the pipeline and click Configure.
If you run Jenkins on Linux or another Unix-like operating system with a Git repository that you want to test, for example, you can do that with syntax like the following, substituting your own name for “joe-user”:
node {
    git url: 'https://github.com/joe_user/simple-maven-project-with-tests.git'
    def mvnHome = tool 'M3'
    sh "${mvnHome}/bin/mvn -B verify"
}
In Windows environments, use “bat” in place of “sh,” and use backslashes as the file separator where needed (backslashes need to be escaped inside strings).
For example, rather than:
sh "${mvnHome}/bin/mvn -B verify"you would use:
bat "${mvnHome}\\bin\\mvn -B verify"Your Groovy pipeline script can include functions, conditional tests, loops, try/catch/finally blocks, and so on.
Sample syntax for one node in a Java environment that is using the open source Maven build automation tool (hence the definition for “mvnHome”) is shown below:
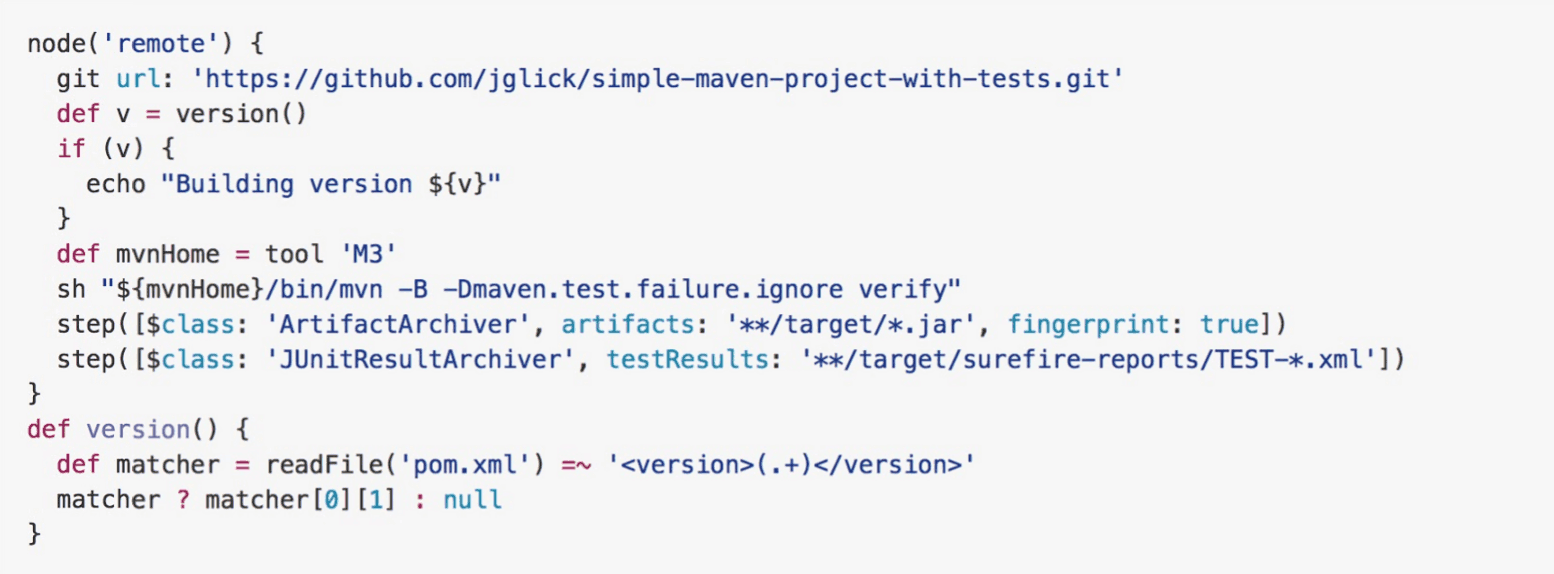
Figure 4. Pipeline Sample
Sample key:
-
def is a keyword to define a function (you can also give a Java type in place of def to make it look more like a Java method)
-
=~ is Groovy syntax to match text against a regular expression
-
[0] looks up the first match
-
[1] looks up the first (…) group within that match
-
readFile step loads a text file from the workspace and returns its content (Note: Do not use java.io.File methods — these refer to files on the Jenkins controller, not files in the current agent workspace).
-
The writeFile step saves content to a text file in the workspace
-
The fileExists step checks whether a file exists without loading it.
The tool step makes sure a tool with the given name is installed on the current node. The script needs to know where it was installed, so the tool can be run later. For this, you need a variable.
The def keyword in Groovy is the quickest way to define a new variable (with no specific type).
In the sample syntax discussed above, a variable is defined by the following expression:
def mvnHome = tool 'M3'This ensures that M3 is installed somewhere accessible to Jenkins and assigns the return value of the step (an installation path) to the mvnHome variable.
Advanced Groovy Syntax for Pipeline Configuration
Groovy lets you omit parentheses around function arguments. The named-parameter syntax is also a shorthand for creating a map, which in Groovy uses the syntax [key1: value1, key2: value2], so you could write:
git([url: 'https://github.com/joe_user/simple-maven-project-with-tests.git', branch: 'master'])For convenience, when calling steps taking only one parameter (or only one mandatory parameter) you can omit the parameter name. For example:
sh 'echo hello'is really shorthand for:
sh([script: 'echo hello'])Managing the Environment
One way to use tools by default is to add them to your executable path using the special variable env that is defined for all pipelines:
node {
    git url: 'https://github.com/joe_user/simple-maven-project-with-tests.git'
    def mvnHome = tool 'M3'
    env.PATH = "${mvnHome}/bin:${env.PATH}"
    sh 'mvn -B verify'
}-
Properties of this variable are environment variables on the current node.
-
You can override certain environment variables and the overrides are seen by subsequent sh steps (or anything else that pays attention to environment variables).
-
You can run mvn without a fully-qualified path.
Setting a variable such as PATH in this way is only safe if you are using a single agent for this build. As an alternative, you can use the withEnv step to set a variable within a scope:
node {
    git url: 'https://github.com/jglick/simple-maven-project-with-tests.git'
    withEnv(["PATH+MAVEN=${tool 'M3'}/bin"]) {
        sh 'mvn -B verify'
    }
}
Jenkins defines some environment variables by default:
Example: env.BUILD_TAG can be used to get a tag like jenkins-projname-1 from Groovy code, or $BUILD_TAG can be used from a sh script. The Snippet Generator help for the withEnv step has additional detail on this topic.
Build Parameters
If you configured your pipeline to accept parameters using the Build with Parameters option, those parameters are accessible as Groovy variables of the same name.
Recording Test Results and Artifacts
If there are any test failures in a given build, you want Jenkins to record them, and then proceed, rather than stopping. If you want it saved, you must capture the JAR that you built. The following sample code for a node shows how (As previously seen in several examples from this guide, Maven is being used as a build tool):
node {
    git url: 'https://github.com/joe_user/simple-maven-project-with-tests.git'
    def mvnHome = tool 'M3'
    sh "${mvnHome}/bin/mvn -B -Dmaven.test.failure.ignore verify"
    archiveArtifacts artifacts: '**/target/*.jar', fingerprint: true
    junit '**/target/surefire-reports/TEST-*.xml'
}-
If tests fail, the Pipeline is marked unstable (as denoted by a yellow ball in the Jenkins UI), and you can browse the Test Result Trend to see the involved history.
-
You should see Last Successful Artifacts on the Pipeline index page.
Loading Pipeline Scripts from SCM
Complex pipelines would be cumbersome to write and maintain if you could only do that in the text area provided by the Jenkins job configuration page.
Accordingly, you also have the option of writing pipeline scripts in your IDE (integrated development environment) or SCM system, and then loading those scripts into Jenkins using the Pipeline Script from SCM option enabled by the workflow-scm-step plugin, which is one of the plugins that the Pipeline plugin depends on and automatically installs.
Loading pipeline scripts from another source leverages the idea of “pipeline as code,” and lets you maintain that source using version control and standalone Groovy editors.
To do this, select Pipeline script from SCM when defining the pipeline.
With the Pipeline script from SCM option selected, you do not enter any Groovy code in the Jenkins UI; you just indicate by specifying a path where in source code you want to retrieve the pipeline from. When you update the designated repository, a new build will be triggered, as long as your job is configured with an SCM polling trigger.
Multibranch Pipeline projects expose the name of the branch being built with the BRANCH_NAME environment variable. They also provide a special checkout scm Pipeline command, which checks out the specific commit that the Jenkinsfile originated, so that branch integrity is automatically maintained.