Jenkins + OpenChoreo: Adopt a modern Internal Developer Platform (IDP) Without Replacing Your CI System
Your Jenkins setup represents a decade of institutional knowledge: countless custom pipelines, shared libraries, and specialized build agents. Yet when platform engineering enters the conversation, most IDP demos ignore this investment entirely. This article is for platform engineers and DevOps leads who run Jenkins at scale and are evaluating an internal developer platform. It lays out a different path: add one stage to your pipeline, and keep everything else exactly where it is – along with a clear model of the CI/platform boundary, a Jenkinsfile stage you can copy directly, and an honest account of what the trade costs.
The most common misconception about platform engineering is that adopting an IDP means throwing away your CI tooling. It doesn’t have to. Here is where OpenChoreo can help with your workflow without altering your CI habits. OpenChoreo’s external CI integration lets teams keep their Jenkins pipelines, plugin ecosystem, and institutional knowledge, while layering on environment management, self-service workflows, multi-cluster deployment, and observability – all via a single API call at the end of the build stage.
The Argument
CI is a core part of the platform experience. But the real question is whether the platform should be tightly coupled to one specific CI implementation, and the answer is no. With the right abstraction at the integration point, teams keep Jenkins or run something else entirely, and the developer experience the platform delivers stays the same.
To do its job, the platform doesn’t need your build graph, your test matrix, or your pipeline DSL. It needs exactly one fact: this image, for this component, is ready.
Everything before that fact is CI implementation, that’s Jenkins’s half of the experience, and it stays exactly as it is. Everything after it is the platform’s half. From there, "adopt an IDP" no longer means "replace your CI". It means only one thing: add one stage to your pipeline.
What Jenkins Teams Fear (and Why)
The concern is real: when a platform team standardises on an IDP, what the Jenkins user hears is that hundreds of pipelines, the shared libraries, agents, etc. that took a long time to design and implement, are about to be thrown away.
That fear comes from how these platforms are usually demoed.
Almost every IDP demo starts at git push and ends at "running in production", which puts CI inside the platform the entire length of the demo.
That’s an accurate description of the experience for a team starting from scratch using the platform’s built-in CI.
It is not, however, an architectural requirement of the platform.
The two systems can be decoupled, and establishing that decoupling is the core focus of this article.
The Boundary
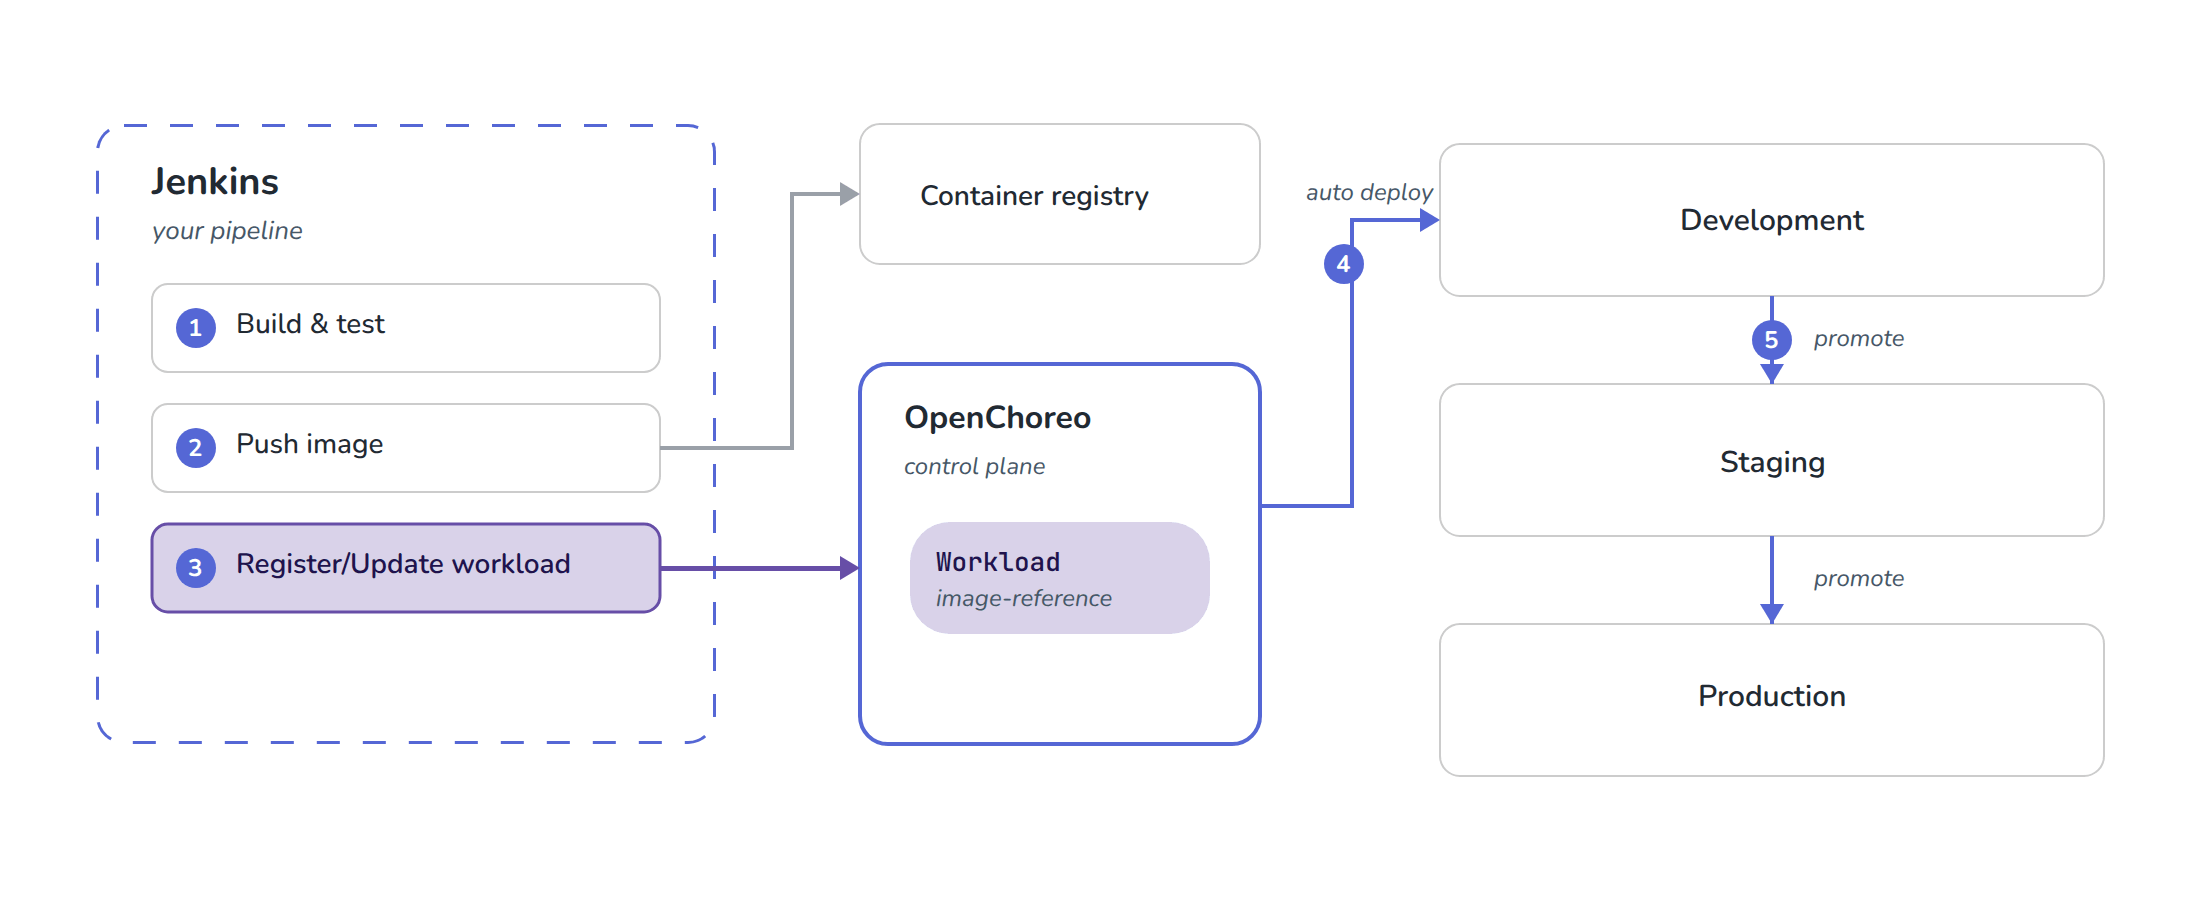
So if the platform does not take over CI, where exactly does CI end and the platform begin? Here is the split.
One artifact reference crosses the boundary. That is the whole contract.
| What stays in Jenkins | What moves to the platform |
|---|---|
SCM triggers, build agents, shared libraries |
Environments and promotion |
Test orchestration, the plugin ecosystem |
Per-environment config and secrets |
Build credentials, pre-build approvals |
Multi-cluster placement |
Build provenance and logs |
Runtime observability, self-service catalog |
The line sits here because the two columns change at different speeds, have different owners, and fail in different ways. Build logic changes per team, per language, per repo. Environments and promotion policy change per organisation. Bundling the two together is what makes platform adoption feel like a CI migration. Keep them separate, and it never has to be one.
The stage you need to add
OpenChoreo is an open-source internal developer platform that runs on Kubernetes. It owns the right-hand column of the table above: environments and promotion, per-environment configuration and secrets, multi-cluster placement, and a self-service portal with runtime observability, a layer your platform team operates over your clusters. The unit it deploys is a Workload: a small record naming a component and the image that should run for it. Registering that Workload from your pipeline is the entire integration, and the pattern applies to any platform with a similar API.
If your pipeline already builds and pushes an image, the diff is small: get a token, then register the workload. Here’s what that looks like with OpenChoreo as the platform.
One-time setup
On the platform side, create a service account – an OAuth2 client with the client_credentials grant, scoped so it can only register workloads.
If you are following the quick start, that account already exists. The installer registers a Workload Publisher client in the bundled Thunder identity provider and binds it to a workload-publisher role. The defaults are:
| Value | Default on a quick-start install |
|---|---|
Thunder token endpoint |
|
OpenChoreo API |
|
Client ID |
|
Client secret |
|
Confirm it works before wiring up Jenkins — this should return an access token:
curl -X POST "http://thunder.openchoreo.localhost:8080/oauth2/token" \
  --data-urlencode "grant_type=client_credentials" \
  --data-urlencode "client_id=openchoreo-workload-publisher-client" \
  --data-urlencode "client_secret=openchoreo-workload-publisher-secret"
This is a shared development credential — it is the same account OpenChoreo’s own in-cluster build workflow authenticates as — so it is fine for a local trial and nothing more. For anything shared, create your own client in the Thunder console (http://thunder.openchoreo.localhost:8080/console, admin / admin) as a Backend Service application, then bind it to a role with a ClusterAuthzRoleBinding: the shipped binding matches the default client’s sub claim, so a new client inherits nothing. The Workload Publishing Credentials guide covers that setup, and Authorization lists the shipped roles and bindings.
Then store three values as ordinary Jenkins credentials:
-
workflows-credentials— the client ID and secret -
thunder-url— the token endpoint of the identity provider (Thunder ships with OpenChoreo, but any OAuth2 IDP works) -
openchoreo-api-url— the platform API URL
The external-CI docs cover this step by step; we’ll walk through the complete setup in the next post in this series.
Worth knowing before you file the security review: the service account’s workload-publisher role grants exactly workload:create, workload:update, workload:view, workflowrun:view, and workflowrun:update and nothing else.
The two workflowrun actions are there for OpenChoreo’s built-in build workflow, which annotates its own run - an external pipeline never needs them, so a dedicated client can be bound to a workload-only role.
If the Jenkins credential ever leaks, the blast radius is "can register an image for this component’s workload".
It cannot promote anything, touch environment configuration, or reach the clusters.
We verified this the direct way: the same token that had just registered our workload got an HTTP 403 when it tried to create a staging release binding.
The stage below isn’t pseudocode: it ran on a real Jenkins (2.541.1) against a live OpenChoreo cluster, twice in a row, so the second build exercises the update path.
NAMESPACE, PROJECT, COMPONENT, and IMAGE come from the surrounding pipeline; the credentials are standard Jenkins credentials.
stage('Register workload with OpenChoreo') {
    steps {
        withCredentials([
            usernamePassword(
                credentialsId: 'workflows-credentials',
                usernameVariable: 'CLIENT_ID',
                passwordVariable: 'CLIENT_SECRET'
            ),
            string(credentialsId: 'thunder-url', variable: 'THUNDER_URL'),
            string(credentialsId: 'openchoreo-api-url', variable: 'OPENCHOREO_API_URL')
        ]) {
            sh '''
                set -eu

                # Jenkins masks the credentials it injected, but NOT the token
                # derived from them -- keep it out of the build log.
                set +x

                # 1. Exchange client credentials for an access token.
                TOKEN=$(curl -sf -X POST "${THUNDER_URL}/oauth2/token" \
                  -d "grant_type=client_credentials" \
                  -d "client_id=${CLIENT_ID}" \
                  -d "client_secret=${CLIENT_SECRET}" \
                  | jq -r '.access_token')

                # 2. Build the Workload payload.
                WORKLOAD_NAME="${COMPONENT}-workload"
                cat > workload-cr.json <<EOF
{
  "metadata": { "name": "${WORKLOAD_NAME}", "namespace": "${NAMESPACE}" },
  "spec": {
    "owner": { "projectName": "${PROJECT}", "componentName": "${COMPONENT}" },
    "container": { "image": "${IMAGE}" }
  }
}
EOF

                # 3. Create the Workload; on HTTP 409 fall back to PUT.
                #    The first build creates it; every build after that updates it.
                CODE=$(curl -s -o resp.json -w '%{http_code}' -X POST \
                  "${OPENCHOREO_API_URL}/api/v1/namespaces/${NAMESPACE}/workloads" \
                  -H "Authorization: Bearer ${TOKEN}" \
                  -H "Content-Type: application/json" \
                  -d @workload-cr.json)

                if [ "${CODE}" = "409" ]; then
                  curl -sf -X PUT \
                    "${OPENCHOREO_API_URL}/api/v1/namespaces/${NAMESPACE}/workloads/${WORKLOAD_NAME}" \
                    -H "Authorization: Bearer ${TOKEN}" \
                    -H "Content-Type: application/json" \
                    -d @workload-cr.json -o resp.json
                elif [ "${CODE}" -lt 200 ] || [ "${CODE}" -ge 300 ]; then
                  echo "Workload registration failed (HTTP ${CODE}):"
                  cat resp.json
                  exit 1
                fi
            '''
        }
    }
}
Using the OpenChoreo CLI
Alternatively, the OpenChoreo CLI (occ) completes registration in five commands.
occ apply checks whether the workload exists and creates or updates it, so the 409 fallback disappears; API errors come back as readable messages with a non-zero exit code, so no jq is needed; and the CLI reads its credentials from environment variables and never prints the token, so the set +x guard is unnecessary.
This sequence was verified on the same Jenkins instance:
export HOME="${WORKSPACE}"   # occ stores its login under ${HOME}/.openchoreo
occ config controlplane update default --url "${OPENCHOREO_API_URL}"
occ login --client-credentials   # reads OCC_CLIENT_ID / OCC_CLIENT_SECRET
occ workload create --descriptor workload.yaml \
  -n "${NAMESPACE}" -p "${PROJECT}" -c "${COMPONENT}" \
  --image "${IMAGE}" -o workload-cr.yaml
occ apply -f workload-cr.yaml
Notice what the stage does not contain: the environment names, kubectl, cluster credentials, manifests, and promotion logic.
The pipeline does not need to know how many environments exist.
At the scale this post’s audience runs - hundreds of pipelines - you wouldn’t paste this stage into each Jenkinsfile by hand.
Wrap it as a step in your global shared library, and the per-pipeline diff shrinks to one line, something like openchoreoRegister(image: env.IMAGE).
Rolling the integration out, or changing it later, becomes a library release instead of a hundred pipeline edits.
We’re leaving the wrapper itself as packaging; the API call inside it is exactly the stage above.
The point is that Jenkins already has the distribution mechanism for this, and it is one your team uses today.
What you get back
The exact image Jenkins built, promoted unchanged through development → staging → production.
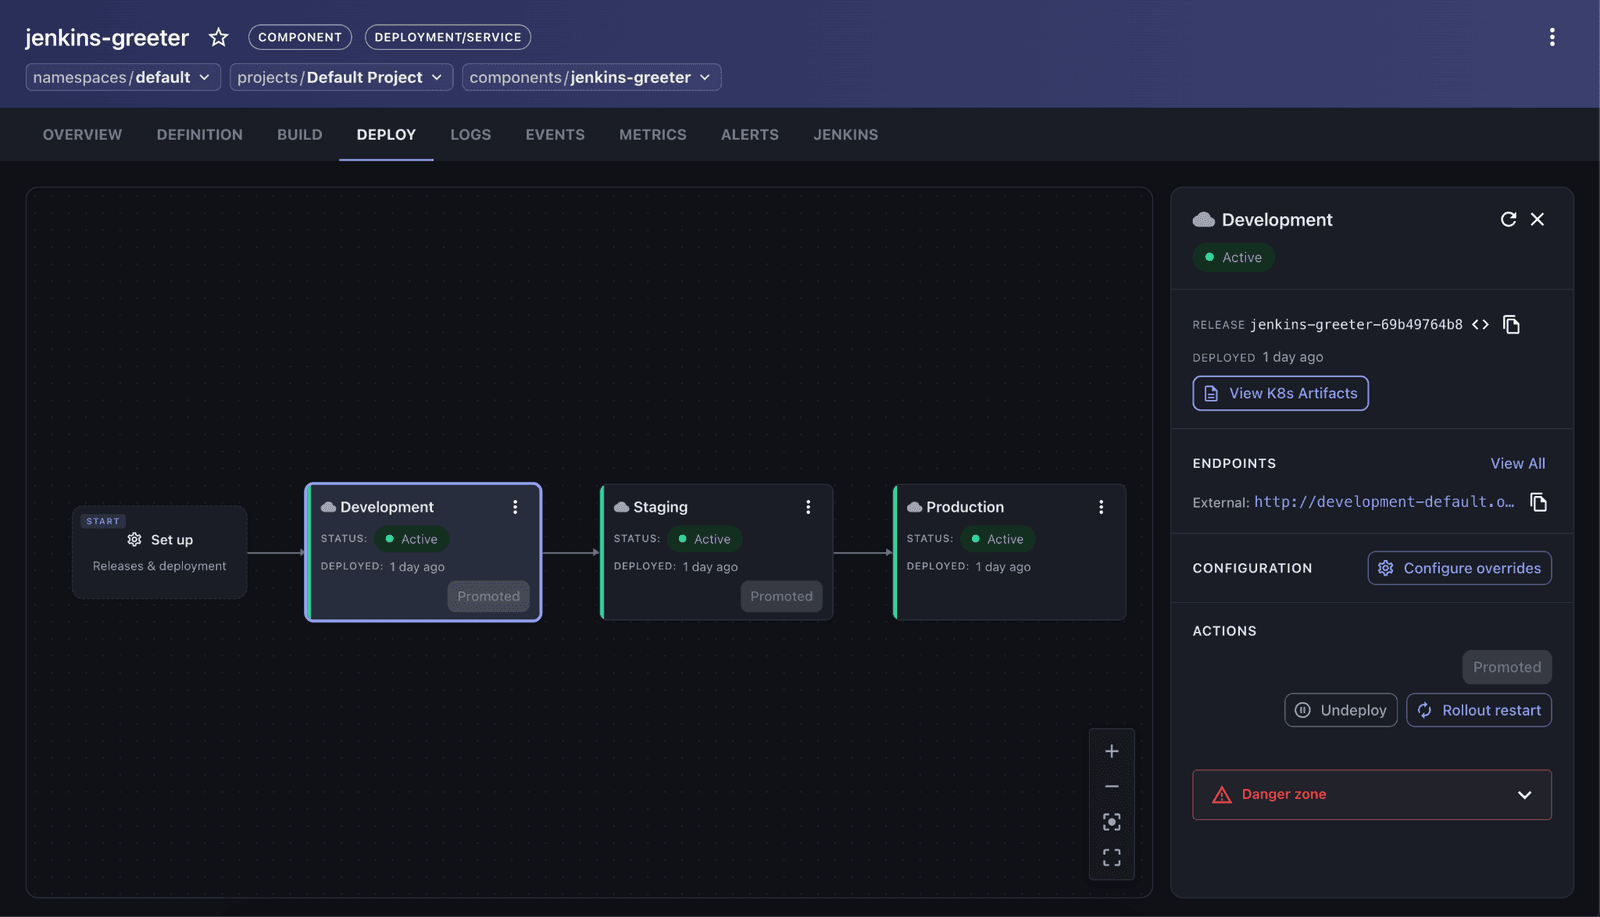
Promotion becomes a platform-level operation rather than a pipeline stage. Engineers or release managers promote components through the UI portal or via a single CLI command:
occ component deploy <component> --to stagingThe exact build Jenkins produced was promoted through all three environments and served the same content in each, with Jenkins uninvolved after the registration call.
Build-once, promote-many works because the line sits where it does: promotion has its own access control and doesn’t inherit from Jenkins. Deploy the pipeline to each environment directly instead, and you’re left with two options: rebuild per environment, or teach Jenkins your organization’s entire promotion policy.
The Trade-Offs
-
Access and Security: Jenkins requires a service account and network access to the platform API, introducing a new credential to manage and an additional dependency in the build path.
-
Shift in Deployment State: Operational state shifts away from the pipeline. For teams accustomed to viewing "the Jenkins job as the deploy," this represents a structural shift in workflow tracking.
-
Rollback Mechanics: Re-running a Jenkins job builds and registers a new artifact. Rollbacks are executed as platform actions targeting previously validated releases.
The migration is incremental by design: one component, one extra stage, one pipeline you don’t otherwise touch. Nothing about it is a cutover. By decoupling the build from the deployment, you gain the benefits of a modern platform without the friction of a forced migration, proving that progress can be achieved through evolution rather than revolution.
If you want to try this yourself, the OpenChoreo quick start gives you a local cluster with the three environments used above. In the next post in this series, we will walk through the complete setup end to end — the service account, the credentials, the component, and surfacing Jenkins build status inside the portal.
Links:
OpenChoreo Repository: https://github.com/openchoreo/openchoreo
OpenChoreo external-CI integration docs: https://openchoreo.dev/docs/platform-engineer-guide/workflows/external-ci
About the authors

Kris has been an org admin for Jenkins' GSoC program since 2022 and is also a GSoC project mentor. She has participated in GSoC twice as a contributor/student previously in 2019 and 2020, and has been trained academically as an astrophysicist with a PhD in the discipline of observational astronomy obtained from the University of Hong Kong in 2021. She also obtained the MCIT degree from UPenn in 2026. Professionally, Kris works in the IT sector as a software engineer. She has work experiences in Python, C++, Java, JavaScript, TypeScript, HTML, CSS/Sass, JQuery, SQL, and has completed projects in software development in general and specifically in artificial intelligence/deep learning/computer vision, Qt programming, and web development. Kris is passionate about open-source and would like to share this passion with fellow learners.