Securing a Jenkins instance on Azure
| This is a guest post by Claudiu Guiman and Eric Jizba, Software Engineers in the Azure DevOps team at Microsoft. If you have any questions, please email us at azdevopspub@microsoft.com. |
One of the most frequently asked questions for managing a Jenkins instance is "How do I make it secure?" Like any other web application, these issues must be solved:
-
How do I securely pass secrets between the browser and the server?
-
How do I hide certain parts from unauthorized users and show other parts to anonymous users?
This blog post details how to securely connect to a Jenkins instance and how to setup a read-only public dashboard. We’ll cover topics like: setting up a reverse proxy, blocking inbound requests to certain URLs and ports, enabling project-based authorization, and making the Jenkins agents accessible through the JNLP protocol.
Deploy Jenkins
The simplest way to deploy a secure Jenkins instance is by using the Azure Marketplace offer. If you have an existing Jenkins instance or want to setup your instance manually, follow the steps below.
Securely log in to Jenkins
After you’ve deployed your new virtual machine with a hosted Jenkins instance, you will notice that by default the instance listens on port 8080 using 'HTTP'. If you want to set up 'HTTPS' communication, you will need to provide an SSL certificate. Unfortunately, most certificate authorities are not cheap and other free services like Let’s Encrypt have a very small quota (about 20 certificates per week for the entire 'azure.com' subdomain). The only other option is to use a self-signed certificate, but then users must explicitly verify and mark your certificate as trusted, which is not recommended.
If you do not setup 'HTTPS' communication, the best way to make sure the sign-in credentials are not leaked due to a Man-in-the-middle attack is to only log in using SSH tunneling. An SSH tunnel is an encrypted tunnel created through an SSH protocol connection, which can be used to transfer unencrypted traffic over an unsecured network. Simply run this command:
ssh -L 8080:localhost:8080 <username>@<domain name>
putty.exe -ssh -L 8080:localhost:8080 <username>@<domain name>
This command will open an SSH connection to your remote host and bind remote port 8080 to listen to requests coming from your local machine. Navigate to http://localhost:8080 on your local machine to view your Jenkins dashboard and you’ll be able to log in securely.
Setup a reverse proxy
Now that you can securely log in to your Jenkins instance, you should prevent people from accidentally authenticating through the public (unsecured) interface. To achieve this, you can setup a reverse proxy on the Jenkins hosting machine that will listen on a different port (80 is the best candidate) and redirect only certain requests to port 8080.
Specifically, it is recommended to block the login and the CLI requests. Some CLI versions fall back to unsecure HTTP connections if they have problems establishing the secured connection. In most cases, users don’t need the CLI and it should be enabled on an as-needed basis.
-
Install Nginx:
sudo apt-get update
sudo apt-get install nginx
-
Open the Nginx config file:
sudo nano /etc/nginx/sites-enabled/default
-
Modify the file to configure Nginx to work as a reverse proxy (you’ll need to update <your domain name>):
server {
    listen 80;
    server_name <your domain name>;
    # Uncomment the line bellow to change the default 403 error page
    # error_page 403 /secure-jenkins;
    location / {
        proxy_set_header        Host \$host:\$server_port;
        proxy_set_header        X-Real-IP \$remote_addr;
        proxy_set_header        X-Forwarded-For \$proxy_add_x_forwarded_for;
        proxy_set_header        X-Forwarded-Proto \$scheme;
        proxy_pass              http://localhost:8080;
        proxy_redirect          http://localhost:8080 http://<your domain name>;
        proxy_read_timeout      90;
    }
    #block requests to /cli
    location /cli {
        deny all;
    }
    #block requests to /login
    location ~ /login* {
        deny all;
    }
    # Uncomment the lines bellow to redirect /secure-jenkins
    #location /secure-jenkins {
    #  alias /usr/share/nginx/secure-jenkins;
    #}
}
The first section tells the Nginx server to listen to any requests that come from port 80. It also contains a commented redirect of the 403 error to a custom location (we’ll get back to this later).
    listen 80;
    server_name <your domain name>;
    # error_page 403 /secure-jenkins;
The next section describes the reverse proxy configuration. This tells the Nginx server to take all incoming requests and proxy them to the Jenkins instance that is listening to port 8080 on the local network interface.
    location / {
        proxy_set_header        Host \$host:\$server_port;
        proxy_set_header        X-Real-IP \$remote_addr;
        proxy_set_header        X-Forwarded-For \$proxy_add_x_forwarded_for;
        proxy_set_header        X-Forwarded-Proto \$scheme;
        proxy_pass              http://localhost:8080;
        proxy_redirect          http://localhost:8080 http://<your domain name>;
        proxy_read_timeout      90;
    }
The last section filters out specific URLs (login, cli) and denies access to them.
location /cli { deny all; } location ~ /login* { deny all; } -
Restart Nginx:
sudo service nginx restart
-
Go to
http://<your domain name>and verify you can access your Jenkins instance. -
Verify clicking 'login' returns a '403 Forbidden' page. If you want to customize that page, update the Nginx configuration and remove the comments around /secure-jenkins. This will redirect all 403 errors to the file
/usr/share/nginx/secure-jenkins. You can add any content to that file, for example:sudo mkdir /usr/share/nginx/secure-jenkins echo "Access denied! Use SSH tunneling to log in to your Jenkins instance!" | sudo tee /usr/share/nginx/secure-jenkins/index.html
If restart fails or you cannot access your instance, check the error log: cat /var/log/nginx/error.log
|
Secure your Jenkins dashboard
If you go to http://<your domain name>:8080 you’ll notice you can still
bypass the reverse proxy and access the Jenkins instance directly through an
unsecure channel. You can easily block all inbound requests on port 8080 on
Azure with a
Network
Security Group (NSG).
-
Create the NSG and add it to your existing network interface or to the subnet your Azure Virtual Machine is bound to.
-
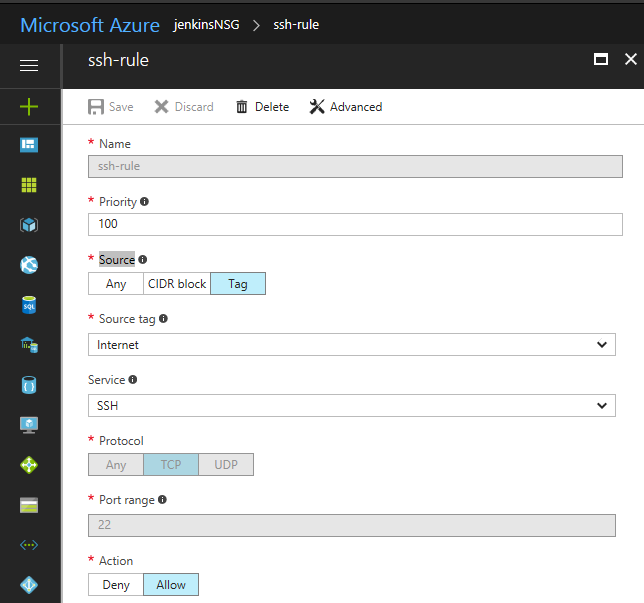
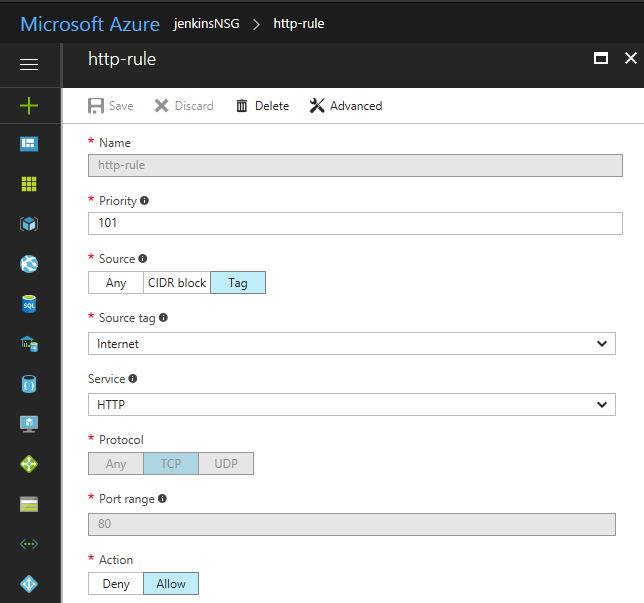
Add 2 inbound security rules:
-
Allow requests to port 22 so you can SSH into the machine.
-
Allow requests to port 80 so the reverse proxy can be reached
By default, all other external traffic will be blocked 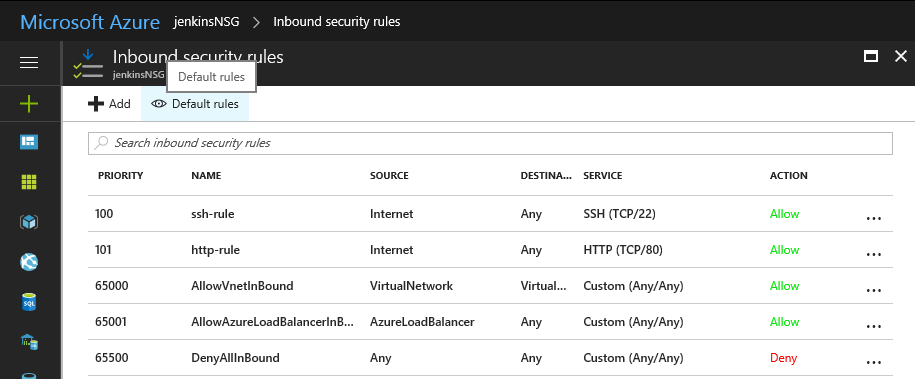
-
-
Navigate to
http://<your domain name>:8080and verify you cannot connect.If you don’t want to deploy an Azure Network Security Group, you can block port 8080 using the Uncomplicated Firewall (ufw)
Configure read-only access to your dashboard
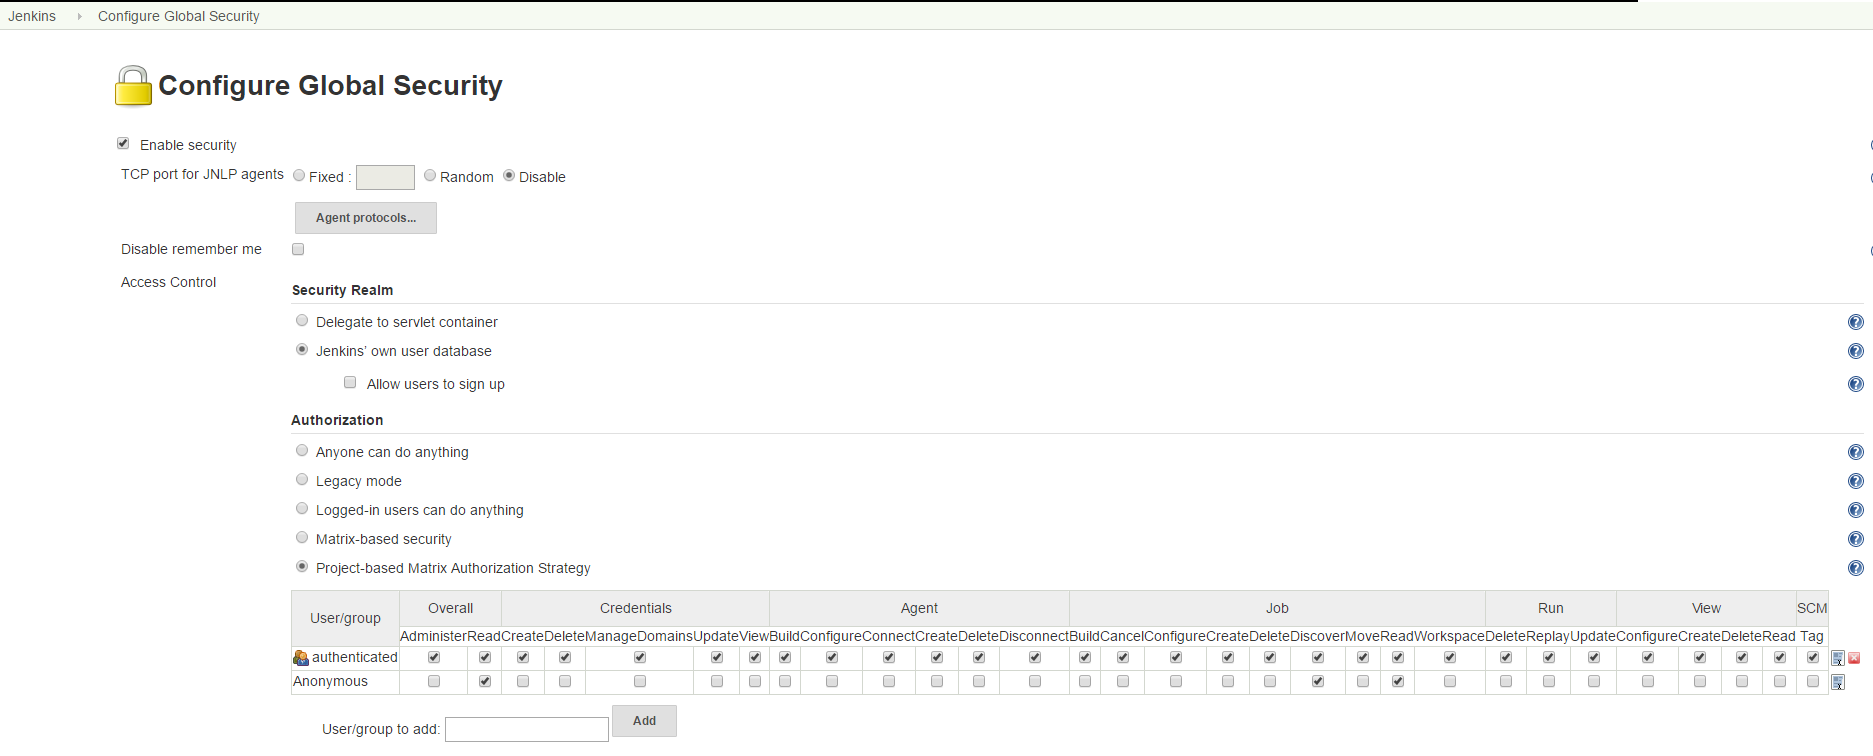
After installing Jenkins, the default security strategy is 'Logged-in users can do anything'. If you want to allow read-only access to anonymous users, you need to set up Matrix-based security. In this example, we’ll set up a project-based authorization matrix, so that you can make certain projects private and others public.
-
Install the Matrix Authorization Strategy Plugin and restart Jenkins.
-
Go to http://localhost:8080/configureSecurity/ ('Configure Global Security' page under 'Manage Jenkins') and select 'Project-base Matrix Authorization Strategy' from the 'Authorization' options.
-
As an example, you can grant read-only access to anonymous users (Overall/Read, Job/Discover and Job/Read should be enough) and grant all logged in users full access in a group called 'authenticated':
Connect JNLP-based agents
Since your Jenkins instance is only accessible through the reverse proxy on port 80, any Jenkins agents that use the JNLP protocol will not be able to register to the controller anymore. To overcome this problem, all agents must be in the same virtual network as the Jenkins controller and must connect using their private IP (by default, the NSG allows all internal traffic).
-
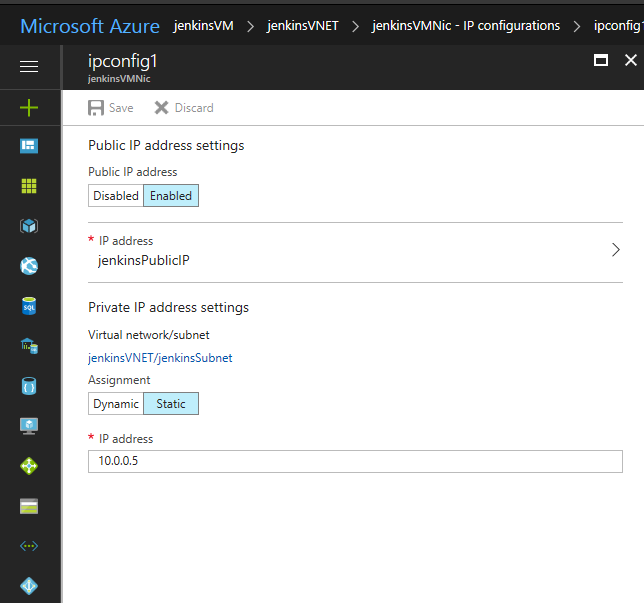
Make sure that the Jenkins virtual machine will always be assigned the same private IP by going to the Azure Portal, opening the Network Interface of your virtual machine, opening 'IP configuration', and clicking on the configuration.
-
Make sure the Private IP has a static assignment and restart the virtual machine if necessary.
-
Copy the static IP Address and go to http://localhost:8080/configure ('Configure System' page under 'Manage Jenkins') and update the 'Jenkins URL' to point to that private IP (
https://10.0.0.5:8080/in this example)
Now agents can communicate through JNLP. If you want to streamline the process, you can use the Azure VM Agents plugin, which automatically deploys agents in the same virtual network and connects them to the controller.