Declarative Pipeline for Maven Projects

| This is a guest post by Liam Newman, Technical Evangelist at CloudBees. |
Declare Your Pipelines! Declarative Pipeline 1.0 is here! This is first in a series of blog posts that will show some of the cool features of Declarative Pipeline. For several of these posts, I’ll be revisiting some of my previous posts on using various plugins with (Scripted) Pipeline, and seeing how those are implemented in Declarative Pipeline.
To start though, let’s get familiar with the basic structure of a Declarative Pipeline by creating a simple Pipeline for a Maven-based Java project - the Jenkins JUnit plugin. We’ll create a minimal Declarative Pipeline, add the settings needed to install Maven and the JDK, and finally we’ll actually run Maven to build the plugin.
Set up
With Declarative, it is still possible to run Pipelines edited directly in the
Jenkins web UI, but one of the key features of "Pipeline as Code" is
checking-in and being able to track changes. For this post, I’m going to use
the
blog/add-declarative-pipeline
branch of
my fork of the JUnit plugin.
I’m going to set up a Multi-branch Pipeline and point it at my repository.
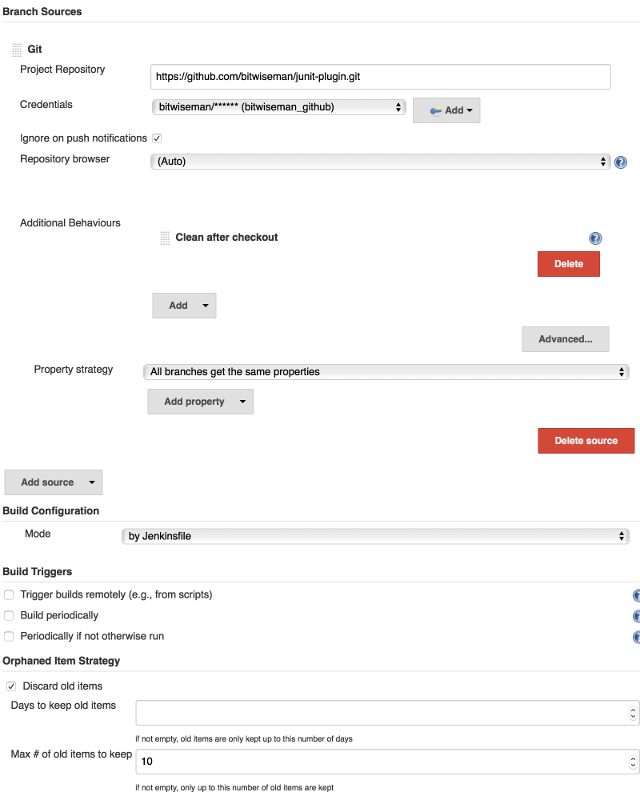
I’ve also set this Pipeline’s Git configuration to automatically "clean after checkout" and to only keep the ten most recent runs.
Writing a Minimal Pipeline
As has been said before, Declarative Pipeline provides a more structured, "opinionated" way to create Pipelines. I’m going to start by creating a minimal Declarative Pipeline and adding it to my branch. Below is a minimal Pipeline (with annotations) that just prints a message:
pipeline { (1)
    agent any (2) (3)
    stages { (4)
        stage('Build') { (5)
            steps { (6)
               echo 'This is a minimal pipeline.' (7)
            }
        }
    }
}| 1 | All Declarative Pipelines start with a pipeline section. |
| 2 | Select where to run this Pipeline, in this case "any" agent, regardless of label. |
| 3 | Declarative automatically performs a checkout of source code on the agent,
whereas Scripted Pipeline users must explicitly call checkout scm, |
| 4 | A Declarative Pipeline is defined as a series of stages. |
| 5 | Run the "Build" stage. |
| 6 | Each stage in a Declarative Pipeline runs a series of steps. |
| 7 | Run the echo step to print a message in the Console Output. |
| If you are familiar with Scripted Pipeline, you can toggle the above Declarative code sample to show the Scripted equivalent. |
Once I add the Pipeline above to my Jenkinsfile and run "Branch Indexing", my
Jenkins will pick it up and run run it. We see that the Declarative Pipeline
has added stage called "Declarative: Checkout SCM":
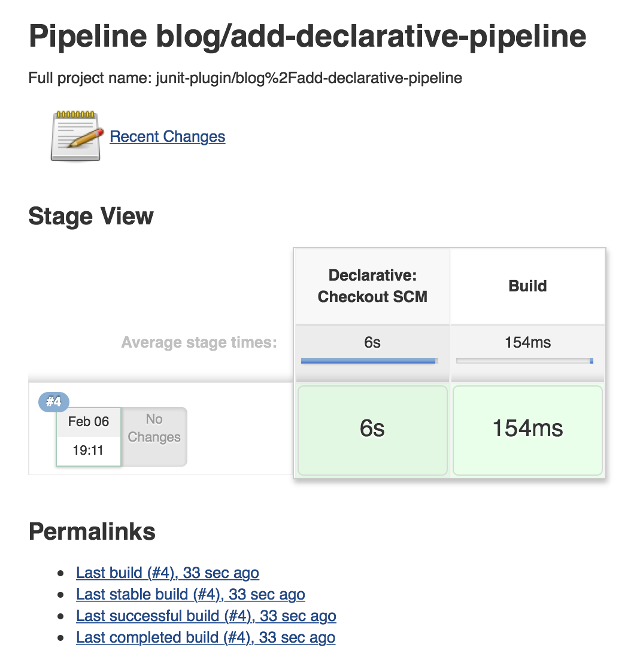
This a "dynamic stage", one of several the kinds that Declarative Pipeline adds as needed for clearer reporting. In this case, it is a stage in which the Declarative Pipeline automatically checkouts out source code on the agent.
As you can see above, we didn’t have to tell it do any of this,
[Pipeline] node
Running on osx_mbp in /Users/bitwiseman/jenkins/agents/osx_mbp/workspace/blog_add-declarative-pipeline
[Pipeline] {
[Pipeline] stage
[Pipeline] { (Declarative: Checkout SCM)
[Pipeline] checkout
Cloning the remote Git repository
{ ... truncated 20 lines ... }
[Pipeline] }
[Pipeline] // stage
[Pipeline] stage
[Pipeline] { (Build)
[Pipeline] echo
This is a minimal pipeline
[Pipeline] }
[Pipeline] // stage
[Pipeline] }
[Pipeline] // node
[Pipeline] End of Pipeline
Finished: SUCCESS
Declarative Pipeline syntax is a little more verbose than the equivalent Scripted Pipeline, but the added detail gives a clearer, more consistent view of what the Pipeline is supposed to do. It also gives us a structure into which we can add more configuration details about this Pipeline.
Adding Tools to Pipeline
The next thing we’ll add in this Pipeline is a tools section to let us use
Maven. The tools section is one of several sections we can add under
pipeline, which affect the configuration of the rest of the Pipeline. (We’ll
look at the others, including agent, in later posts.) Each tool entry will
make whatever settings changes, such as updating PATH or other environment
variables, to make the named tool available in the current pipeline. It will
also automatically install the named tool if that tool is configured to do so
under "Managing Jenkins" → "Global Tool Configuration".
pipeline {
    agent any
    tools { (1)
        maven 'Maven 3.3.9' (2)
        jdk 'jdk8' (3)
    }
    stages {
        stage ('Initialize') {
            steps {
                sh '''
                    echo "PATH = ${PATH}"
                    echo "M2_HOME = ${M2_HOME}"
                ''' (4)
            }
        }

        stage ('Build') {
            steps {
                echo 'This is a minimal pipeline.'
            }
        }
    }
}| 1 | tools section for adding tool settings. |
| 2 | Configure this Pipeline to use the Maven version matching "Maven 3.3.9" (configured in "Managing Jenkins" → "Global Tool Configuration"). |
| 3 | Configure this Pipeline to use the Maven version matching "jdk8" (configured in "Managing Jenkins" → "Global Tool Configuration"). |
| 4 | These will show the values of PATH and M2_HOME environment variables. |
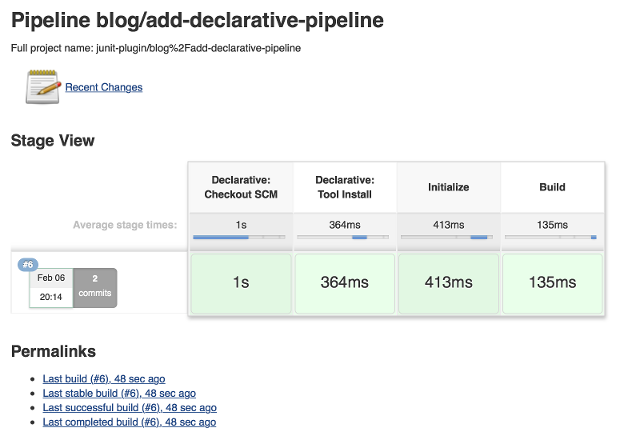
When we run this updated Pipeline the same way we ran the first, we see that
the Declarative Pipeline has added another stage called "Declarative: Tool
Install": In the console output, we see that during this particular stage "Maven 3.3.9" gets installed,
and the PATH and M2_HOME environment variables are set:
{ ... truncated lines ... }
[Pipeline] // stage
[Pipeline] stage
[Pipeline] { (Declarative: Tool Install)
[Pipeline] tool
Unpacking https://repo.maven.apache.org/maven2/org/apache/maven/apache-maven/3.3.9/apache-maven-3.3.9-bin.zip
to /Users/bitwiseman/jenkins/agents/osx_mbp/tools/hudson.tasks.Maven_MavenInstallation/Maven_3.3.9
on osx_mbp
[Pipeline] envVarsForTool
[Pipeline] tool
[Pipeline] envVarsForTool
[Pipeline] }
[Pipeline] // stage
{ ... }
PATH = /Library/Java/JavaVirtualMachines/jdk1.8.0_92.jdk/Contents/Home/bin:/Users/bitwiseman/jenkins/agents/osx_mbp/tools/hudson.tasks.Maven_MavenInstallation/Maven_3.3.9/bin:...
M2_HOME = /Users/bitwiseman/jenkins/agents/osx_mbp/tools/hudson.tasks.Maven_MavenInstallation/Maven_3.3.9
{ ... }
Running a Maven Build
Finally, running a Maven build is trivial. The tools section already added
Maven and JDK8 to the PATH, all we need to do is call mvn install. It
would be nice if I could split the build and the tests into separate stages,
but Maven is famous for not liking when people do that, so I’ll leave it alone
for now.
Instead, let’s load up the results of the build using the JUnit plugin, however the version that was just built, sorry.
pipeline {
    agent any
    tools {
        maven 'Maven 3.3.9'
        jdk 'jdk8'
    }
    stages {
        stage ('Initialize') {
            steps {
                sh '''
                    echo "PATH = ${PATH}"
                    echo "M2_HOME = ${M2_HOME}"
                '''
            }
        }

        stage ('Build') {
            steps {
                sh 'mvn -Dmaven.test.failure.ignore=true install' (1)
            }
            post {
                success {
                    junit 'target/surefire-reports/**/*.xml' (2)
                }
            }
        }
    }
}| 1 | Call mvn, the version configured by the tools section will be first on the path. |
| 2 | If the maven build succeeded, archive the JUnit test reports for display in the Jenkins web UI.
We’ll discuss the
post section in detail in the next blog post. |
| If you are familiar with Scripted Pipeline, you can toggle the above Declarative code sample to show the Scripted equivalent. |
Below is the console output for this last revision:
{ ... truncated lines ... }
+ mvn install
[INFO] Scanning for projects...
[WARNING] The POM for org.jenkins-ci.tools:maven-hpi-plugin:jar:1.119 is missing, no dependency information available
[WARNING] Failed to build parent project for org.jenkins-ci.plugins:junit:hpi:1.20-SNAPSHOT
[INFO]
[INFO] ------------------------------------------------------------------------
[INFO] Building JUnit Plugin 1.20-SNAPSHOT
[INFO] ------------------------------------------------------------------------
[INFO]
[INFO] --- maven-hpi-plugin:1.119:validate (default-validate) @ junit ---
[INFO]
[INFO] --- maven-enforcer-plugin:1.3.1:display-info (display-info) @ junit ---
[INFO] Maven Version: 3.3.9
[INFO] JDK Version: 1.8.0_92 normalized as: 1.8.0-92
[INFO] OS Info: Arch: x86_64 Family: mac Name: mac os x Version: 10.12.3
[INFO]
{ ... }
[INFO] ------------------------------------------------------------------------
[INFO] BUILD SUCCESS
[INFO] ------------------------------------------------------------------------
[INFO] Total time: 03:25 min
[INFO] Finished at: 2017-02-06T22:43:41-08:00
[INFO] Final Memory: 84M/1265M
[INFO] ------------------------------------------------------------------------
Conclusion
The new Declarative syntax is a significant step forward for Jenkins Pipeline. It trades some verbosity and constraints for much greater clarity and maintainability. In the coming weeks, I’ll be adding new blog posts demonstrating various features of the Declarative syntax along with some recent Jenkins Pipeline improvements.
About the author